CHANGING TO A RUBY PROPSHAFT
This is an extract from
a fuller article by Roger Bateman on changing from a 3-speed to a 4-speed
gearbox. Click
here.
Introduction by David
Whetton (DA7C)
See photos at the end
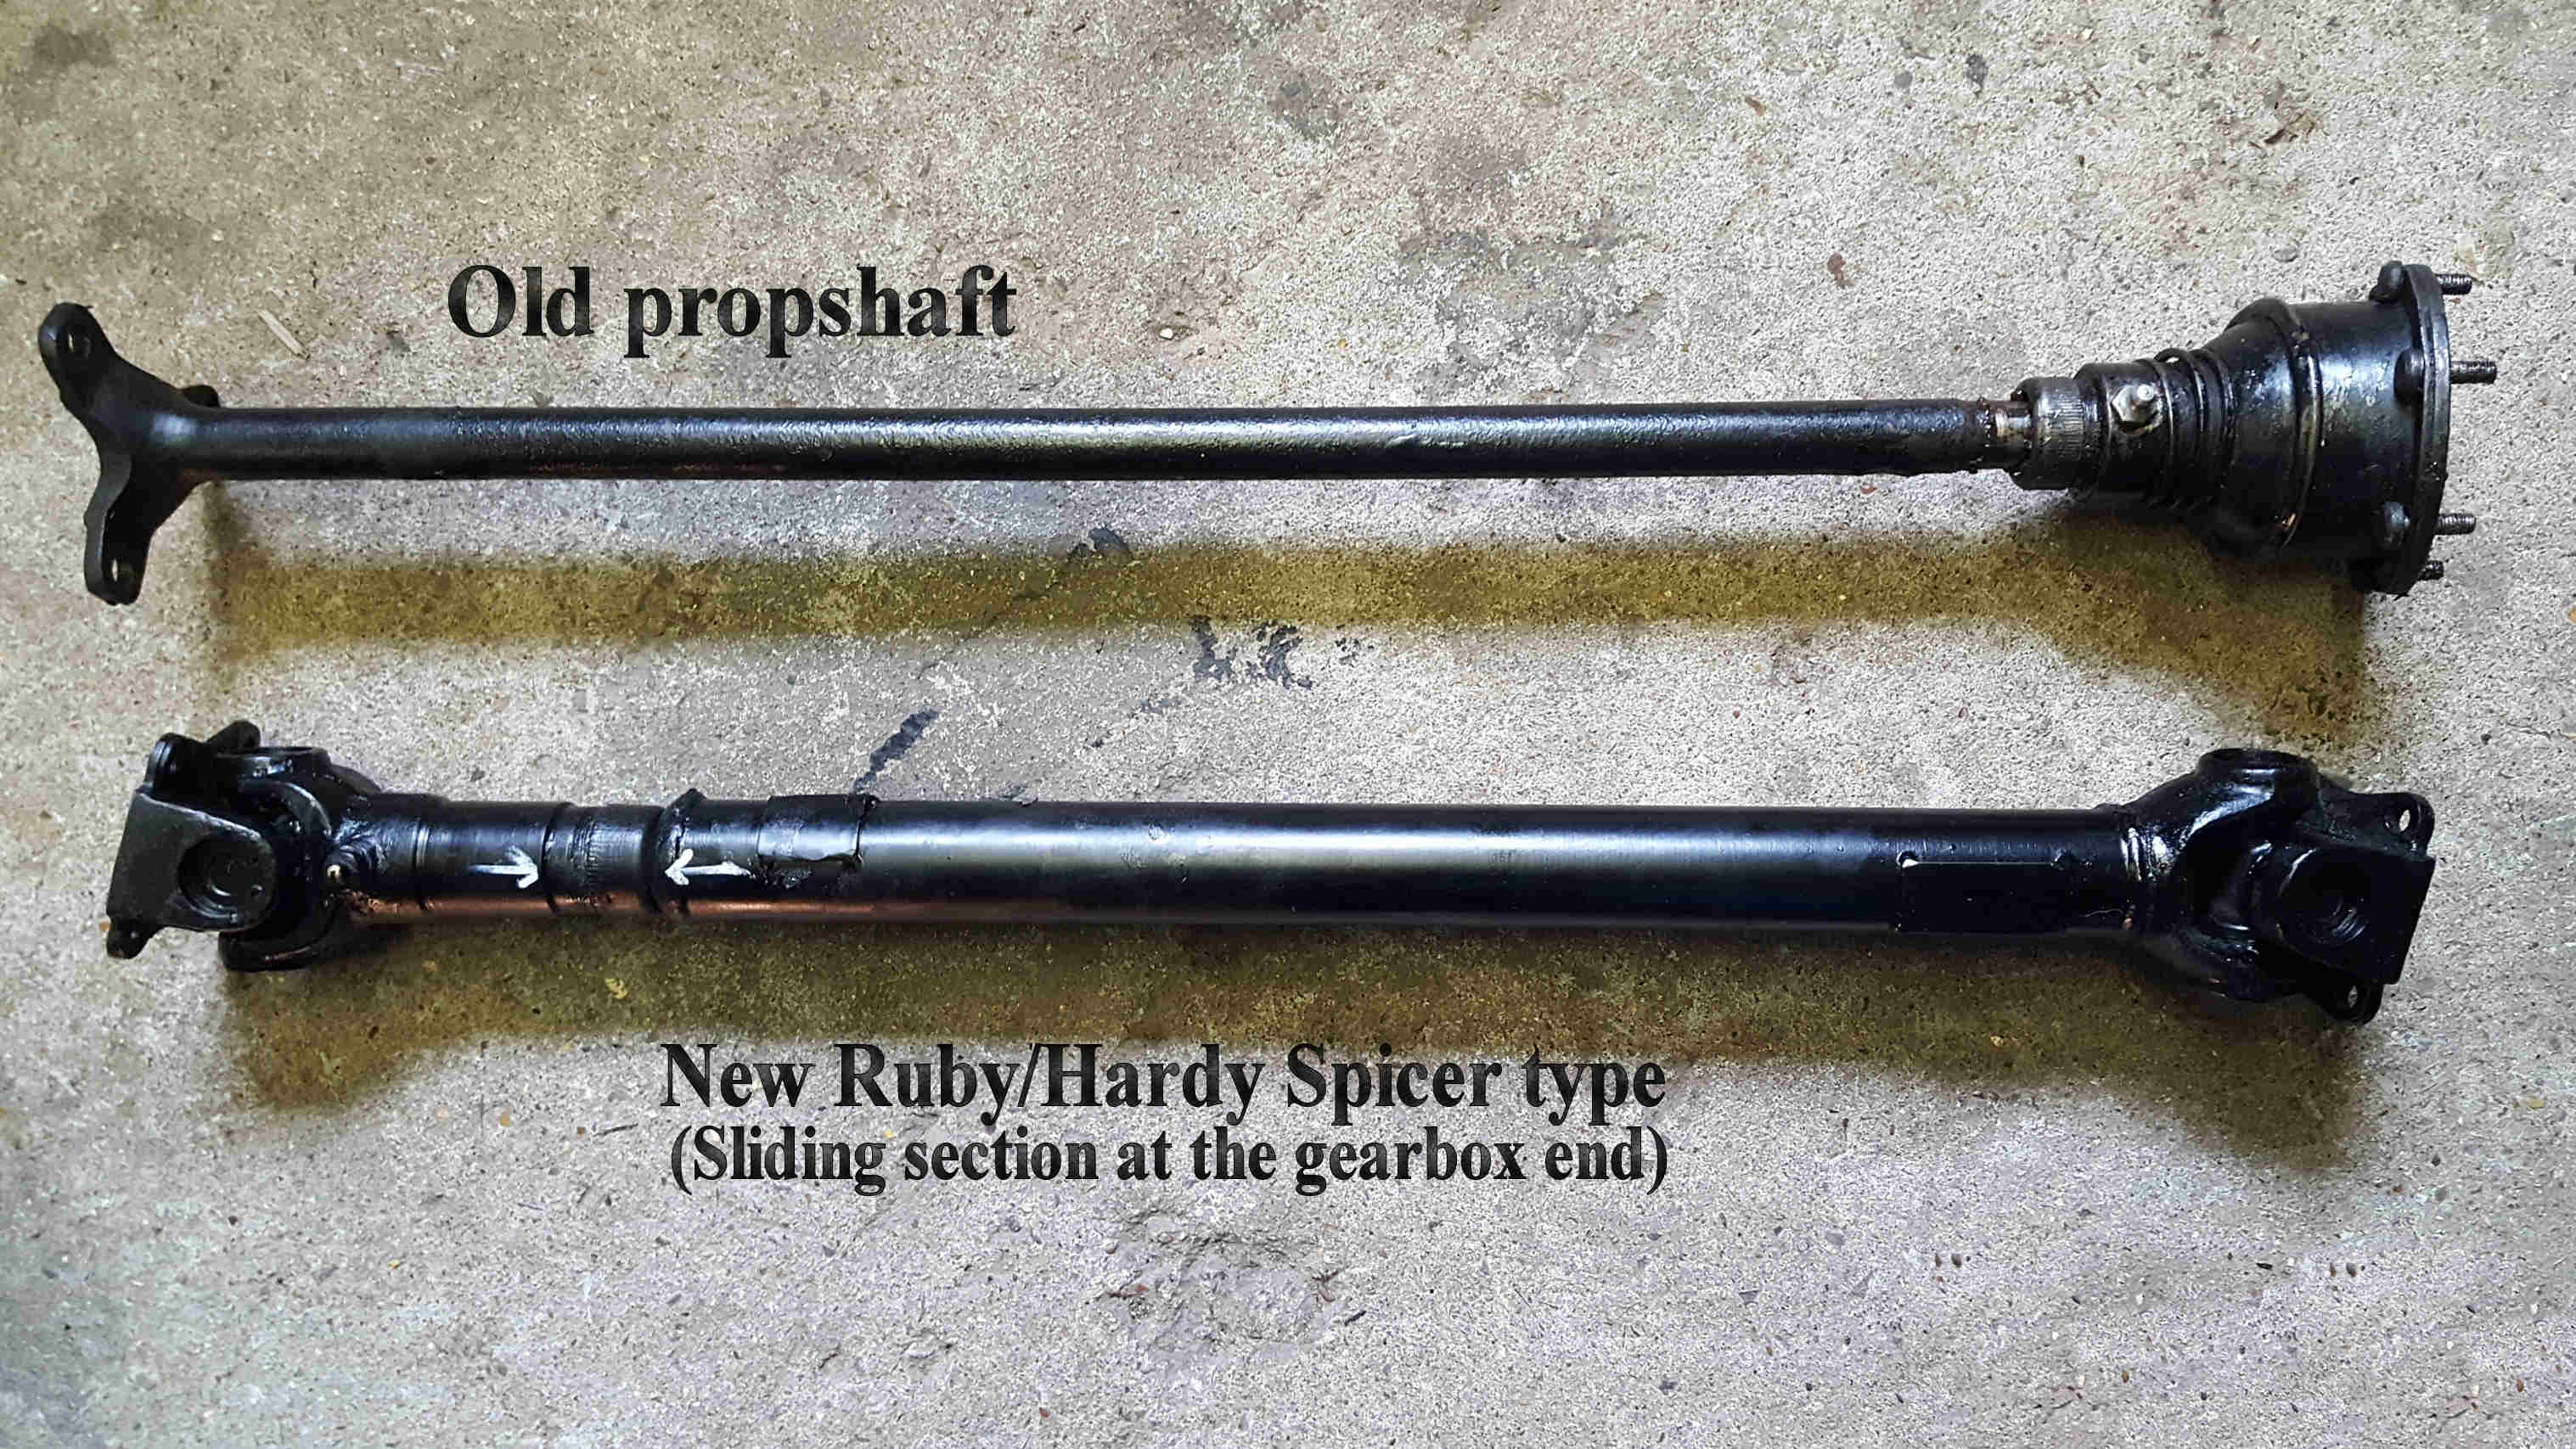
My long wheel base '33/34 Box had a thin propshaft
with a flexible joint at the gearbox end. (See page 152 of the Austin
Seven Companion ‘Green Bible’ for details of all propshafts. Mine was the
third one up). As I already had a 4-speed gearbox, it seemed sensible when
the flexible coupling started to break up and get noisy, to change to the more
modern Ruby-type, Hardy-Spicer propshaft. They are getting rarer, but well-known
Austin Seven suppliers can often supply newly manufactured ones as well as
second-hand.
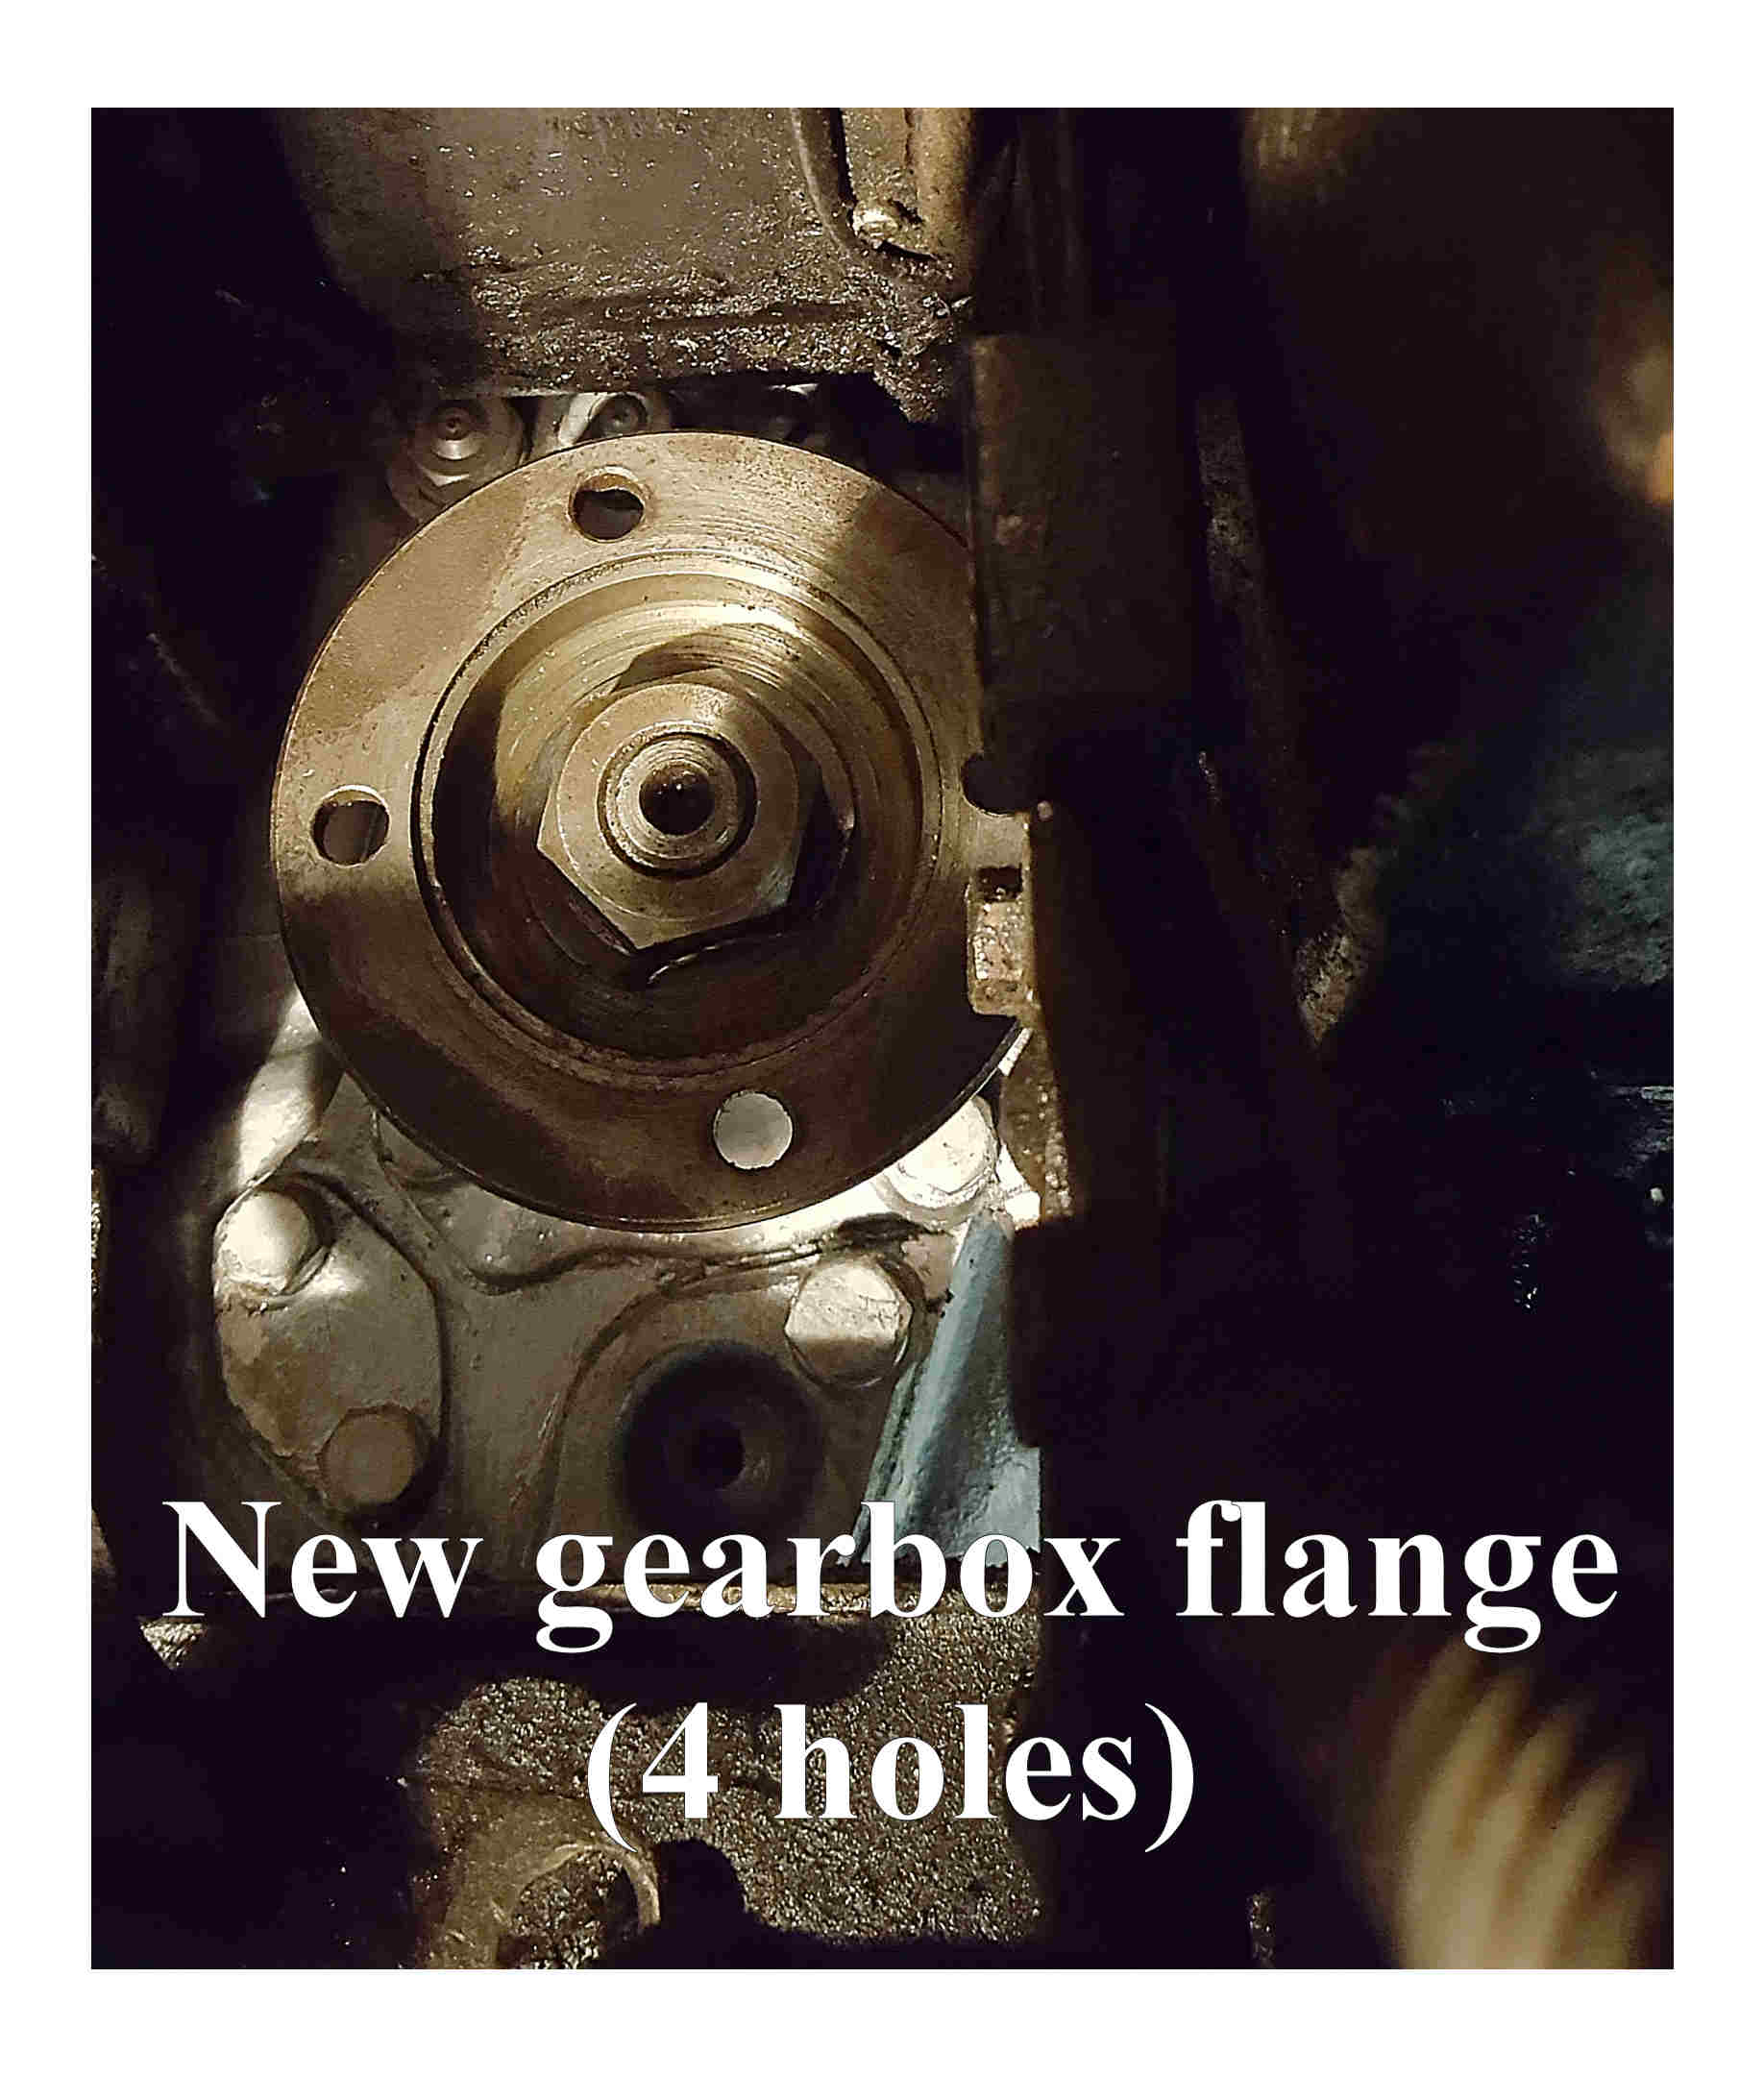
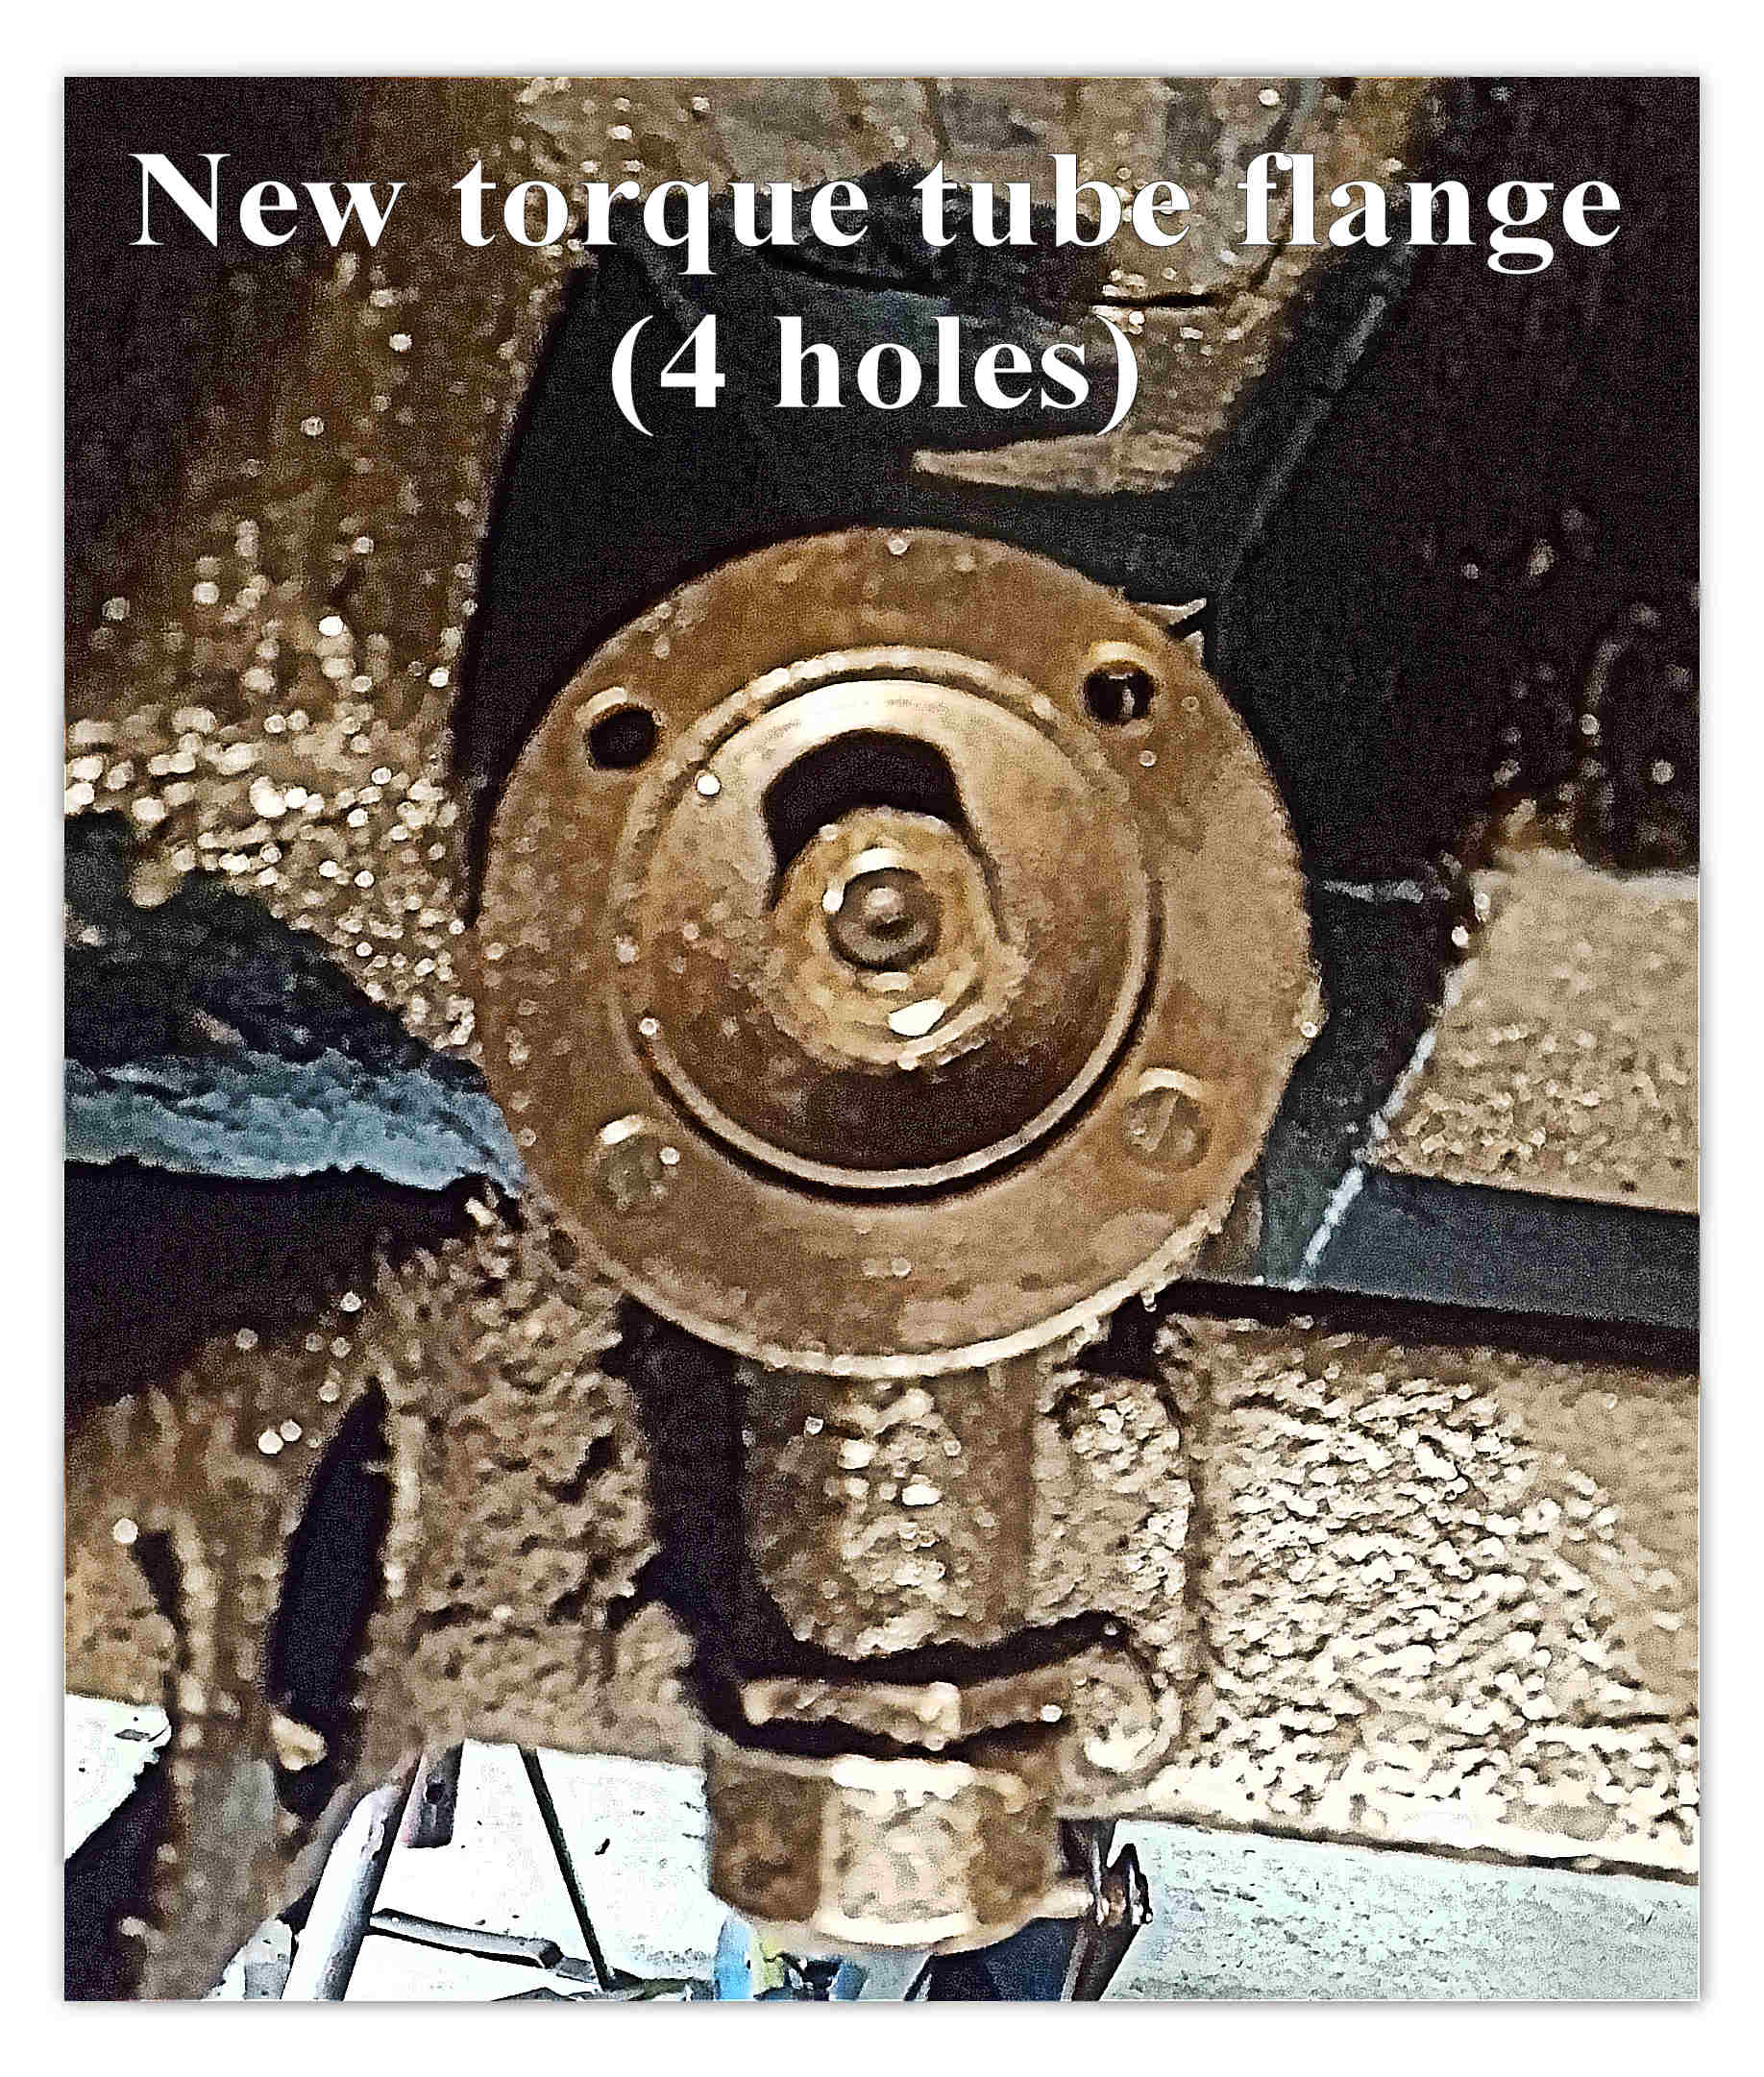
The whole kit comprises the
propshaft, new Hardy-Spicer bearings, a 4-hole gearbox flange, a 4-hole torque
tube flange and 8 D-bolts and nuts, preferably Nyloc, available from the Seven
Workshop. Be aware that there are 2 versions of the rear 4-hole flanges (early
and late) with different hole spacing. The one you want will be the same
as the front flange, the later of the two. These are getting extremely
rare these days so gather the whole kit together before dismantling the old
propshaft.
Finally,
before commencing work, I can recommend sending the newly acquired propshaft and
bearings off to Propshaft Services,
www.propshaft-services.co.uk Tel:
02088442265 for new Hardy Spicer bearings, balancing and general clean-up as
there’s no point in going to all this trouble with a dodgy replacement.
They will also correctly re-align the yokes if necessary.
The old propshaft came out easily as
did the two old flanges (I was warned there might be trouble with the rear
flange as it’s on a taper) and the new gear all went in without a problem.
This is where the big problem starts – the lower handbrake mechanism fouls the
knuckles on the front Hardy Spicer bearings. There are two solutions: to drill
out the rivets that hold the handbrake in place and remove the cotton reel
spacers from the handbrake or, if you’ve got a lathe, to skim down the shoulders
of the Hardy Spicer knuckles on the propshaft itself. Here is the method of altering the handbrake
lever to fit from Roger Bateman’s article. I found it a pig of a job and
very time-consuming with much swearing. You will need an angle grinder
which fits in the small spaces involved and a selection of nuts, bolts and
washers for spacers.
ROGER BATEMAN’S
ARTICLE ON REPLACING THE PROPSHAFT
The prop I had purchased was in good condition and
needed no attention, although I had been prepared to overhaul the Hardy Spicers
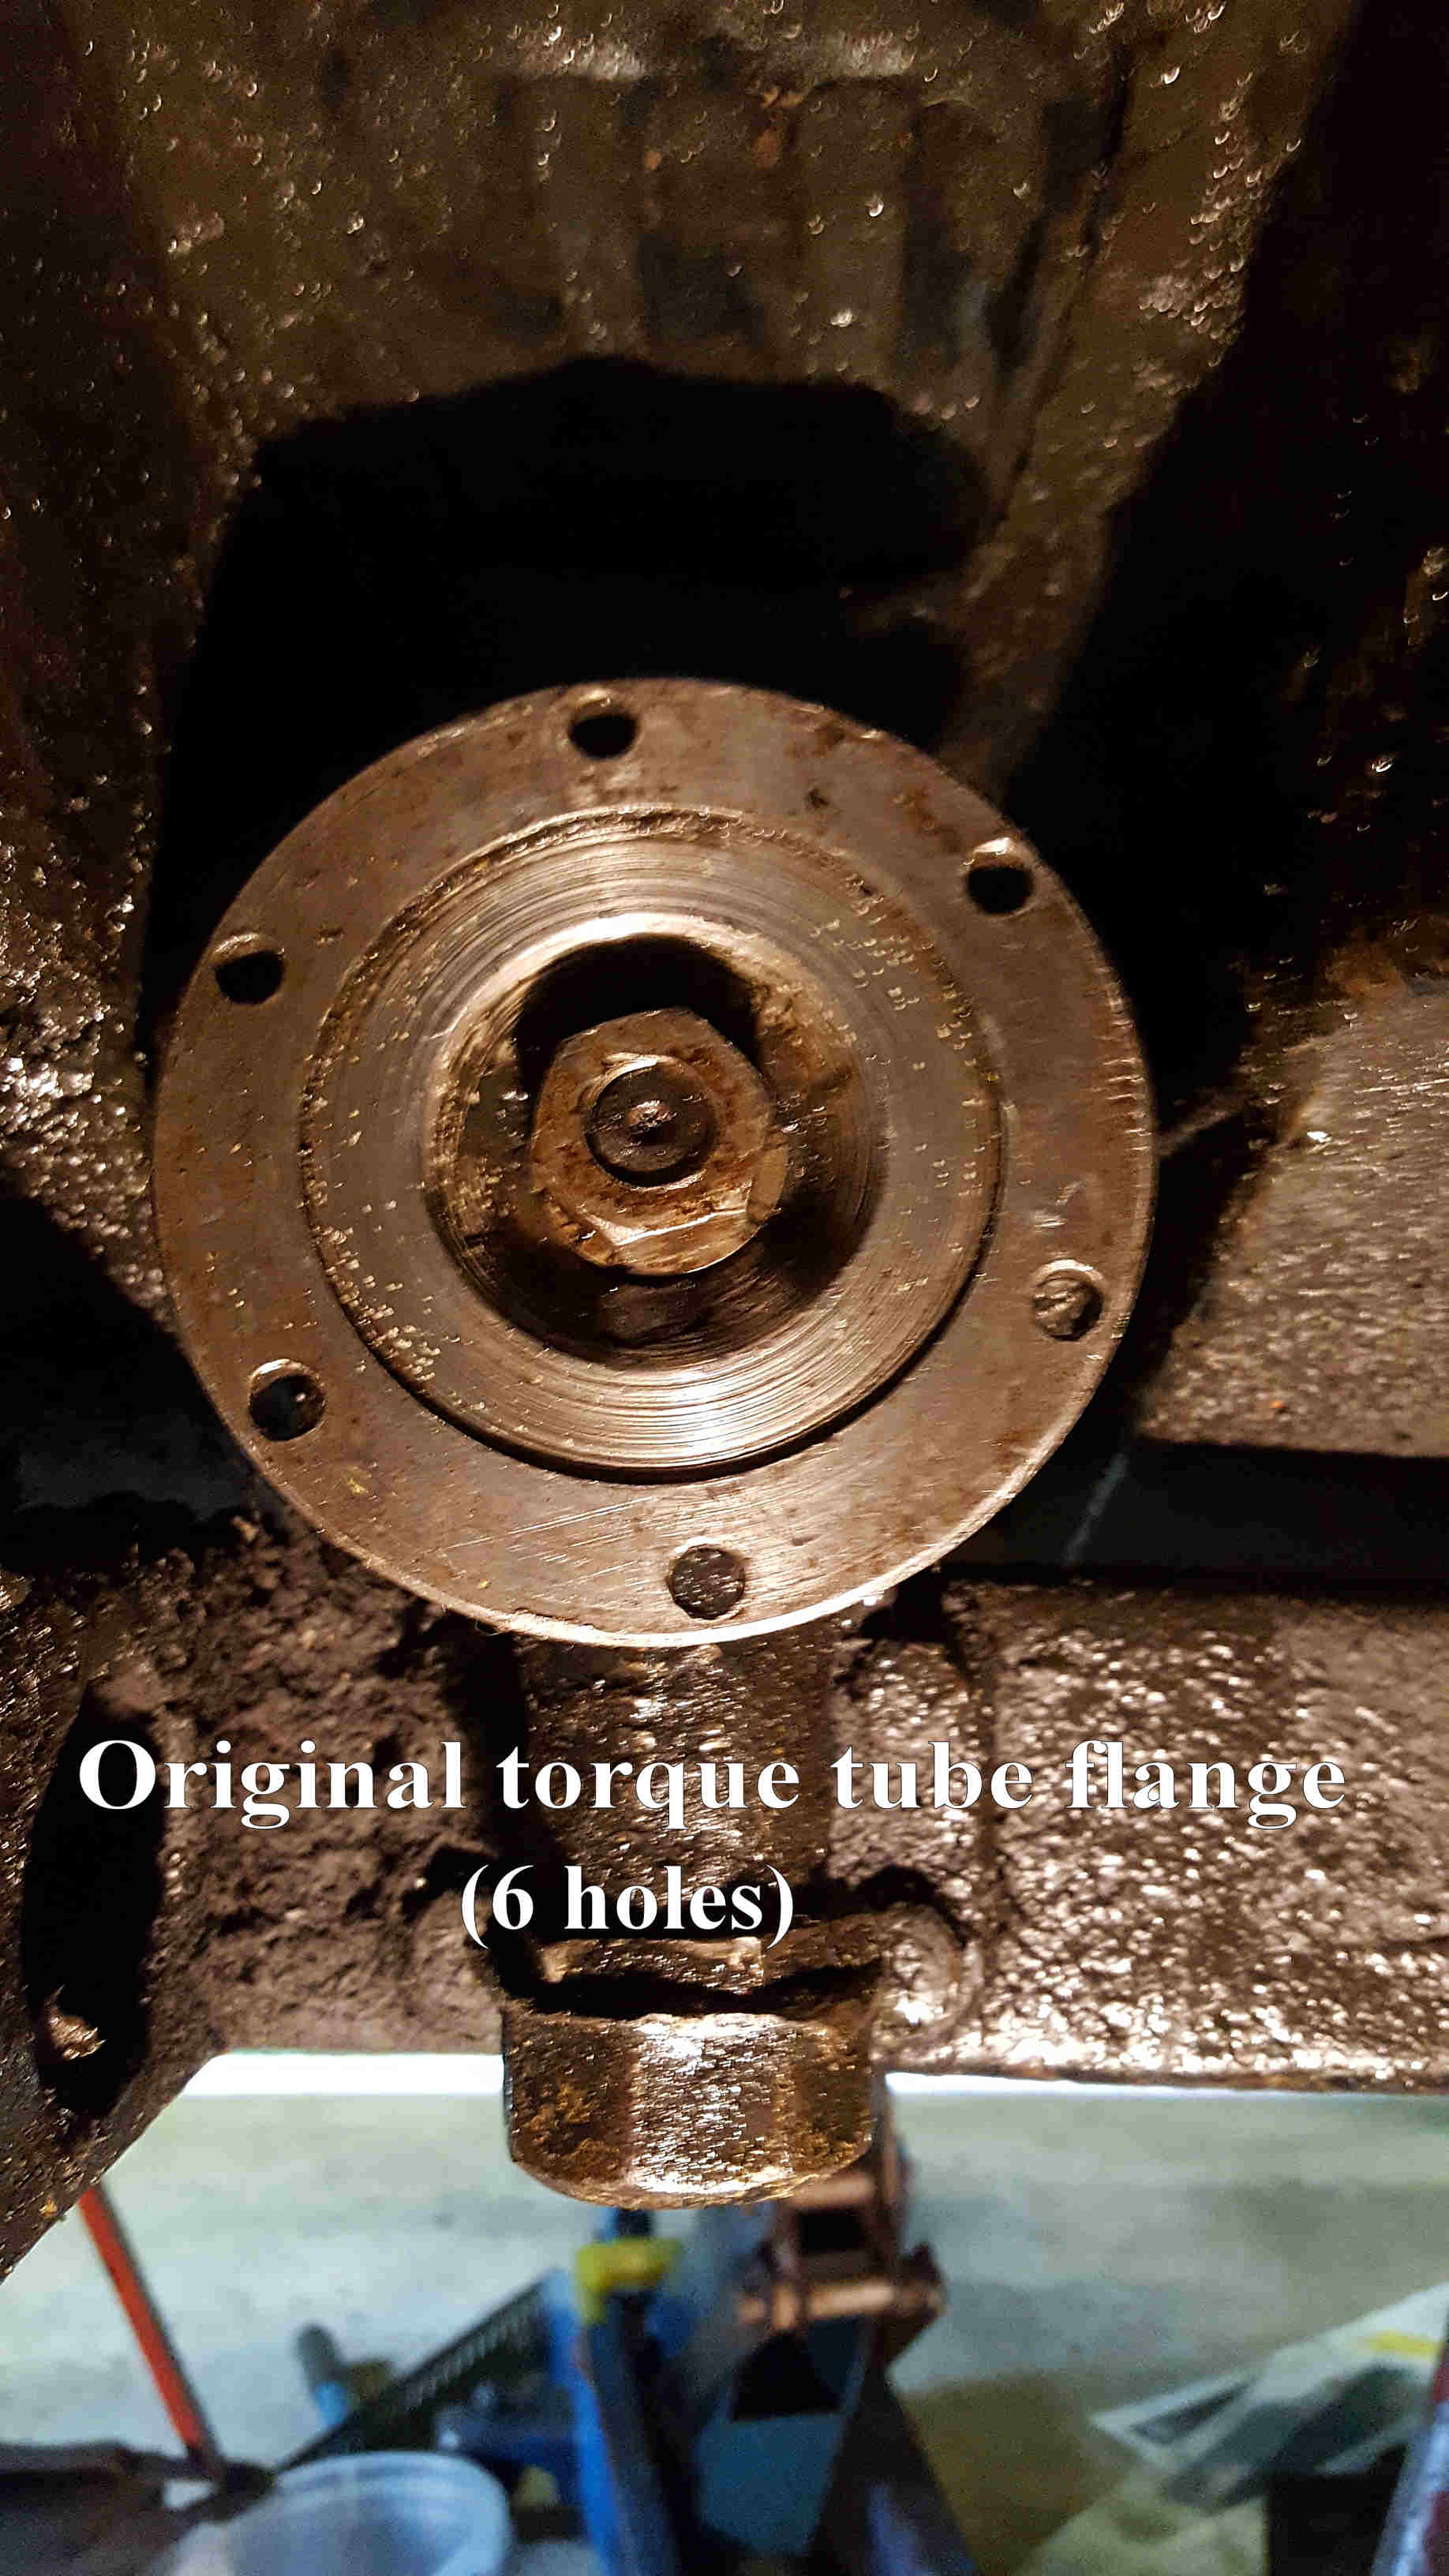
if necessary. So it was offered up and snag no 2 was discovered. Foolish of me,
I know, but it was at this late stage that I discovered that the Ruby prop rear
flange has 4 holes whereas my original had 6 - and no way would they line up,
especially as the location registers are different! So off I went to find
a Ruby flange. No problem thought I, until I discovered that they are like
gold-plated hen’s teeth because the Ulster Rep builders have already snaffled
them! Everyone I spoke to sucked their teeth and told me the same story. Two
members generously offered to lend me one off their spare projects, but then
Vince Leek came up trumps and found one in his stash of spares.
Removing the old one proved
tricky as it was stuck fast on its taper. The advice in Woodrow’s big red Austin
Seven Manual is to strike the rear of the flange axially with a hammer and drift
along the line of the woodruff key, but this proved impossible with the axle in
the car. I managed it by applying some tension with a 3-legged puller and
then a single smart hammer tap to the circumference of the flange, administered
radially, did the trick.
So then I could fit up the propshaft on the car. The
bolts are larger diameter than on the old prop, and with shaped heads to fit
behind the flanges. I overcame this with 8mm x 25 mm bolts with one side of the
heads ground flat and installed with washers and nyloc nuts. OK, it’s as
unoriginal as can be, but it works!
Whilst searching for the Ruby
torque tube flange, a well-known guru had suggested that I might be able to fit
my original prop (type D-2 on page D2 of Woodrow) without shortening it. He
wasn’t sure. If so, it would involve using the original fabric coupling mated to
an early 4-speed gearbox output star flange (the one from the 3-speed being of
no use as it is integral with the output shaft). I did obtain a star flange and
offered up the prop to the car to see if this would be possible, but found it
was just that bit too long. Perhaps it would fit if the engine/gearbox is
unbolted from the chassis and temporarily pulled forward while the prop is
fitted, then moving it rearwards again to the normal position afterwards; but I
was disinclined to do that as I think the prop would then be solid, without any
of the desirable sliding action - which would have, at the very least, a
detrimental effect on the fabric coupling. The only way I could envisage that
this might work would be to move the engine forwards permanently, which I wanted
to avoid.
Handbrake
People said the prop might foul the
handbrake - and by golly it does! I read all my books, searched the internet and
spoke to everyone I could. I found half a dozen solutions, none of which were
extreme enough to solve my ‘little’ problem. Eventually, I worked out a solution
that incorporated some of the ideas already suggested by others, plus my own
tweaks.
The reference numbers that
follow refer to the handbrake drawing.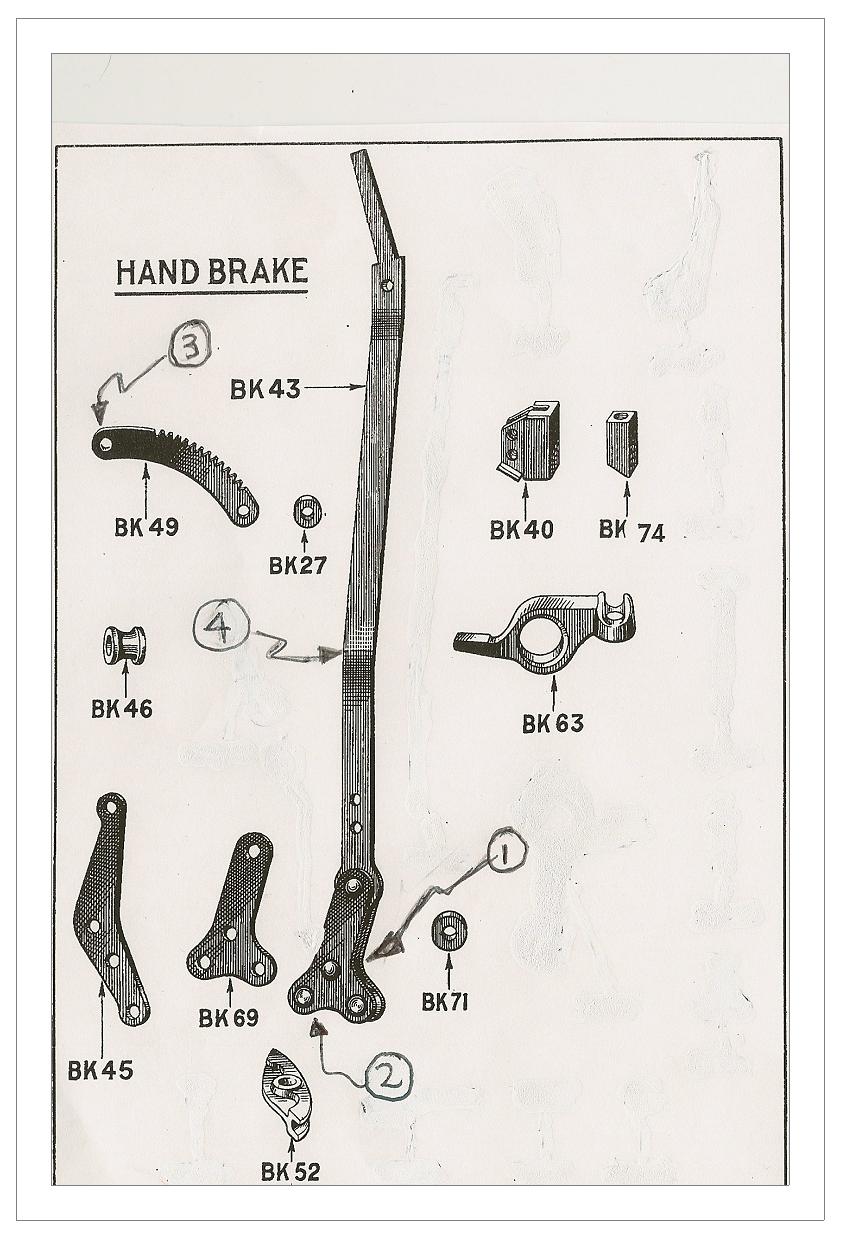
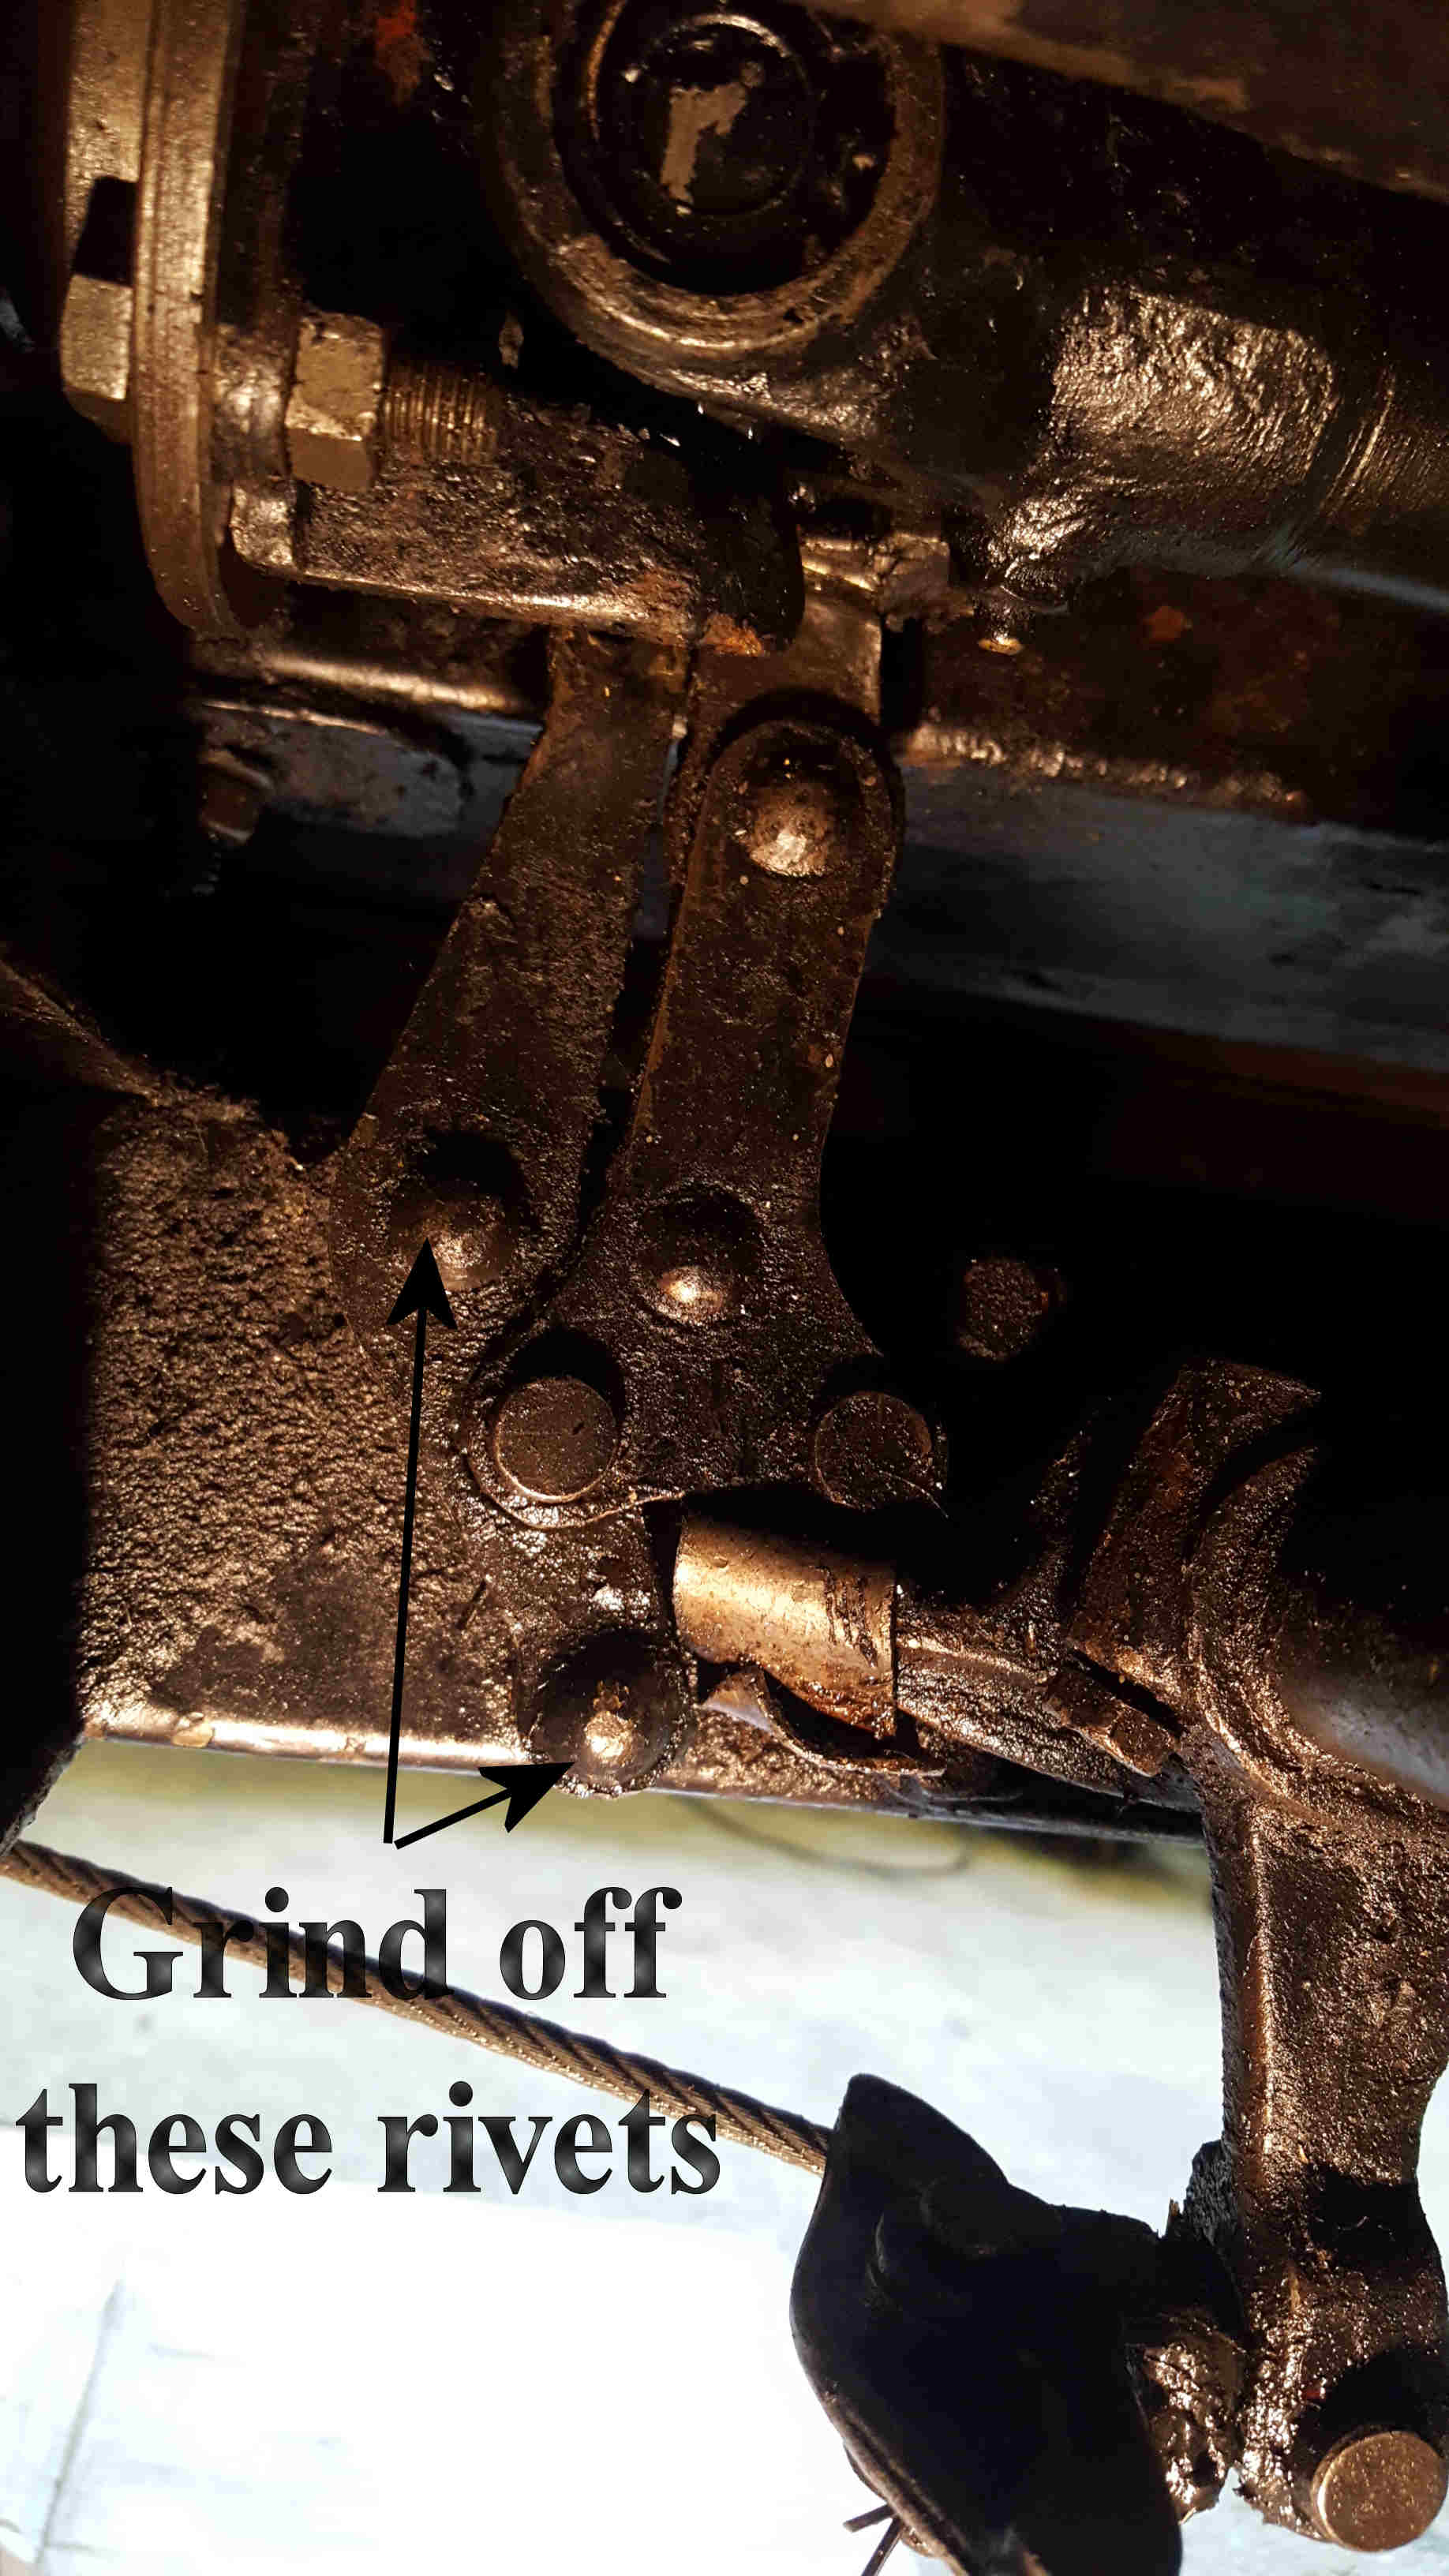
First, remove the front brake cable centre swivel BK52
by removing the split pin. Then, with an angle grinder, carefully grind the
heads off the two rivets holding the handbrake bracket BK45 to the chassis.
Remove the handbrake assembly from the car and put the two spacer bobbins BK46
carefully in your spares box as they will no longer be needed. On the bench,
grind the head of the rivet (1) flat so it no longer stands proud of the rest of
the mechanism. This is the lower of the two rivets joining the plates BK69 to
the lever BK43. Fit clevis pin (2) so that the head is on the nearside.
Replace bolt (3) at the front of the ratchet rack BK49 with a shallow domed head
gutter bolt, head to nearside (you could countersink the hole and use an
appropriate c/s bolt if necessary to gain extra clearance).
My handbrake had always had a floppy
action and I found two reasons for this: excessive clearance (a) between the
lever BK43 and the two ratchet plates BK49, and (b) between the mounting bracket
BK45 and the two plates BK69. The solution was to squeeze the BK49s and BK69s in
a vice till the clearances were reduced to a satisfactory minimum. It is
possible that the clevis pin (2) might also be worn and need replacing, but not
in my case.
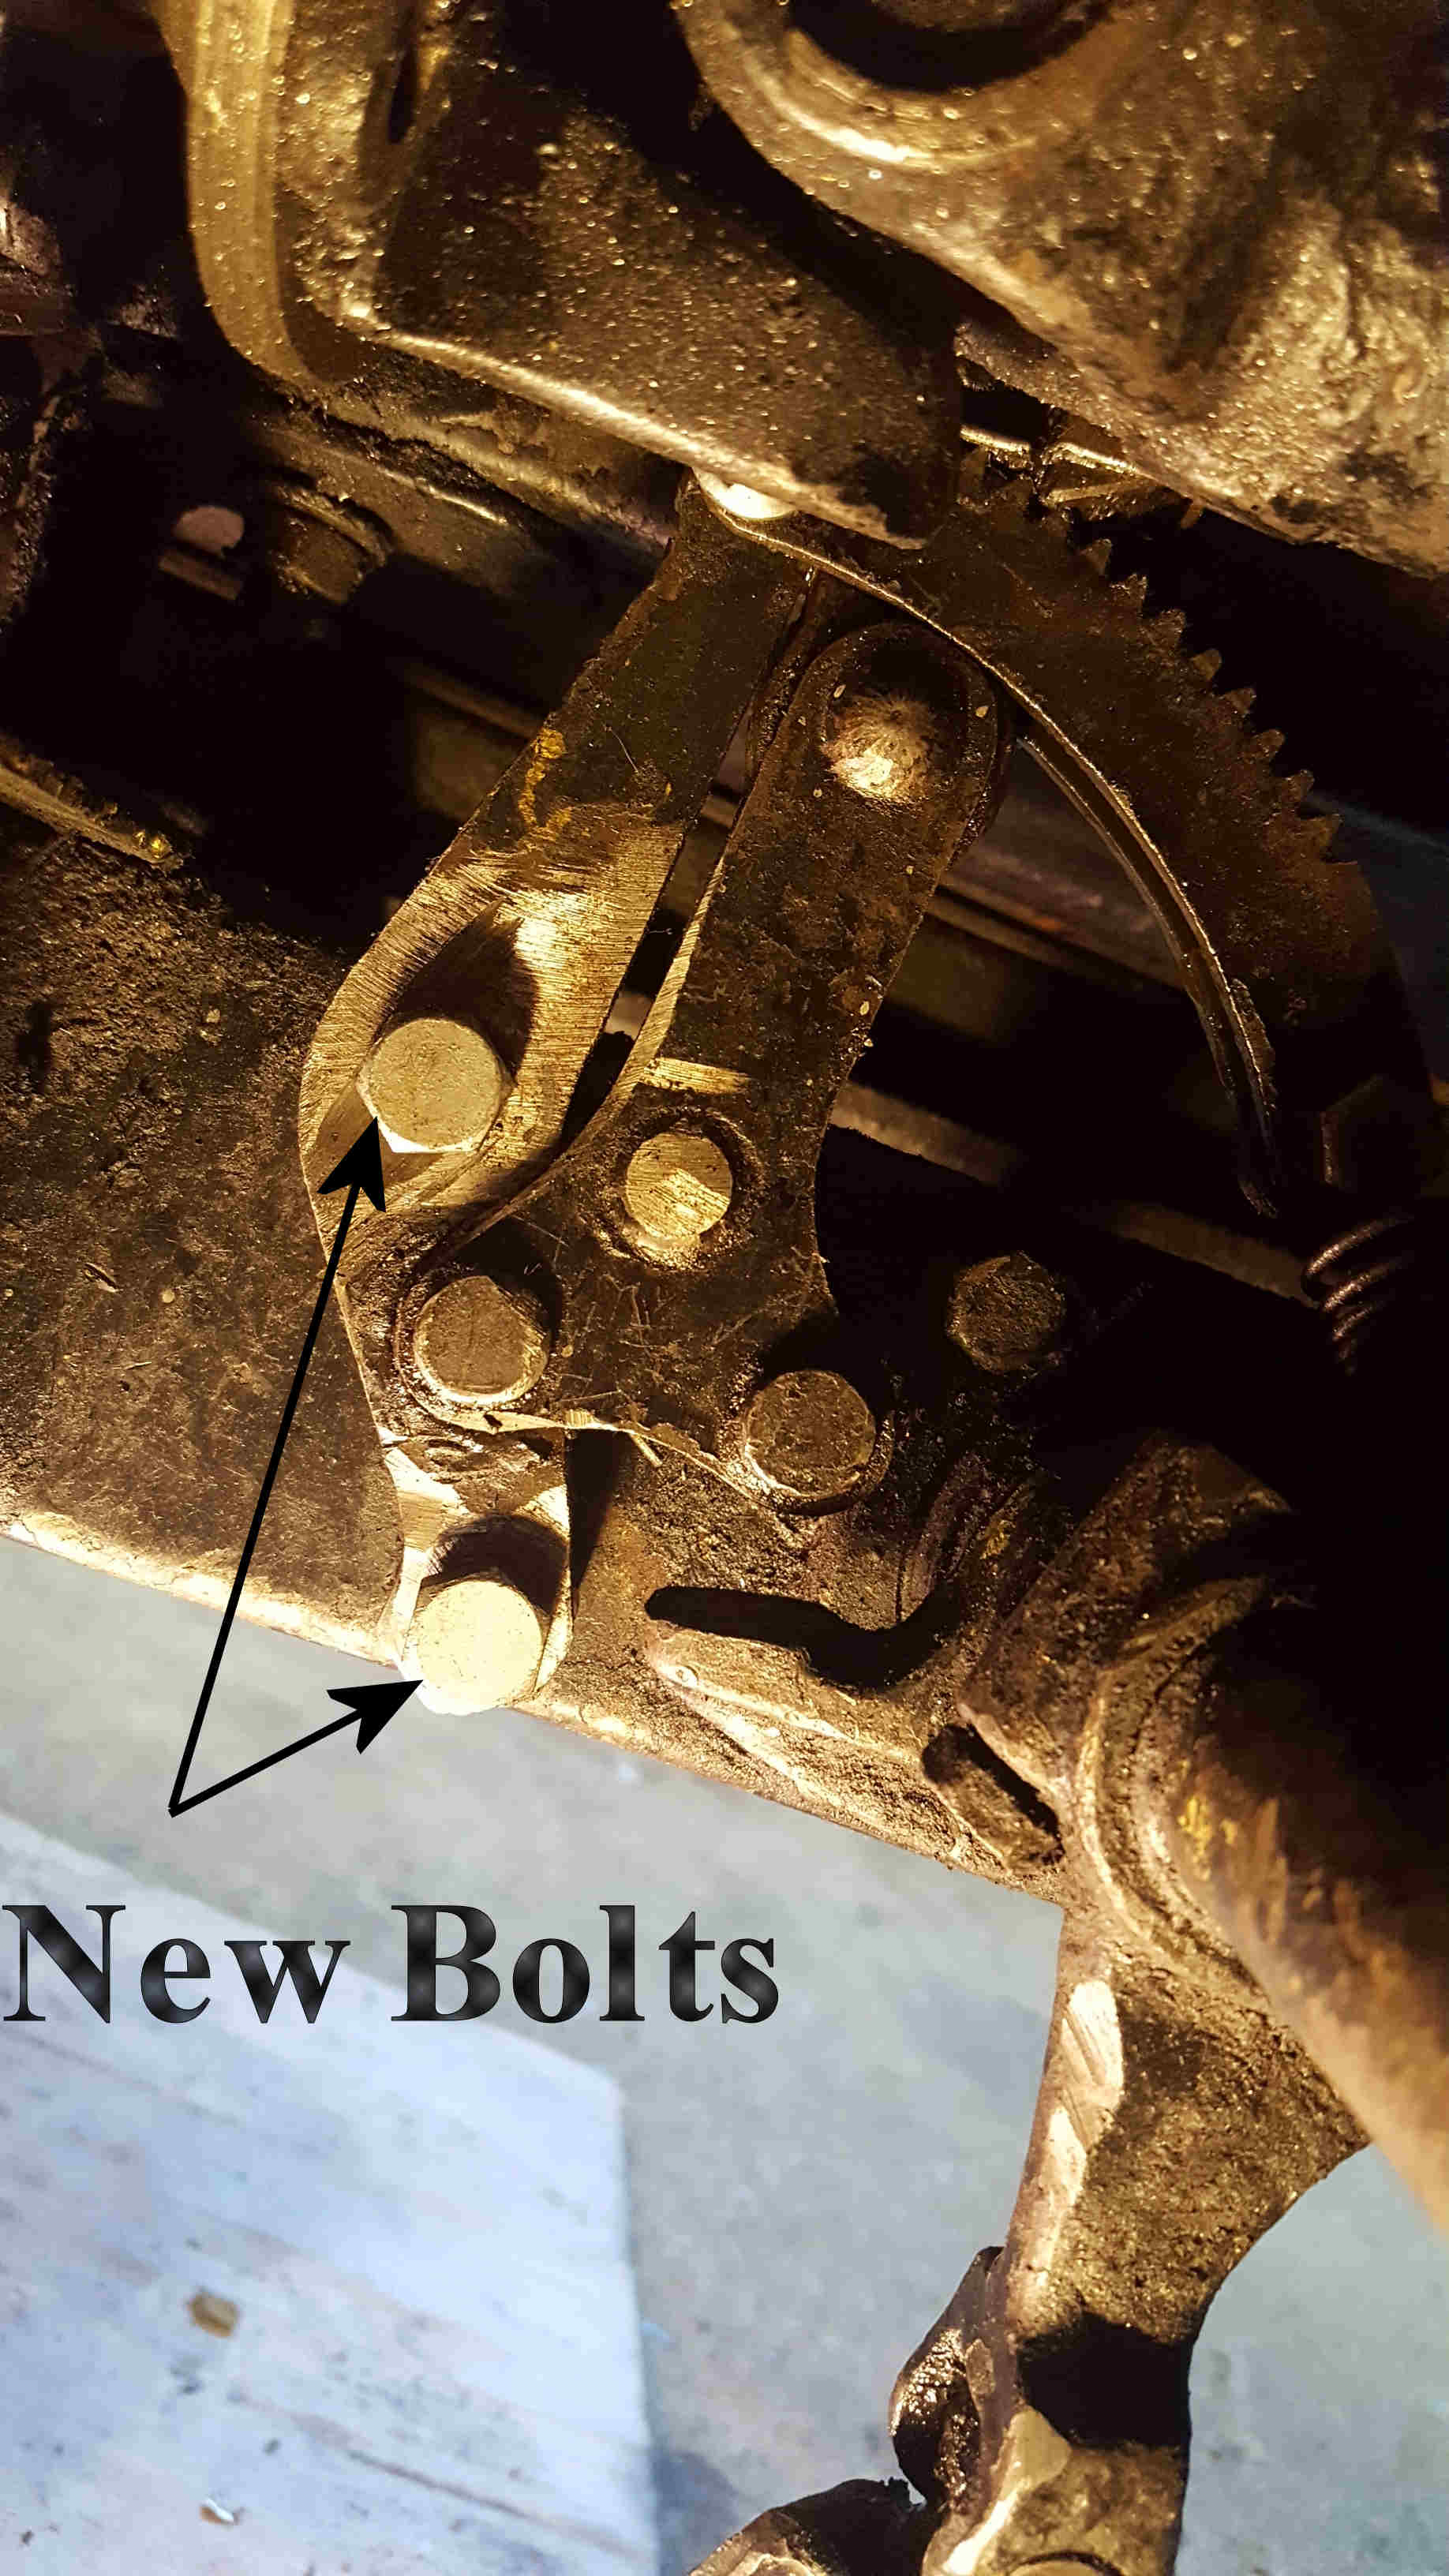
Replace the two handbrake-to-chassis
mounting rivets with bolts of the same diameter - using standard nuts instead of
the original bobbins BK46 – one nut at the top and two at the bottom, which will
make the handbrake assembly lean to the offside and gain valuable clearance from
the prop. I also found that the ratchet pawl and its housing (BK74 & BK40),
which had not seen the light of day for 81 years, benefited from dunking in Gunk
and lubricating with copperslip grease. Bolt the handbrake assembly in
place using nuts and lock washers on the inside of the chassis rail, but first
hammer the lower bend (4) in the handbrake lever flat as it will otherwise
interfere with the driver’s nearside leg. In my case the operating roller
BK71 was wide enough to maintain contact with the adjusting lever BK63 after
these mods but, if you find that yours isn’t, try replacing it with an HT bolt
and nut of the necessary dimensions.
I found that these mods
provided sufficient clearance – just a few thou, but the propshaft does rotate
cleanly. However the angle at which the handbrake lever now enters the car means
that the slot for it in the transmission tunnel cover must be widened or the
cover will no longer fit. I did this by cutting away the outer edge just enough
for the fore-and-aft movement of the lever (which is always far less than the
length of the ratchet). As this produced an unpleasantly large slot in the
floor, I finished it off by riveting in place a strip of inner tube rubber
folded double – on the underside - to fully cover the slot to prevent water
ingress, which flexes up as the lever passes back and forth along its slot. All
is then covered by the carpets.
Oh, and don’t forget to refit the front brake cable
and adjust the handbrake!
Roger Bateman DA7C
Post op note: Don’t
over-bend the handbrake lever as, if it is too vertical in the cabin, it will
foul the gear lever when trying to select reverse. David Whetton.