BRAKING EFFICIENCY (PART 2)
Click Here For
Part 1
(from
the Austin Magazine 1936)
IN our last issue we dealt with Austin Seven brake
adjustments and with maintenance as far as proves possible without removing the
hubs. Here we propose to take
 the
subject of brake attentions on this model a step further and deal with the
rectification and prevention of "oil on the brakes," as well as the process of
relining, for both of which hub removal is essential. Access to the hubs of
either the front or rear wheels first of all entails removal of the wheel itself
and then the brake drum, the latter being secured to the hub by three screws
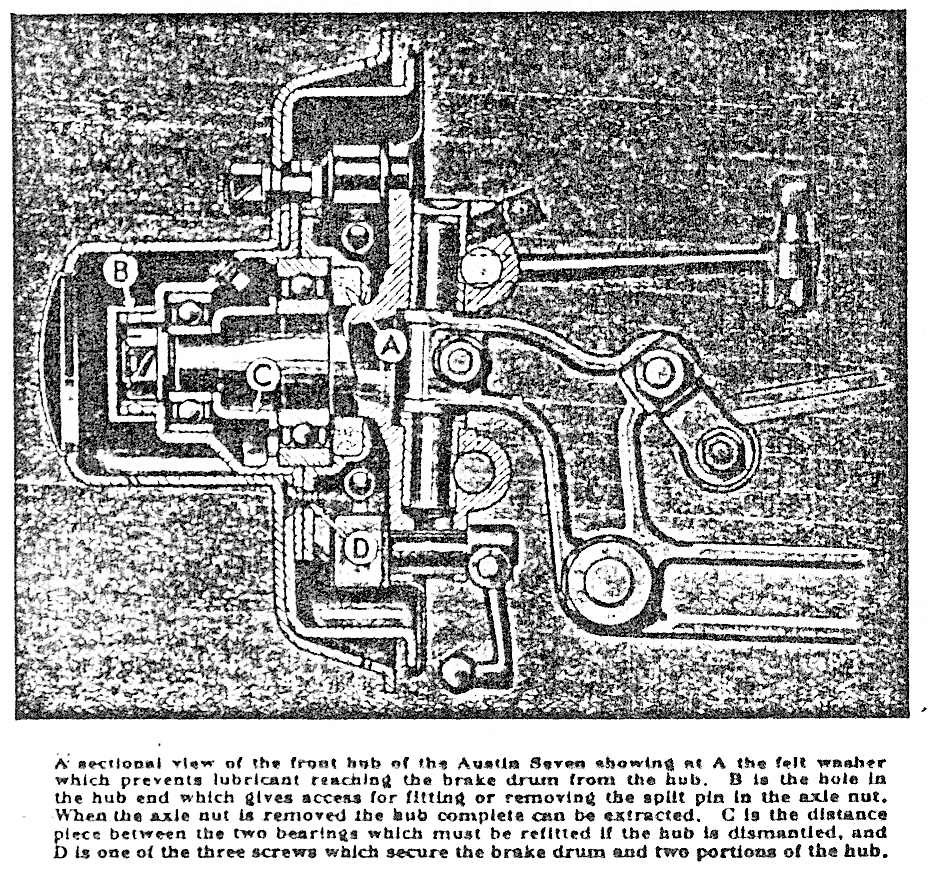
which also hold the two portions of the hub together. For withdrawing the hub a
small extractor is supplied in the tool kit. The front hubs are free for removal
when the axle nut and its securing split pin are removed. The nut will be found
behind the hub cap and will require a 7/16 in. box spanner which will fit inside
the hub casing. The split pin may be found somewhat difficult to deal with as it
is located inside the end of the hub. The head and ends of the pin should first
be chiselled off with a small cold chisel or sheared off by driving the box
spanner onto the nut. Then, using a suitable drift through the hole in the end
of the hub (which should be turned until in line with the split pin) the remains
of the pin can be driven clear of both the nut and the axle end. When the nut is
off it may be possible to prise the hub off the stub axle, but if the hub
extractor is required, its body can be screwed home on the thread of the outside
of the hub and its screw tightened firmly on to the axle end. By continuing to
tighten up this screw, the hub will be withdrawn from the axle. If it proves
stubborn, a smart blow with a hammer on the head of the extractor screw when
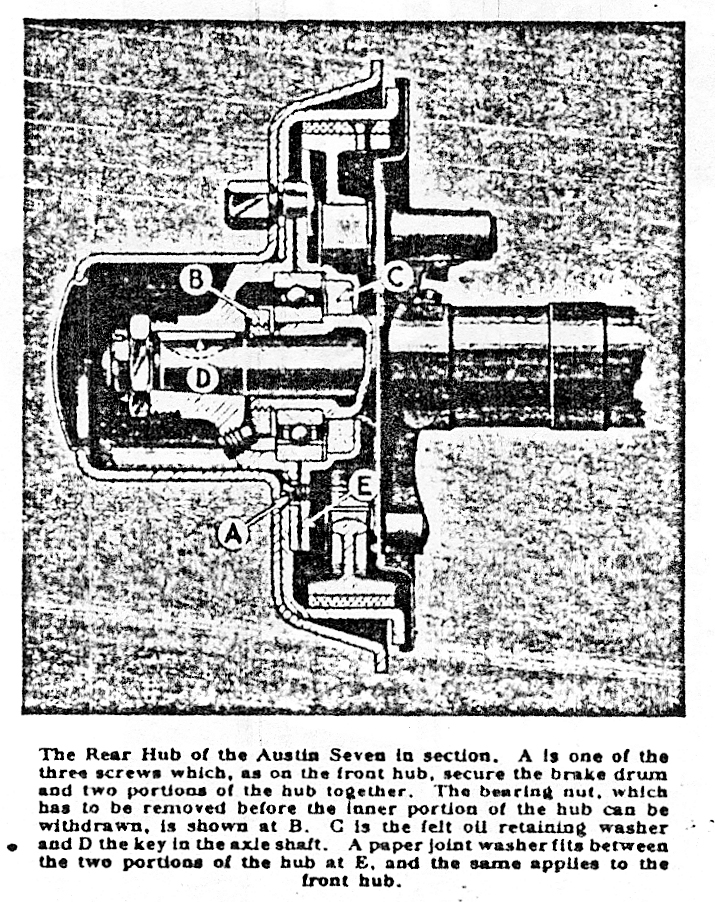
tight will usually "start" it. The procedure for removing the rear hubs is
somewhat different, due to the inner portion of the hub retained by a bearing
nut. When the axle-nut has been removed and the extractor screwed into position,
the outer portion of the hub is first withdrawn. As it is mounted on a taper on
the axle shaft and is keyed to the shaft as well, it may prove more difficult to
withdraw than the front hub, and the practice of tightening both the body of the
extractor and the screw well home, and then giving the head of the latter a
sharp blow to start the hub, will most likely prove essential. Do not mislay the
key; it will be found in the axle-shaft when the hub is clear. The paper washer
located between the two portions of the hub should also be saved unless damaged
so that a renewal is desirable. The large nut which retains the wheel bearing
and inner portion of the hub is now accessible, and can be screwed off the end
of the axle casing when the tab of its locking washer has been bent back.
Subsequently the inner portion of the hub and its bearing can be prised off the
axle casing; if it proves stubborn the outer hub should be refitted up to it and
secured by its screws, whereupon the extractor can again be used to withdraw
both. portions of the hub together. In both the front and rear hubs of the Seven
the oil or grease is prevented from penetrating from the hub to the brake drum
and shoes by a felt washer
the
subject of brake attentions on this model a step further and deal with the
rectification and prevention of "oil on the brakes," as well as the process of
relining, for both of which hub removal is essential. Access to the hubs of
either the front or rear wheels first of all entails removal of the wheel itself
and then the brake drum, the latter being secured to the hub by three screws
which also hold the two portions of the hub together. For withdrawing the hub a
small extractor is supplied in the tool kit. The front hubs are free for removal
when the axle nut and its securing split pin are removed. The nut will be found
behind the hub cap and will require a 7/16 in. box spanner which will fit inside
the hub casing. The split pin may be found somewhat difficult to deal with as it
is located inside the end of the hub. The head and ends of the pin should first
be chiselled off with a small cold chisel or sheared off by driving the box
spanner onto the nut. Then, using a suitable drift through the hole in the end
of the hub (which should be turned until in line with the split pin) the remains
of the pin can be driven clear of both the nut and the axle end. When the nut is
off it may be possible to prise the hub off the stub axle, but if the hub
extractor is required, its body can be screwed home on the thread of the outside
of the hub and its screw tightened firmly on to the axle end. By continuing to
tighten up this screw, the hub will be withdrawn from the axle. If it proves
stubborn, a smart blow with a hammer on the head of the extractor screw when
tight will usually "start" it. The procedure for removing the rear hubs is
somewhat different, due to the inner portion of the hub retained by a bearing
nut. When the axle-nut has been removed and the extractor screwed into position,
the outer portion of the hub is first withdrawn. As it is mounted on a taper on
the axle shaft and is keyed to the shaft as well, it may prove more difficult to
withdraw than the front hub, and the practice of tightening both the body of the
extractor and the screw well home, and then giving the head of the latter a
sharp blow to start the hub, will most likely prove essential. Do not mislay the
key; it will be found in the axle-shaft when the hub is clear. The paper washer
located between the two portions of the hub should also be saved unless damaged
so that a renewal is desirable. The large nut which retains the wheel bearing
and inner portion of the hub is now accessible, and can be screwed off the end
of the axle casing when the tab of its locking washer has been bent back.
Subsequently the inner portion of the hub and its bearing can be prised off the
axle casing; if it proves stubborn the outer hub should be refitted up to it and
secured by its screws, whereupon the extractor can again be used to withdraw
both. portions of the hub together. In both the front and rear hubs of the Seven
the oil or grease is prevented from penetrating from the hub to the brake drum
and shoes by a felt washer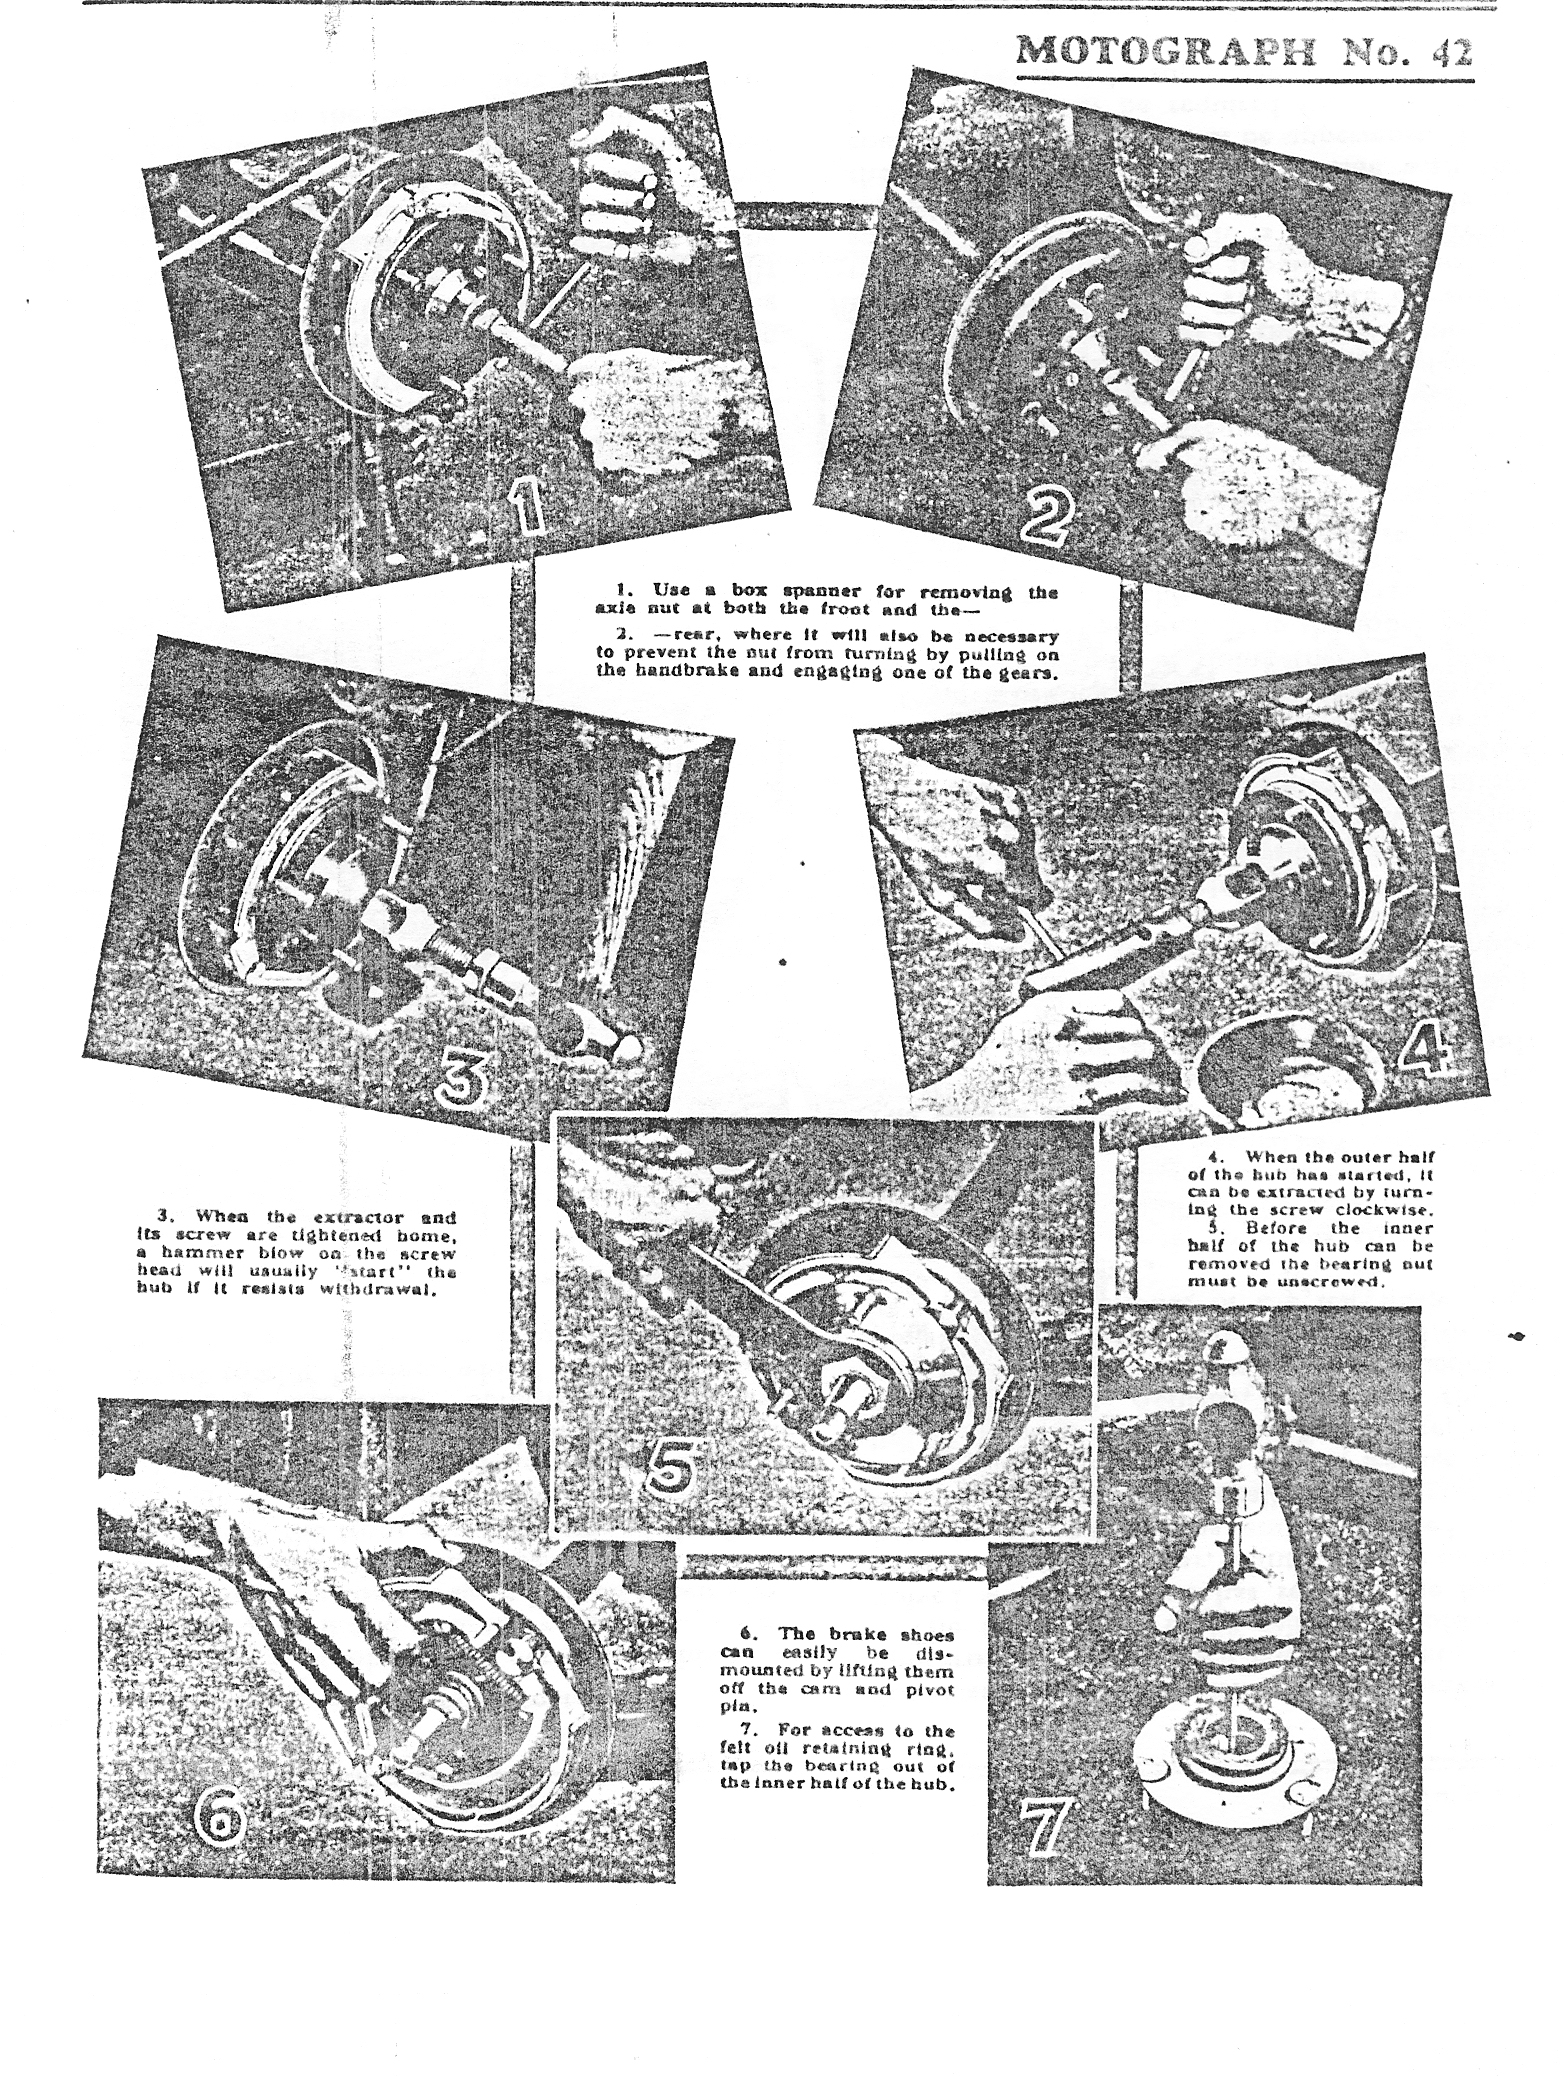 located behind the ball bearing in the inner hub shell. Splitting the hub gives
access to this bearing, which must be removed from the inner hub casing before
the felt washer can be reached. When the inner hub is dismounted the bearing
can be tapped clear from the rear side. With it will come the retaining plate
for the felt washer, to leave the latter fully exposed. The washer is in the
form of a ring and can be readily extracted from its housing. The new washer
should be soaked in hot liquid tallow and fitted while warm and moist so that
when the tallow sets it will make an effective oil seal. The retaining plate
should be immediately pushed into position with its concave face outwards and
the bearing tapped home to bed on it. When reassembled there should be no
recurrence of oil leakage unless or until the hub (or possibly the axle where
the rear brakes are concerned) is overcharged with lubricant. The question of
brake re-lining is often involved when lubricant has reached the linings as,
quite apart from wear, relining may be required because oil has permanently
impaired their braking efficiency. Naturally, an attempt will first be made to
overcome the oil leakage if the linings are still capable of further service if
protected from oil. Actually, leakage past the felt hub washer may terminate
with a reduction of the supply of lubricant to the hubs and/or axle, in which
case renewal of the felt washer may prove unnecessary. As mentioned in the
previous article, all oil inside the brake drum, on the back plate of the brake
or on the exterior surfaces of the shoes and hub, should be washed off with
petrol. The linings should also be washed with petrol and if they fail to give
efficient braking after this treatment relining can be assumed to be the only
remedy. The need for relining as a result of wear will be obvious from an
examination of the linings which, in this event, will be so thin as to leave no
clearance above the rivet heads. The shoes are held in position on the axle by
the brake springs and can be readily detached when the hub is off. They should
be identified so that the same pairs can be re-assembled together after the
re-lining process. Removal of the old linings presents no difficulty. The
easiest method of doing this is to punch the hollow rivets through from the
inner face of the shoe holding it the while in a vice. If the rivets are not of
the hollow type their heads can be cut off with a cold chisel so that the rest
of the rivet can be punched clear. Alternatively, the old linings can be prised
off the shoes and the rivets removed subsequently. The shoes, although of
aluminium, are fairly substantial, but even so it is advisable to avoid being
too vigorous at any stage of the process so that there is no risk of damage or
distortion. The surface on which the new lining has to bed should be cleaned off
so that the lining, which is supplied already curved to the correct radius, can
sit securely on the shoe. Needless to say, the side with the countersunk rivet
holes will be uppermost. Four hollow rivets will be required for each lining,
and the rivet must be supported on a punch held in a vice while its head is
riveted over. The two centre ones should be fitted first and riveted well home
so that their heads bed down into the countersinking in the lining. Then the end
rivets can be fitted to make the lining secure with all the rivet heads well
countersunk. Each shoe can be similarly treated and it is essential to reline at
the one time all four shoes on the one axle. Actually, of course, it is
desirable to reline all four brakes, both front and rear, when undertaking this
attention, but if for any reason only one axle is dealt with, it will obviously
be necessary to re-compensate the operation of the brakes as between the two
axles. With the lining fitted, it should be "backed off" at each extremity, i.e.
tapered down to half thickness,
located behind the ball bearing in the inner hub shell. Splitting the hub gives
access to this bearing, which must be removed from the inner hub casing before
the felt washer can be reached. When the inner hub is dismounted the bearing
can be tapped clear from the rear side. With it will come the retaining plate
for the felt washer, to leave the latter fully exposed. The washer is in the
form of a ring and can be readily extracted from its housing. The new washer
should be soaked in hot liquid tallow and fitted while warm and moist so that
when the tallow sets it will make an effective oil seal. The retaining plate
should be immediately pushed into position with its concave face outwards and
the bearing tapped home to bed on it. When reassembled there should be no
recurrence of oil leakage unless or until the hub (or possibly the axle where
the rear brakes are concerned) is overcharged with lubricant. The question of
brake re-lining is often involved when lubricant has reached the linings as,
quite apart from wear, relining may be required because oil has permanently
impaired their braking efficiency. Naturally, an attempt will first be made to
overcome the oil leakage if the linings are still capable of further service if
protected from oil. Actually, leakage past the felt hub washer may terminate
with a reduction of the supply of lubricant to the hubs and/or axle, in which
case renewal of the felt washer may prove unnecessary. As mentioned in the
previous article, all oil inside the brake drum, on the back plate of the brake
or on the exterior surfaces of the shoes and hub, should be washed off with
petrol. The linings should also be washed with petrol and if they fail to give
efficient braking after this treatment relining can be assumed to be the only
remedy. The need for relining as a result of wear will be obvious from an
examination of the linings which, in this event, will be so thin as to leave no
clearance above the rivet heads. The shoes are held in position on the axle by
the brake springs and can be readily detached when the hub is off. They should
be identified so that the same pairs can be re-assembled together after the
re-lining process. Removal of the old linings presents no difficulty. The
easiest method of doing this is to punch the hollow rivets through from the
inner face of the shoe holding it the while in a vice. If the rivets are not of
the hollow type their heads can be cut off with a cold chisel so that the rest
of the rivet can be punched clear. Alternatively, the old linings can be prised
off the shoes and the rivets removed subsequently. The shoes, although of
aluminium, are fairly substantial, but even so it is advisable to avoid being
too vigorous at any stage of the process so that there is no risk of damage or
distortion. The surface on which the new lining has to bed should be cleaned off
so that the lining, which is supplied already curved to the correct radius, can
sit securely on the shoe. Needless to say, the side with the countersunk rivet
holes will be uppermost. Four hollow rivets will be required for each lining,
and the rivet must be supported on a punch held in a vice while its head is
riveted over. The two centre ones should be fitted first and riveted well home
so that their heads bed down into the countersinking in the lining. Then the end
rivets can be fitted to make the lining secure with all the rivet heads well
countersunk. Each shoe can be similarly treated and it is essential to reline at
the one time all four shoes on the one axle. Actually, of course, it is
desirable to reline all four brakes, both front and rear, when undertaking this
attention, but if for any reason only one axle is dealt with, it will obviously
be necessary to re-compensate the operation of the brakes as between the two
axles. With the lining fitted, it should be "backed off" at each extremity, i.e.
tapered down to half thickness,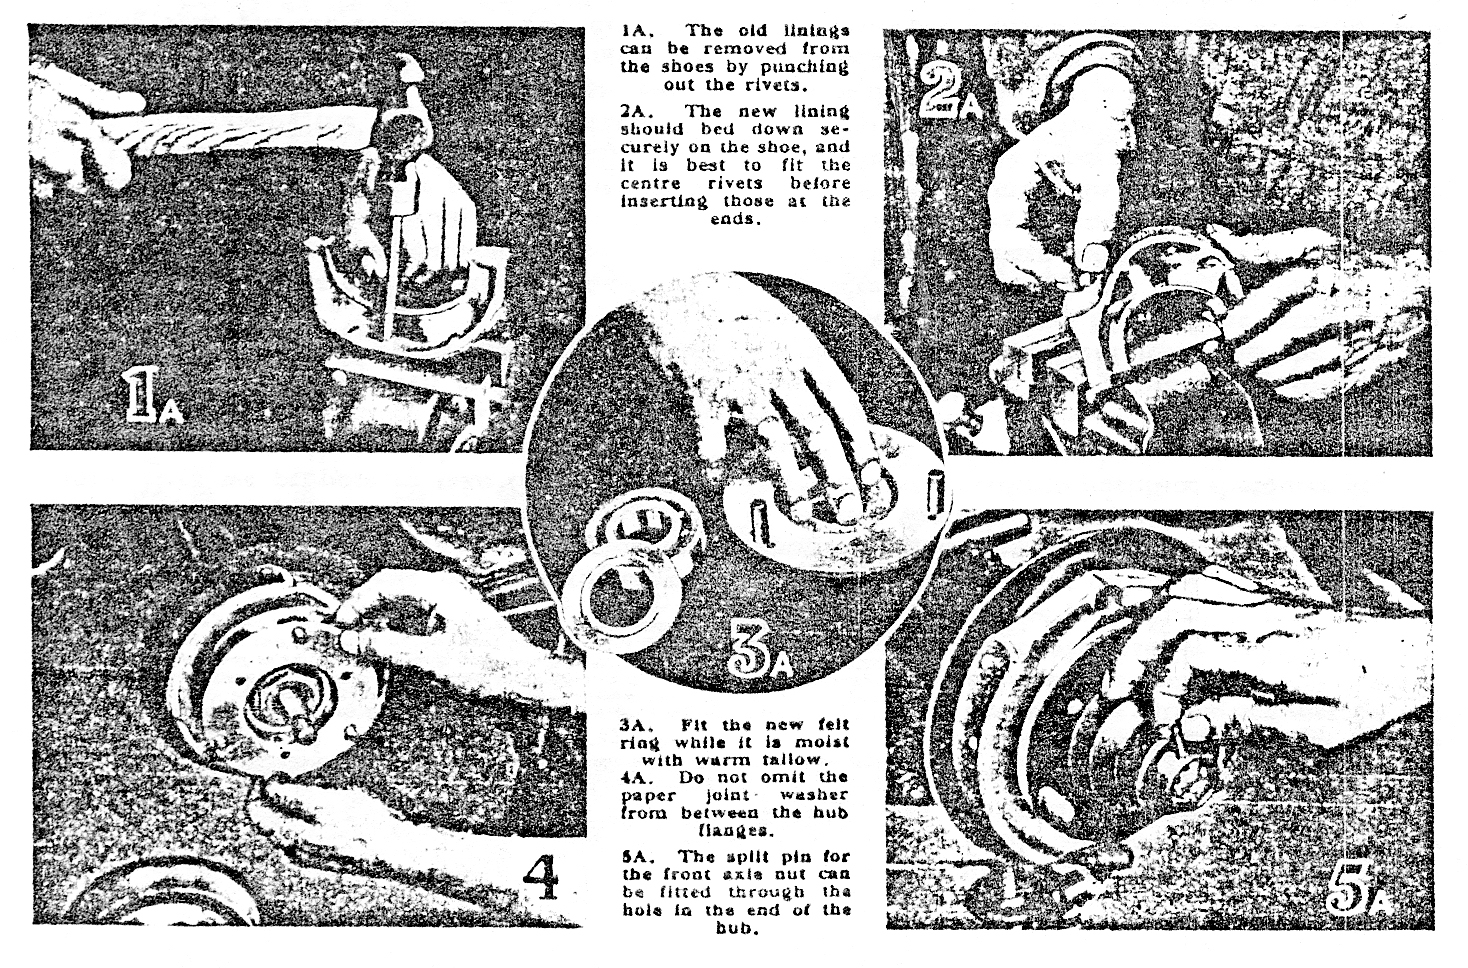 extending
about half-an-inch from the end. This prevents brake "grab" and uneven
operation. The surface of the lining should also be roughened slightly with a
rough file. After re-assembling the shoes in their correct pairs on the axle,
the hubs can be refitted. At the rear it will be necessary to tap the inner hub
with wheel bearing, etc., into position on the axle casing so that its securing
nut can be tightened until quite firm and locked with its washer. Then, before
fitting the outer portion of the hub, the bearing should be smeared well with
grease to provide initial lubrication, the key inserted in the end of the axle
shaft, and the paper joint washer (or preferably a new one) fitted to the joint
surface of the inner hub. The outer hub can then be replaced on the axle shaft
and key and driven up approximately into position. The hub can be finally pulled
up into position by the axle nuts, which must be secured by its spilt pin when
home. With the outer portion of the hub located the inner hub shell should be
prised outward if necessary so that the two hub flanges meet with the holes for
the three securing screws in alignment. The front hub, if split, also requires
the paper joint washer (or a new one) to be fitted between the two portions of
the hub, and an initial supply of grease supplied to the bearing, but in this
instance the hub can be assembled before being refitted on the axle. When the
front axle nut has been tightened, its split pin must be fitted, for which one
of the slots in the nut and the hole in the end of the hub must be aligned with
the hole in the stub axle. If relining has been undertaken it will be necessary
to slacken off the brake adjustment before the brake drums can be replaced.
Tighten the three securing screws for each drum evenly, a turn or so at a time.
Finally, before the wheels are fitted, a good charge of grease should be given
through the grease plug on each hub.
extending
about half-an-inch from the end. This prevents brake "grab" and uneven
operation. The surface of the lining should also be roughened slightly with a
rough file. After re-assembling the shoes in their correct pairs on the axle,
the hubs can be refitted. At the rear it will be necessary to tap the inner hub
with wheel bearing, etc., into position on the axle casing so that its securing
nut can be tightened until quite firm and locked with its washer. Then, before
fitting the outer portion of the hub, the bearing should be smeared well with
grease to provide initial lubrication, the key inserted in the end of the axle
shaft, and the paper joint washer (or preferably a new one) fitted to the joint
surface of the inner hub. The outer hub can then be replaced on the axle shaft
and key and driven up approximately into position. The hub can be finally pulled
up into position by the axle nuts, which must be secured by its spilt pin when
home. With the outer portion of the hub located the inner hub shell should be
prised outward if necessary so that the two hub flanges meet with the holes for
the three securing screws in alignment. The front hub, if split, also requires
the paper joint washer (or a new one) to be fitted between the two portions of
the hub, and an initial supply of grease supplied to the bearing, but in this
instance the hub can be assembled before being refitted on the axle. When the
front axle nut has been tightened, its split pin must be fitted, for which one
of the slots in the nut and the hole in the end of the hub must be aligned with
the hole in the stub axle. If relining has been undertaken it will be necessary
to slacken off the brake adjustment before the brake drums can be replaced.
Tighten the three securing screws for each drum evenly, a turn or so at a time.
Finally, before the wheels are fitted, a good charge of grease should be given
through the grease plug on each hub.
Click Here
For Part 1