The Zenith 24T2 Carburettor
Introduction
After the war ended, basic petrol ration was restored in June 1945, withdrawn in
mid-1947 and re-introduced in June 1948 at a third of the previous value. Petrol
rationing continued until May 1950. New cars produced in the UK were nearly all
diverted overseas to earn foreign income and it was impossible to buy a new car
until after 1950, unless special condition applied (e.g. you were a doctor or
other essential user). This led to many pre-war cars being recommissioned after
a period of storage, which worked well in the case of late 30s cars (Rubies and
Big Sevens) with a few tens of thousands of miles on the clock; such cars, if
they had been carefully laid up were in almost new condition and commanded high
prices. Older cars (in our case, Box saloons etc.) may have had more miles and
their condition was variable. Many vintage cars (Chummies and Top Hats of
various types) had already been scrapped before the war; those that survived
would have been the better, less used examples.
A particular problem existed with the 1929 – 32 cars. These had a 15mm choke,
Zenith updraft carburettor based on the earlier bronze 22FZ type but made using
an injection moulding technique and termed the 22FZB. The material was changed
to “MAZAK”, a smooth flowing casting alloy of Magnesium, Zinc, Aluminium and
Chromium. This material was subject to corrosion, probably due to high levels of
Magnesium and by 1945, many 22FZB carburettors were weakened by corrosion,
leading to cracks and breakage. The Zenith Carburettor Company was helpful and
adapted a carburettor, already in post war production, so that it could be
bolted on to an Austin Seven to replace a broken 22FZB.
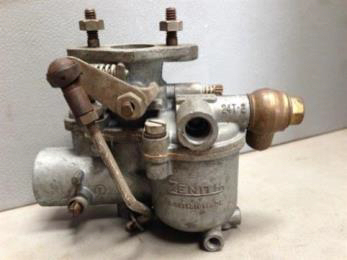
The carburettor that was used was the 24T2, an updraft fitted to the Ferguson
T20 tractor and various stationary engines, mainly of JAP, Lister, Petter and
Villiers manufacture. These engines were used to power generators, concrete
mixers and other industrial and agricultural machinery. Zenith did some
development work and released a version of the 24T2 in the late forties or early
fifties, to satisfy the demand for getting older Austin Sevens roadworthy again.
There are some advantages to using this carburettor in place of the earlier
updraft types, most notably that the carburettor has better changeover from idle
to power and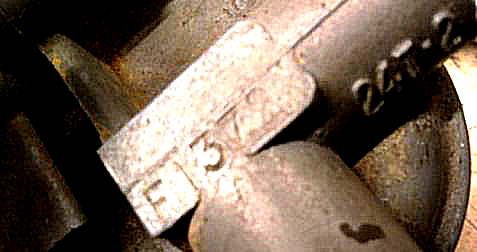 produces power more smoothly with better economy. It is also (if in
good condition), less prone to leaks and may be less susceptible to
vaporization. There are some disadvantages as well; it is very difficult to
clear a blocked jet at the roadside and the carburettor does not have a
“vintage” appearance. If you actually drive an early car however (rather
than using it for shows), the 24T2 may be an option worth considering.
produces power more smoothly with better economy. It is also (if in
good condition), less prone to leaks and may be less susceptible to
vaporization. There are some disadvantages as well; it is very difficult to
clear a blocked jet at the roadside and the carburettor does not have a
“vintage” appearance. If you actually drive an early car however (rather
than using it for shows), the 24T2 may be an option worth considering.
Buying a 24T2
There are a number of traps for the unwary. There are many versions of the 24T2,
with different mounting holes, main jet, throttle arrangements and so on.
Because the carburettor was used on many engines from the 2 litre Ferguson
Tractor (aka Standard Vanguard) OHV wet liner engine to 600cc single cylinder
concrete mixer engines, the version you may be looking at on a random Autojumble
stall is probably not an Austin Seven variant.
The key thing to look for is the Zenith
type number “F1372” stamped adjacent to the petrol inlet. If this number is
present, the carb was originally produced with the setting for use on a Seven.
The settings are as follows: 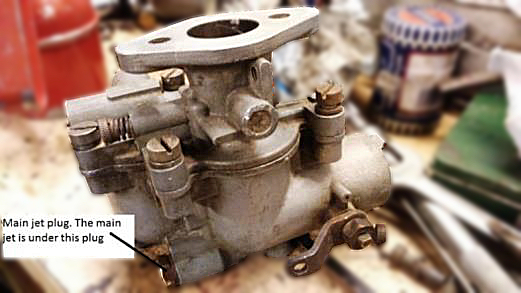
·
Choke tube 14
·
Main Jet 75
·
Slow Running jet 50
·
Air Cap 150
·
Needle valve 1.5
Any other number means that the carburettor has a different setting and while
this may be able to be changed, some carbs were produced with physical
differences that preclude this.
Regarding condition, the main thing to consider is the state of the main jet
housing and thread, which is covered by a brass plug, below the petrol input.
Check that the brass plug can be unscrewed and that the long thread revealed is
sound, especially where the plug fits as it is essential that this can be
tightened fully. Underneath the plug,
at the end of the thread is the main jet; this should be a 75 (0.75mm dia) and
it should unscrew, revealing a red fibre washer beneath. Ensure that you use a
parallel, well-fitting screwdriver to release this jet as a wedge screwdriver
will damage the vulnerable thread. 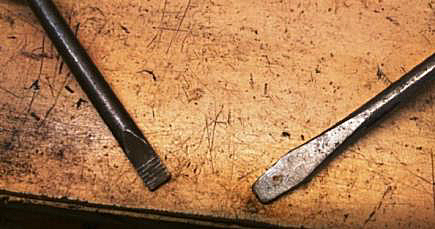
Unfortunately, many carburettors on offer will fail at this point because they
may have been stored on engines, out in the open and filled with water, causing
corrosion of the MAZAK. Previous “mechanics” may also have damaged the thread by
using the wrong screwdriver. If the type number is right and the main jet thread
looks good, you can buy the carb and move on to overhaul.
Overhauling the 24T2
Start by stripping the carb down entirely and checking that the setting, given
above, is correct. The throttle spindle will be worn. Remove the two screws and
the butterfly disc which will enable the throttle spindle to be removed. Inspect
the castings and try the new spindle for fit. There should be negligible play in
the spindle; the casting can be bushed if very worn but this is quite expensive.
Excessive play at this point will cause slow running issues later. Soak the
castings in cellulose thinners to remove the petrol gum. The gasket will have
shrunk and must be replaced.
Overhaul kits are available from Burlen Services and contain a throttle spindle,
screws and disc, gasket, washers and a new needle valve. Unfortunately, 75 main
jets are unobtainable at the moment.
However, 82 jets are available and may “do” at a pinch.
Inspect the main jet thread, it is a metric thread, 10mm dia, 1.0mm pitch.
Tooling is available from Tracy Tools in Devon, however there is very little
meat here to effect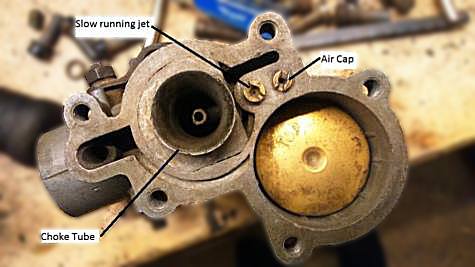 repairs and this thread must be in good condition.
Make sure that the top and the bottom faces of the carb are flat and true; if
necessary use a piece of glass and some “wet or dry” to face them off. You may
need to remove the choke tube to do this but be careful not to damage the tube
or the seating.
The choke tube must be firmly fixed in the housing, if it has worked loose it may have worn both tube and housing which results in the tube sitting low. You may be able to rectify with some gaskets, cut from thick paper, aiming to get the tube slightly above housing level and thus held in when reassembled.
The top mounting flange will be warped and can be carefully faced off with a
sharp, 2nd cut file, making sure that all traces of filings are removed in the
cleaning bath.
After cleaning, blow through all passages with compressed air or a tyre pump and
lay out the parts, ready for assembly. Make sure all the jets and passages are
completely clear. Replace the throttle spindle with the new item from the
overhaul kit, screw in the new butterfly disc and lock the screws into
position. Replace the operating arm and reassemble the carb with a new gasket,
not forgetting to add the float and its valve.
Fitting a 24T2
You will need to fit a ball joint type connection to the operating arm for the
throttle. These are usually fitted to 26VA carburettors on later cars. Make sure
you can get the full range of movement and adjust so that the throttle fully
closes when released. Choke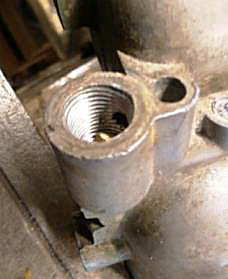 connection will depend on your car; the standard
wires will probably need a special link bending to fit. Note that the input
gasket supplied in the rebuild kit will be too large; use a gasket from one of
the A7 suppliers or cut one from thick paper.
connection will depend on your car; the standard
wires will probably need a special link bending to fit. Note that the input
gasket supplied in the rebuild kit will be too large; use a gasket from one of
the A7 suppliers or cut one from thick paper.
The petrol input will probably need a special feed pipe making up. Make sure that petrol is always flowing downhill, never up. You must have a good, fine filter on the input because the main jet is not easy to clear in the event of a blockage, requiring the removal of the carburettor, which is not a quick job at the roadside. You can use an external filter, suitable for gravity feed or a fine mesh filter in the input banjo.
Once the carburettor is fitted, adjust the air screw about one or two turns off
its seat and start the engine. Set the idle speed and adjust the air screw for
slow, even running, with no noticeable “fluffing” when the throttle is opened. 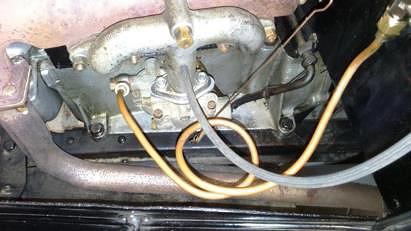
Finally, road test and enjoy!
Tim Reynolds BA7C with very many thanks for a brilliant article