|
TORQUE TUBE PINION NUT:
If you’ve tried undoing the
nut on the pinion inside the
torque tube to remove the bearings, you will know how difficult it can be.
Not
only have you to remember that the nut is usually a left hand thread
but usually it will not budge no matter how much effort you apply to
the spanner. To overcome this problem place the pinion in a wide vice
as close to the nut a possible and tighten as much as you can.
Heat the nut quickly and as much as you can without heating the pinion unduly.
Then quickly apply a chisel to the corner of the nut and give it a hard hit with the hammer.
“One hard hit is worth a thousand soft ones”. |
|
|
REMOVING
REAR HUBS:
Austin " Seven " rear hubs may be removed without the use of a special
extractor.
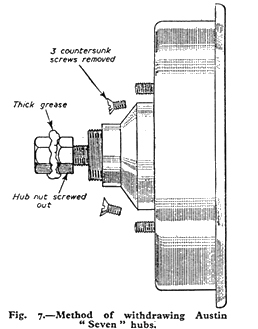 The
procedure is fairly well known, but is worth repeating, and is shown in
Fig. 7. The wheel is removed, and the three countersunk screws which
secure the brake drum are taken out, but the drum is left in place. The
split pin is removed from the hub nut and the nut unscrewed until it is
almost at end of the shaft. A second nut is affixed to the end of the
first with the aid of a blob of thick grease, and the wheel replaced.
The three wheel nuts are then tightened evenly in rotation, and a
smart tap on the centre of the wheel, which should be suitably protected
from the hammer, will loosen the hub. The
procedure is fairly well known, but is worth repeating, and is shown in
Fig. 7. The wheel is removed, and the three countersunk screws which
secure the brake drum are taken out, but the drum is left in place. The
split pin is removed from the hub nut and the nut unscrewed until it is
almost at end of the shaft. A second nut is affixed to the end of the
first with the aid of a blob of thick grease, and the wheel replaced.
The three wheel nuts are then tightened evenly in rotation, and a
smart tap on the centre of the wheel, which should be suitably protected
from the hammer, will loosen the hub. |
REAR AXLE
OIL: Do you struggle
filling your rear axle with that
thick 140 oil? Do you keep saying I must get a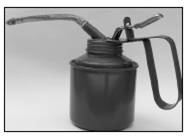 proper pump? Well, Sandy
Croall down in deepest Cornwall has passed on this oh so blindingly simple
solution. Next time you go to an autojumble or event where cheap tools are
sold, get an oil can like the one illustrated with a flexible plastic pipe
attached. They are 'as cheap as chips'. Cut off the brass nozzle, (don't try
and pump the oil with the nozzle attached it will take for ever), and hey
presto, job done. Sandy says he painted the side AXLE OIL, and found that a
tyre valve cap fits the end of the pipe to keep the oil clean. proper pump? Well, Sandy
Croall down in deepest Cornwall has passed on this oh so blindingly simple
solution. Next time you go to an autojumble or event where cheap tools are
sold, get an oil can like the one illustrated with a flexible plastic pipe
attached. They are 'as cheap as chips'. Cut off the brass nozzle, (don't try
and pump the oil with the nozzle attached it will take for ever), and hey
presto, job done. Sandy says he painted the side AXLE OIL, and found that a
tyre valve cap fits the end of the pipe to keep the oil clean.
BUDGET REAR AXLE OIL APPLICATOR:
.JPG)
Click here for
full article
|
REAR AXLE OIL:
When was the last time you checked the oil level in your
back axle? Regular checks ensure that the
bearings and gears will not fail you. Remember to use D140 grade oil; do not
use EP140 as it has a detrimental effect on some of the components within.
Whilst you are under the car make sure that you have greased the universal
joints (both ends on later cars). Excessive backlash (rotation of the
propshaft without rotation of the half-shafts,
and front to back movement of the pinion) is indicative of worn pinion
bearings. Too much movement will lead to catastrophic failure of the teeth
on the crownwheel and pinion. Check it now – especially if your back axle is
noisy, best to replace the bearings, both new and second-hand
crown wheels and pinions are very expensive. “Bumbling” (A7OC)
with many thanks
|
CHECKING REAR HUBS: When did you last have a peek at the relationship betwix your
‘Seven’ hubs
and shafts? Any sign of wear, marks on the key surface, sloppy fitting in
the keyway are evidence of movement however small, between the shaft and
hub, the cause more often than not being an insufficiently tightened nut. It
may also be that the hub has been riding on top of the key. To check, remove
key, fit hub and tighten nut as hard as possible with a
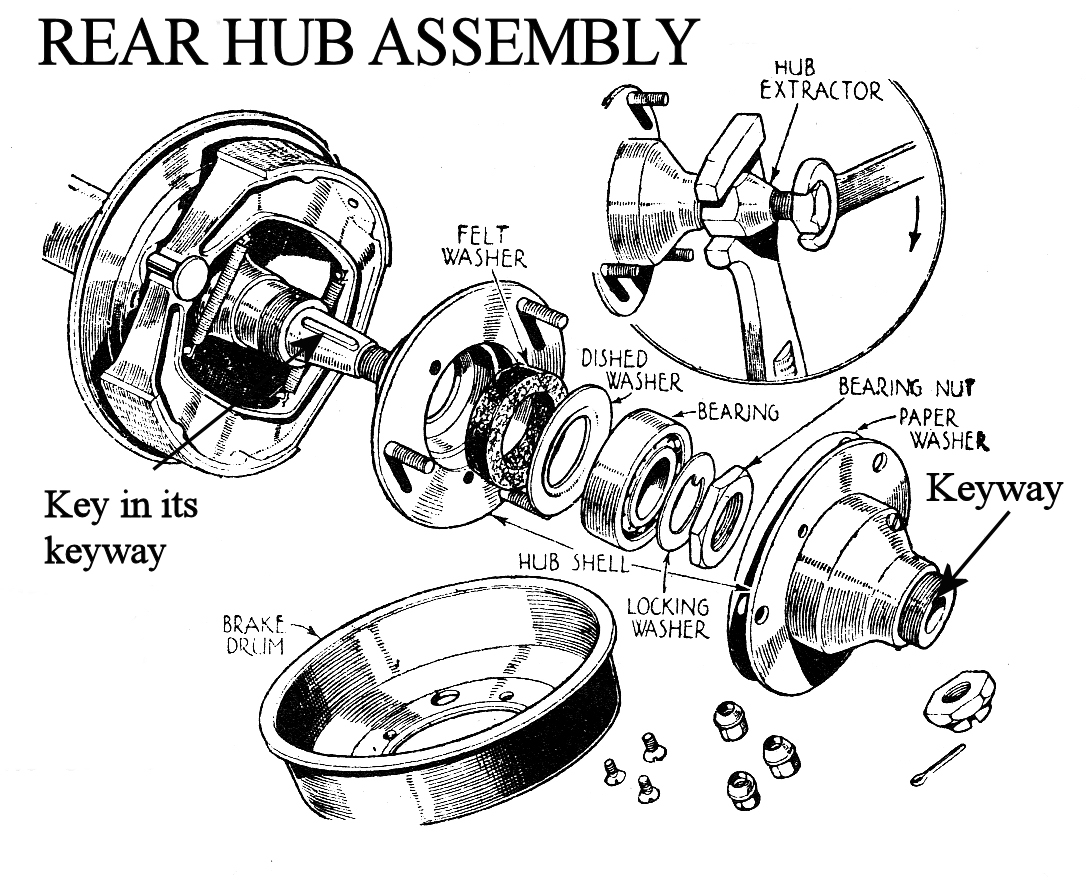 socket
and a substantial lever with a suitable length of bar placed between a wheel
stud with wheel nut fitted (to prevent damage to thread) and the hub centre
extending to the ground. Carefully note position of hub nut, i.e. marking
face etc, remove nut, fit key if completely sound, and re tighten. Whatever
else you do, do not fit a sloppy fitting key. Tightening to a different
position indicates a need to file down the surface of the key until it
tightens exactly to the position achieved without the key. Unless you’re
fitting together the two components which have never previously met, proceed
with caution down the road of ‘lapping’ the hub on to the shaft with
grinding paste about which much has been written. After seven decades or
more, it surely is reasonable to assume that any lapping that’s been needed,
has already been done, who knows how many times. Over doing this lapping
lark can only eventually lead to the risk of the nut tightening against the
shoulder on the shaft beyond the threads, instead of against the hub. It is
known to have happened! For additional confidence in a secure shaft/hub
drive, the oft times repeated advice of re-checking the tightness of the hub
nuts after a couple hundred miles or so is worth considering. And at the
risk of stating the obvious, if, on the final tighten-up, you find that the
cotter pin hole is not lined up to enable fitting the cotter; resist any
temptation to slacken off to accommodate it, no matter how little. Either
fit a suitable shim washer or grind down the nut surface just enough for the
nut to be fully tightened for the cotter pin to be fitted. Incidentally, an
old wheel that has seen better days, and with the centre removed, fitted and
lowered to the ground is ideal for securing the hub while giving the nut
that final tightening heave. John McKay Scottish A7C Meshing Point
June ‘09 with
many thanks. socket
and a substantial lever with a suitable length of bar placed between a wheel
stud with wheel nut fitted (to prevent damage to thread) and the hub centre
extending to the ground. Carefully note position of hub nut, i.e. marking
face etc, remove nut, fit key if completely sound, and re tighten. Whatever
else you do, do not fit a sloppy fitting key. Tightening to a different
position indicates a need to file down the surface of the key until it
tightens exactly to the position achieved without the key. Unless you’re
fitting together the two components which have never previously met, proceed
with caution down the road of ‘lapping’ the hub on to the shaft with
grinding paste about which much has been written. After seven decades or
more, it surely is reasonable to assume that any lapping that’s been needed,
has already been done, who knows how many times. Over doing this lapping
lark can only eventually lead to the risk of the nut tightening against the
shoulder on the shaft beyond the threads, instead of against the hub. It is
known to have happened! For additional confidence in a secure shaft/hub
drive, the oft times repeated advice of re-checking the tightness of the hub
nuts after a couple hundred miles or so is worth considering. And at the
risk of stating the obvious, if, on the final tighten-up, you find that the
cotter pin hole is not lined up to enable fitting the cotter; resist any
temptation to slacken off to accommodate it, no matter how little. Either
fit a suitable shim washer or grind down the nut surface just enough for the
nut to be fully tightened for the cotter pin to be fitted. Incidentally, an
old wheel that has seen better days, and with the centre removed, fitted and
lowered to the ground is ideal for securing the hub while giving the nut
that final tightening heave. John McKay Scottish A7C Meshing Point
June ‘09 with
many thanks. |
|
|
CARDEN
BLOCK COVER:
The rubber boot cover for the Carden block
on the earlier
propshafts from the usual suppliers is very insubstantial and has only ever
lasted a few weeks for me. A much tougher option is the Mini Mark 1 cv joint
boot (Delphi Lockheed part reference TBJ2197) which has lasted now for over
4 years and is available locally from the likes of Autoquip at about the
same cost. Eddie Eddles Devon A7 Club with many thanks. (Also
available through Mini Spares on the internet but I notice there are “inner”
& “outer” boots so 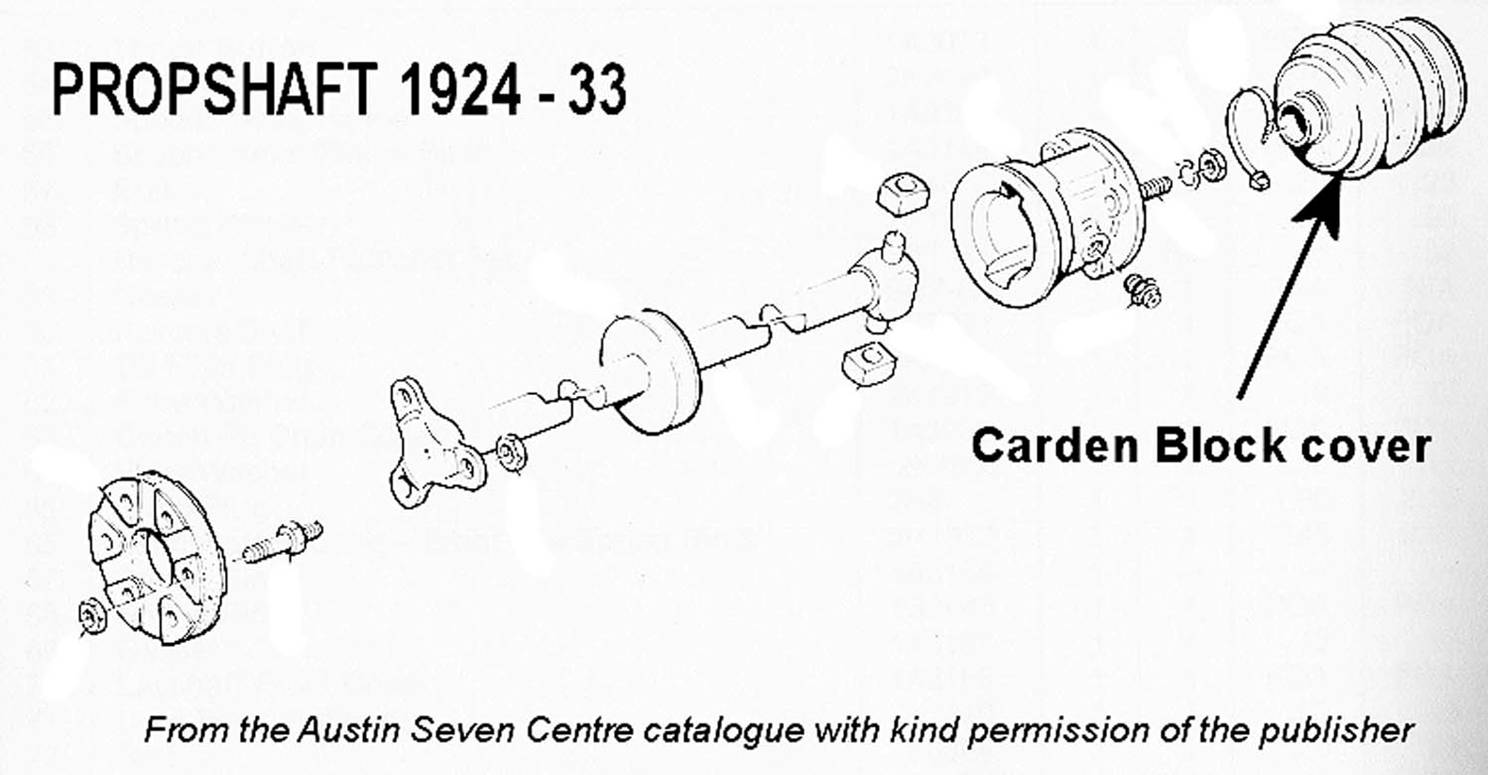 be careful—Ed) CARDEN BLOCK UPDATE:
I have
bought and fitted several Mini Rubber covers from our cherished suppliers
and they are useless! They are too big on the middle diameter and rub one
side of the tunnel until a hole appears and the grease comes out!! I've read
your article and looked at the Mini Spares website and I see the cheap ill-fitting
boots that have previously failed. Now on the same page they show a superior
boot at £14.95 - is this perhaps a
better fitting boot and smaller in the middle.
Bryan Downes PWA7C be careful—Ed) CARDEN BLOCK UPDATE:
I have
bought and fitted several Mini Rubber covers from our cherished suppliers
and they are useless! They are too big on the middle diameter and rub one
side of the tunnel until a hole appears and the grease comes out!! I've read
your article and looked at the Mini Spares website and I see the cheap ill-fitting
boots that have previously failed. Now on the same page they show a superior
boot at £14.95 - is this perhaps a
better fitting boot and smaller in the middle.
Bryan Downes PWA7C |
|
TIGHTENING
REAR HUB NUTS:
Glyn and I use a 4 foot gas bar on the end of a socket bar when tightening
the rear hub (taking care not to damage the hub threads with the socket). If
not kept really tight, the hub works on the axle shaft key instead of the
taper as it is not tight on the taper and eventually, at the very least, the
key breaks but more often or not the half shaft shears off at the key.
Does your Austin clonk at a back wheel area when drive is taken up between
going backwards and forwards? BEWARE!!!
Gary Munn |
|
FLYWHEEL OIL THROWER:
Having to tighten the flywheel on my Box, I noticed the thin
tin-plate
oil thrower
between the rear bearing and
the flywheel was just spinning loosely around and incapable of throwing oil
anywhere! A quick call to Vince Leek solved the problem—the oil thrower is
just pinched by the flywheel boss and will always be flattened out when the
flywheel is put on. The solution is to lightly crimp the inner edge of the
thrower with a pair of pliers, preferably pointed, and then fit the thrower
over the sticking out end of the crank, concave face outwards, and replace
the flywheel—simple! However, I did notice a scratching noise when I first
turned over the engine by hand but this disappeared when I pressed in the
clutch for the first time. David Whetton |
|
HARDY SPLICER PROP FLANGES:
Hardy Spicer propshafts can only connect in two positions. It is not
possible to release the bolts and turn through 90 degrees as the fixing
holes permit only 180 degree rotation on the flanges. To set the splined
sleeved end at 90 degrees different to the fixed rear requires removal
of the sleeved unit and refit at a new position by disengaging from the
splined shaft and re engaging at the desired position.
George Mooney DA7C
|
|
INPUT SHAFT BEARING: As the
input shaft bearing of an Austin 7 3-speed gearbox wears, the oil
returning quick thread gets damaged in the nose piece, allowing oil to
leak onto the clutch. A simple and cheap way to overcome this problem
is, firstly, to renew the bearing and then insert a modern oil seal in
the nose piece between the input bearing housing and the roller
bearing. This stops oil from reaching the worn quick thread. There are
2 types of seal: either Payen NA080 or Payen NA092 will do the job and
they are simply a press fit in the housing, It is a good idea to grease
the new bearing as hopefully no oil should now reach it. |
|
GEARBOX DRAIN PLUG
REPAIR: Damage to the thread of the drain
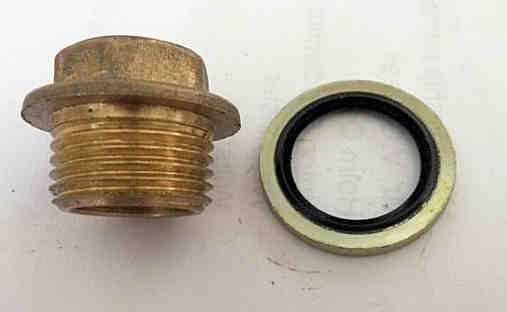 plug
can be a cause of oil leakage. The casting in this area is not very
thick and the thread can easily be stripped. Here is a simple repair. plug
can be a cause of oil leakage. The casting in this area is not very
thick and the thread can easily be stripped. Here is a simple repair.
1. Open up plug hole to ¾ inch,
2, Tap new thread ¾” BSP being careful to hold the tap square with the
case.
3. Fit ¾” BSP blanking plug with ¾” Dowty seal.
Obviously this is easiest done with the gear box out of the car, but it
can be done with the gearbox in situ. Just make sure the car is safely
jacked up on tall stands. If you do not have a ¾“ drill carefully open
up the hole with careful use of a round file. Suitable plugs are
available from plumbers merchants.. Taps from Tracy tools. Vince
Leek DA7C
|
| SPEEDO
CABLE OILING: Once a year I oil the speedo drive cable
inside the armoured outer. Previously the cable has broken and also the
drive wheel broke, but so far I haven’t had problems having been oiling
it. For Ruby-type motors, unscrew the cable from the back of the speedo
and feed it through the bulkhead grommet back into the battery box. But
for 'Boxes', the speedo cable will just appear out of the bulkhead. With
the cable held upright, use an oil can to slowly run oil down the
inside. There is some slack in the drive cable along its length, so pull
it up and down a few times to allow the oil to flow down the cable then
add some more oil. Leave it a few minutes for the oil to run down, wipe
any excess and feed it back through the bulkhead and re-connect to the
speedo. It only takes a few minutes but may prevent the speedo breaking.
Nick Kidd DA7C |
| |
| |
| |
| |
| |
| |
| |
| |
| |
| |
| |
| |