|
HANDBRAKE LEVER: Excessive
handbrake lever
travel on late Ruby Saloons, where the hand brake moves nearly full
travel even if the brakes are in good adjustment, is usually caused by
the diameter of the wheel that touches the actuating lever on the cross
shaft. Remove the hand brake lever assembly, remove the wheel and
replace it with five, 1” diameter plain washers with a 5/16"
hole. In most cases this will remove the free play completely. |
|
CABLE BRAKES: When adjusting Austin 7
cable brakes
(on
cars with coupled brakes) with all 4 wheels jacked off the ground, have
a mate apply medium pressure to the brake pedal, or if all your mates
are down the pub, wedge a block of wood between the seat and the pedal,
and test the resistance on each wheel. It is most important that the
brakes are tested from the footbrake rather than the handbrake, as the
latter acts on the centre of the cross-shaft rather than from the
offside end. The difference being the handbrake won’t pull and twist
the shaft, especially if the brakes are worn, in the same way as when
the pedal is used in normal road conditions. As you all know the cables
should be adjusted so that the front brakes come on slightly in advance
of the rear and the nearside rear should under light pedal pressure
come on slightly more than the offside rear, so that under heavier
pressure as the cross-shaft moves they equal themselves up. Having
successfully adjusted the cables, go for a test drive and join your
mates down the pub to celebrate. |
|
HYDRAULIC BRAKE ADJUSTERS:
Morris Minor brake cylinder
adjusters can be reversed so that the screwdriver slot faces the back
plate. Drilling the appropriate hole would allow adjustment from the
rear. The hole needs to be 3/8" as the adjuster changes position
as it is adjusted and you also need to cover the hole as well to keep
water out. All this means that by drilling a couple of carefully
aligned holes in the back plate it saves all that hassle of drilling
the cast iron brake drums and removing the wheels every time you want
to adjust your brakes. |
|
BRAKE CAM ADJUSTERS:
If new
brake cams
have a sharp edge where they push against the brake shoe, it must be
rounded off. Also, look for a groove that may have been worn in the old
brake shoe by previous cams. Should your brakes lock-on, it may be that
the cam has lodged underneath the groove. In which case, drive the car
in the opposite direction and it should release. In a worst case, a
plate can be attached to the end of the brake shoe to remove the groove. |
|
BRAKE LININGS: When removing
old brake linings,
don’t drill out the old ones as this may damage the shoes. Instead, break off
the old lining, if it will come, and hacksaw off the heads of the old rivets
then punch out the remaining bits. If they don’t break off, just carefully
put the saw blade between the lining and the shoe and proceed as above.
Glyn Llewellyn
|
REPLACING BRAKE SHOES:
When
replacing brake shoes,
especially the fronts, take off the hubs first to remove and replace shoes.
It saves a lot of sore fingers, a lot of time in the end, and gives you a
chance to check and grease the bearings. Ian Mason-Smith
REPLACING REAR BRAKE SHOES
1. Check the brake shoe pull-off springs. Replace elongated or
miss-shaped springs with new.
2. When you have to reconnect the last brake shoe spring, loop a length
of string through the spring hook, pull it tight and tie-off on
something. Now push the spring in position around the hook on the brake
shoe with a screwdriver. Release string. Remove string. Job done!
3. It is most important that the brake linings are not impregnated with
grease, etc. Stick masking tape on the linings to protect them until the
dirty work is done then just peel it off.
4. When you have replaced the brake linings you probably will not be
able to get the brake drum on again. Remove any adjuster you have on the
cable. If the drum still will not go on, slacken off the foot pedal
adjusting screw. This allows the brake cross-shaft to turn back and
allows the brake shoes to fully return to normal. Now the drum should go
on. If not, bad luck! It means you have to slacken the clamp bolt
in the brake cable forked end and pull the cable out a bit. Terrible
job! Don't pull it right out as it is a so and so of a job to get it
back into the forked end again!
With thanks to Viv Orchard from the IOW A7 Club |
SNAIL
ADJUSTERS:
There are two types of
snail
adjusters in use on Morris braking systems. The smaller type is used
on the front brakes because there are two leading shoes !! The rear has only
one leading shoes so a larger snail adjuster with greater lift because there
is only one in the rear brake. If a small adjuster is fitted to the rear
brake it will barely lift the shoe to a contact point for the brake shoe
with the drum leading to virtually all the braking on the front axle. Take a
look at your hydraulic brakes if you are NOT aware of this technical
feature. You may find a problem that you were did not know you had.
George Mooney DA7C two leading shoes !! The rear has only
one leading shoes so a larger snail adjuster with greater lift because there
is only one in the rear brake. If a small adjuster is fitted to the rear
brake it will barely lift the shoe to a contact point for the brake shoe
with the drum leading to virtually all the braking on the front axle. Take a
look at your hydraulic brakes if you are NOT aware of this technical
feature. You may find a problem that you were did not know you had.
George Mooney DA7C |
IMPROVING REAR
BRAKES ON PRE-1930 SEVENS:
Earlier Sevens with uncoupled brakes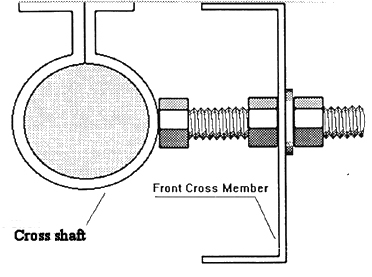 suffer from a very spongy pedal, due to the amount of flexing in the
brake linings. Most of this is because the cross-shaft bearings are made
from strip, and move considerably under braking force. A quick mod. can
be done to improve this. It takes half an hour or so, needs no
dismantling, and the only materials needed are a 5/16 BSF x 2½" bolt,
spring washer and two pins. Drill a 5/16" hole in the front cross member
in line with the centre of the offside cross shaft bearing, and insert
the aforementioned bolt with one nut on, fit the washer and second nut.
Adjust so it bears against the cross shaft. That's it! As a bonus, this
will also give a fine adjustment for balancing the rear brakes. Mike
Phelan PWA7C
suffer from a very spongy pedal, due to the amount of flexing in the
brake linings. Most of this is because the cross-shaft bearings are made
from strip, and move considerably under braking force. A quick mod. can
be done to improve this. It takes half an hour or so, needs no
dismantling, and the only materials needed are a 5/16 BSF x 2½" bolt,
spring washer and two pins. Drill a 5/16" hole in the front cross member
in line with the centre of the offside cross shaft bearing, and insert
the aforementioned bolt with one nut on, fit the washer and second nut.
Adjust so it bears against the cross shaft. That's it! As a bonus, this
will also give a fine adjustment for balancing the rear brakes. Mike
Phelan PWA7C |
REFITTING GIRLING BRAKE SHOES:
 After
relining brake shoes it can be quite a fiddle fitting them once more
with the springs connecting the shoes together behind the hubs. For
older Sevens it’s usual to remove the hub but that shouldn’t be
necessary for the later Girling brakes aided by the springs with a
little loop at each end into which a specific tool can be used to pull
the springs or one can use a combination of bullnose pliers and a large
screwdriver. However even then it seems that it would be easier to have
three hand with one holding the shoes in place whilst you try and fit
the springs! Instead it’s useful to use large elastic bands to hold the
two shoes in place. A spring removal tool (not A7 specific) is
availble from most motor suppliers, or from eBay for under £5.
Peter Trebilco DA7C After
relining brake shoes it can be quite a fiddle fitting them once more
with the springs connecting the shoes together behind the hubs. For
older Sevens it’s usual to remove the hub but that shouldn’t be
necessary for the later Girling brakes aided by the springs with a
little loop at each end into which a specific tool can be used to pull
the springs or one can use a combination of bullnose pliers and a large
screwdriver. However even then it seems that it would be easier to have
three hand with one holding the shoes in place whilst you try and fit
the springs! Instead it’s useful to use large elastic bands to hold the
two shoes in place. A spring removal tool (not A7 specific) is
availble from most motor suppliers, or from eBay for under £5.
Peter Trebilco DA7C
SNAGGING BRAKES IN
REVERSE:
Snagging brakes in reverse can happen for a variety of reasons and below
are some of the main reasons and my suggested remedies.
1. The bolt holding the rear of the radius arms is loose, spring is
broken or brass cups are worn. REMEDY: Replace, preferably all three,
with new. Check the fitting is secure.
2. Brake linings are not chamfered and/or overhang brake shoe.
REMEDY: Cut to size and/or chamfer with rasp file.
3. Nut(s) securing front of radius arm to axle beam are loose.
REMEDY: Ensuring radius arm is steady using a large spanner or grip,
tighten nut. (If radius arm is not steady during tightening it will
twist and, therefore, be able to flex under load, impairing braking
capabilities somewhat.)
4. Shackle pins and/or bushes are worn allowing whole beam to twist
under forward and reverse braking conditions. REMEDY: Replace with new.
Ensure that the bushes are tight fits in the axle and spring eyes. Any
movement will soon turn into lots of movement!!
5. King pins are loose or worn. REMEDY: Tighten king pin securing nut
initially. If this does not cure the slack then replace king pins and
bushes. Check the axle eye for ovality as this is more often the actual
problem. If you find this to be the problem the eye will need to be
repaired or another suitable beam found.
This is by no means definitive, although if any of the faults 1 - 5
exist it will undoubtedly have a negative effect on the braking
capabilities of the car and let's face it, Austin Sevens need all the
braking they can muster at the best of times!
Ruairidh Dunford with thanks to Meshing Point March 1999
|
| |
| |
| |
| |
| |
| |
| |
| |
| |
| |
| |
| |
| |
| |
| |