STEERING
AND FRONT AXLE REFURBISHMENT
The first job is to put the car
safely up onto axle stands before making a start on the front axle, first onto
the spring shackles, which separated easily, but not so the bolt that holds the
radius arms onto the ball joint. I finally managed to free it and, after
dismantling a very rusty shock absorber unit, the front suspension was off and
could be taken into the workshop for closer examination. I removed the king pins and checked
their fit in the axle. They both had a fair amount of movement so that meant
sending the axle off to Ruairidh Dunford for heat shrinking. I was then able to
strip both stub axles of bearings etc. and pay attention to the backplates which
had seen better days. But with a made-up dolly the right size, I was able to
carefully tap away and restore the 90 degree edge all round both backplates. I
then worked on overall flatness and after some time on the fly-press things were
looking much better. Definitely the brake drums won’t be rubbing and binding
anymore! The next job was to remove the old
king pin bushes from the stub axles, a process made easier by removing the brake
cams and their bushes, all of which have seen better days and will need
replacing.
I removed the king pins and checked
their fit in the axle. They both had a fair amount of movement so that meant
sending the axle off to Ruairidh Dunford for heat shrinking. I was then able to
strip both stub axles of bearings etc. and pay attention to the backplates which
had seen better days. But with a made-up dolly the right size, I was able to
carefully tap away and restore the 90 degree edge all round both backplates. I
then worked on overall flatness and after some time on the fly-press things were
looking much better. Definitely the brake drums won’t be rubbing and binding
anymore! The next job was to remove the old
king pin bushes from the stub axles, a process made easier by removing the brake
cams and their bushes, all of which have seen better days and will need
replacing.
I then modified the drag link end
caps by braising a nut on each end cap, which can
 then take a grease nipple. I
had done this mod to both my Ruby and Special and it guarantees that lubrication
reaches the ball pin and mating surfaces.
then take a grease nipple. I
had done this mod to both my Ruby and Special and it guarantees that lubrication
reaches the ball pin and mating surfaces.
The next job was to check the
axle to see that all surfaces were at right angle to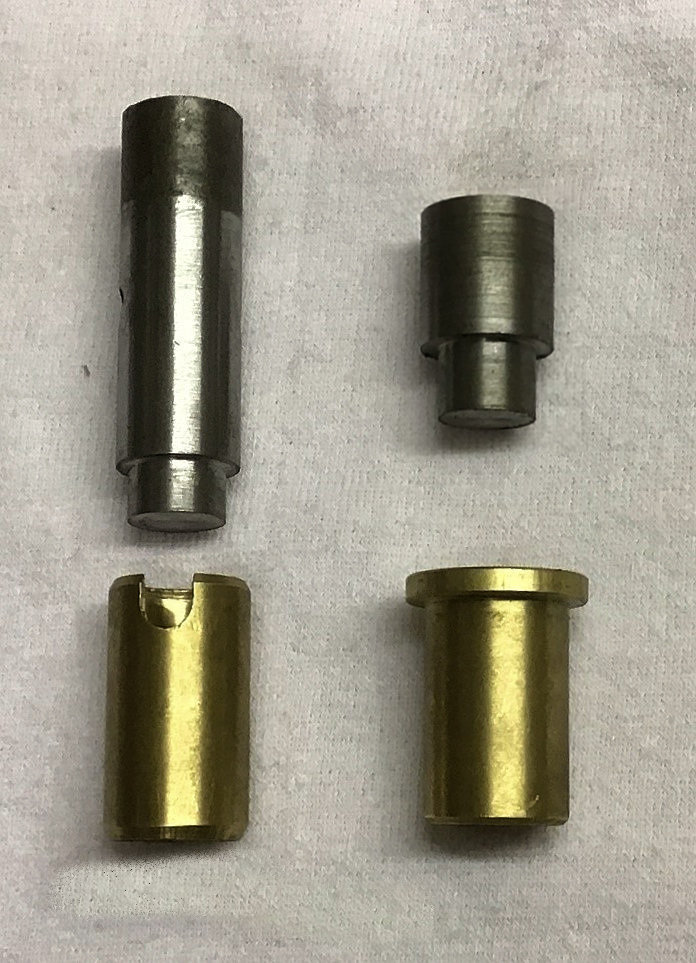 the king pins. I had a
piece of bar the right diameter to cover the end of the axle so in the lathe I
faced one end and then drilled and reamed it to give a good fit on the king pin.
With the pin in the axle and the bar slid onto it I was able to check each
seating and carefully filed where necessary. This was repeated top and bottom
both sides a slow job but necessary.
the king pins. I had a
piece of bar the right diameter to cover the end of the axle so in the lathe I
faced one end and then drilled and reamed it to give a good fit on the king pin.
With the pin in the axle and the bar slid onto it I was able to check each
seating and carefully filed where necessary. This was repeated top and bottom
both sides a slow job but necessary.
The stub axles were then offered up with the hardened
washers in place on the lower bush, this was to check to see if any packing
washers were re-quired at the top. One side was a good fit and did not require
anything, but the other side was very tight, so the washer had to be worked on
using the diamond lap, quite a lengthy process as the washer is hardened, but a
good fit was finally achieved. With cotter pin and stub axle in place the king
pin was inserted. One side worked fine but with the other the king pin refused
to enter all the way and on checking I could see that it had started to raise a
ri dge in the axle, it must be going out of line because of a fat cotter! So,
with the stub axle out of the way I very lightly reamed the hole so the king pin
would fit again and then filed the cut out of the cotter. It worked and the king
pin went right down, thank heavens! Whilst on the subject of these cotters, I
have always given them a healthy tap with a suitable punch before tightening the
nuts up on the other side. I feel that it is asking too much of the threads on
their own to pull the cotter in tight with the king pin. With my two Austins I
always did this every time I carried out a greasing service to the front
suspension and never had any problems with the kingpins.
dge in the axle, it must be going out of line because of a fat cotter! So,
with the stub axle out of the way I very lightly reamed the hole so the king pin
would fit again and then filed the cut out of the cotter. It worked and the king
pin went right down, thank heavens! Whilst on the subject of these cotters, I
have always given them a healthy tap with a suitable punch before tightening the
nuts up on the other side. I feel that it is asking too much of the threads on
their own to pull the cotter in tight with the king pin. With my two Austins I
always did this every time I carried out a greasing service to the front
suspension and never had any problems with the kingpins.
Next assembly was the track
rod where the levers required the pins being in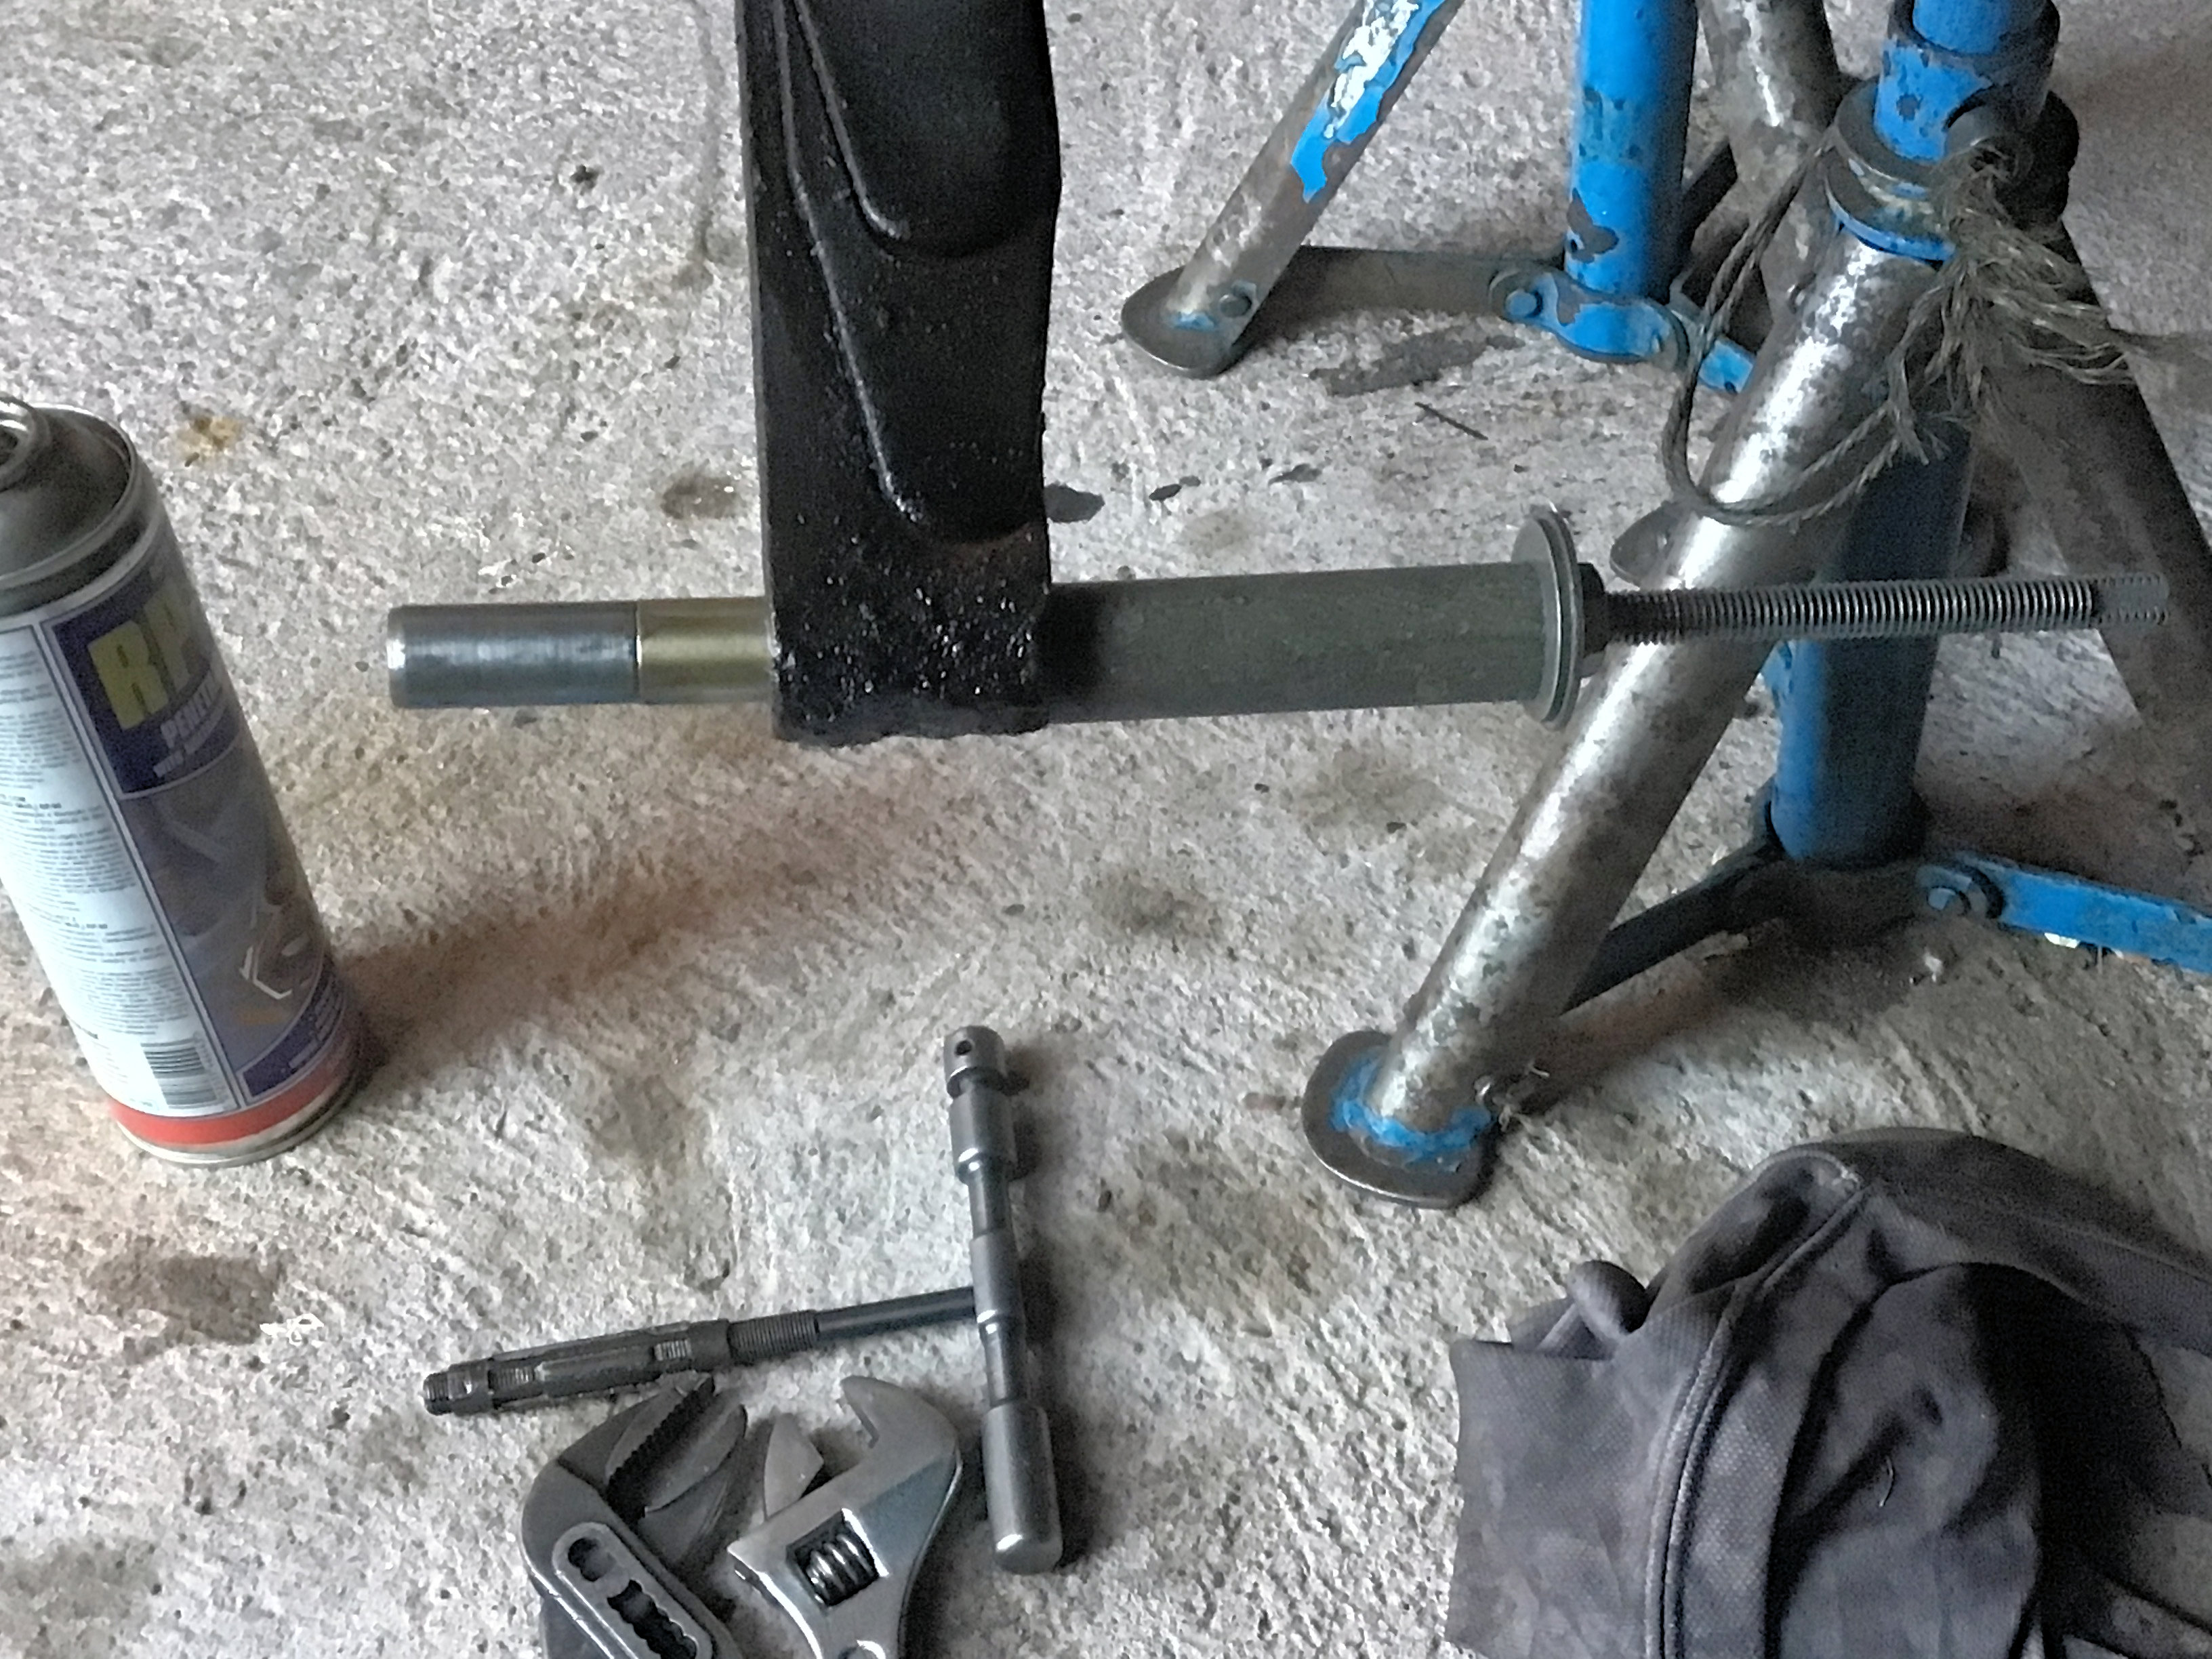 serted and locked in place with
cotter pins. This was followed by the shock absorber which required the
aluminium links to have their rubber bushes fitted and everything bolted
together. The final job to be done before fitting the axle was to fit the bushes
into the spring ready for the spring shackles so a very light ream and the
puller did the required job.
serted and locked in place with
cotter pins. This was followed by the shock absorber which required the
aluminium links to have their rubber bushes fitted and everything bolted
together. The final job to be done before fitting the axle was to fit the bushes
into the spring ready for the spring shackles so a very light ream and the
puller did the required job.
I jacked up the axle so I was able to fit the spring
shackles and with them done up tight the shock absorber was fitted and
everything bolted in, a good job done!
The next part was not so easy as the
ball joint on the steering box arm needed rep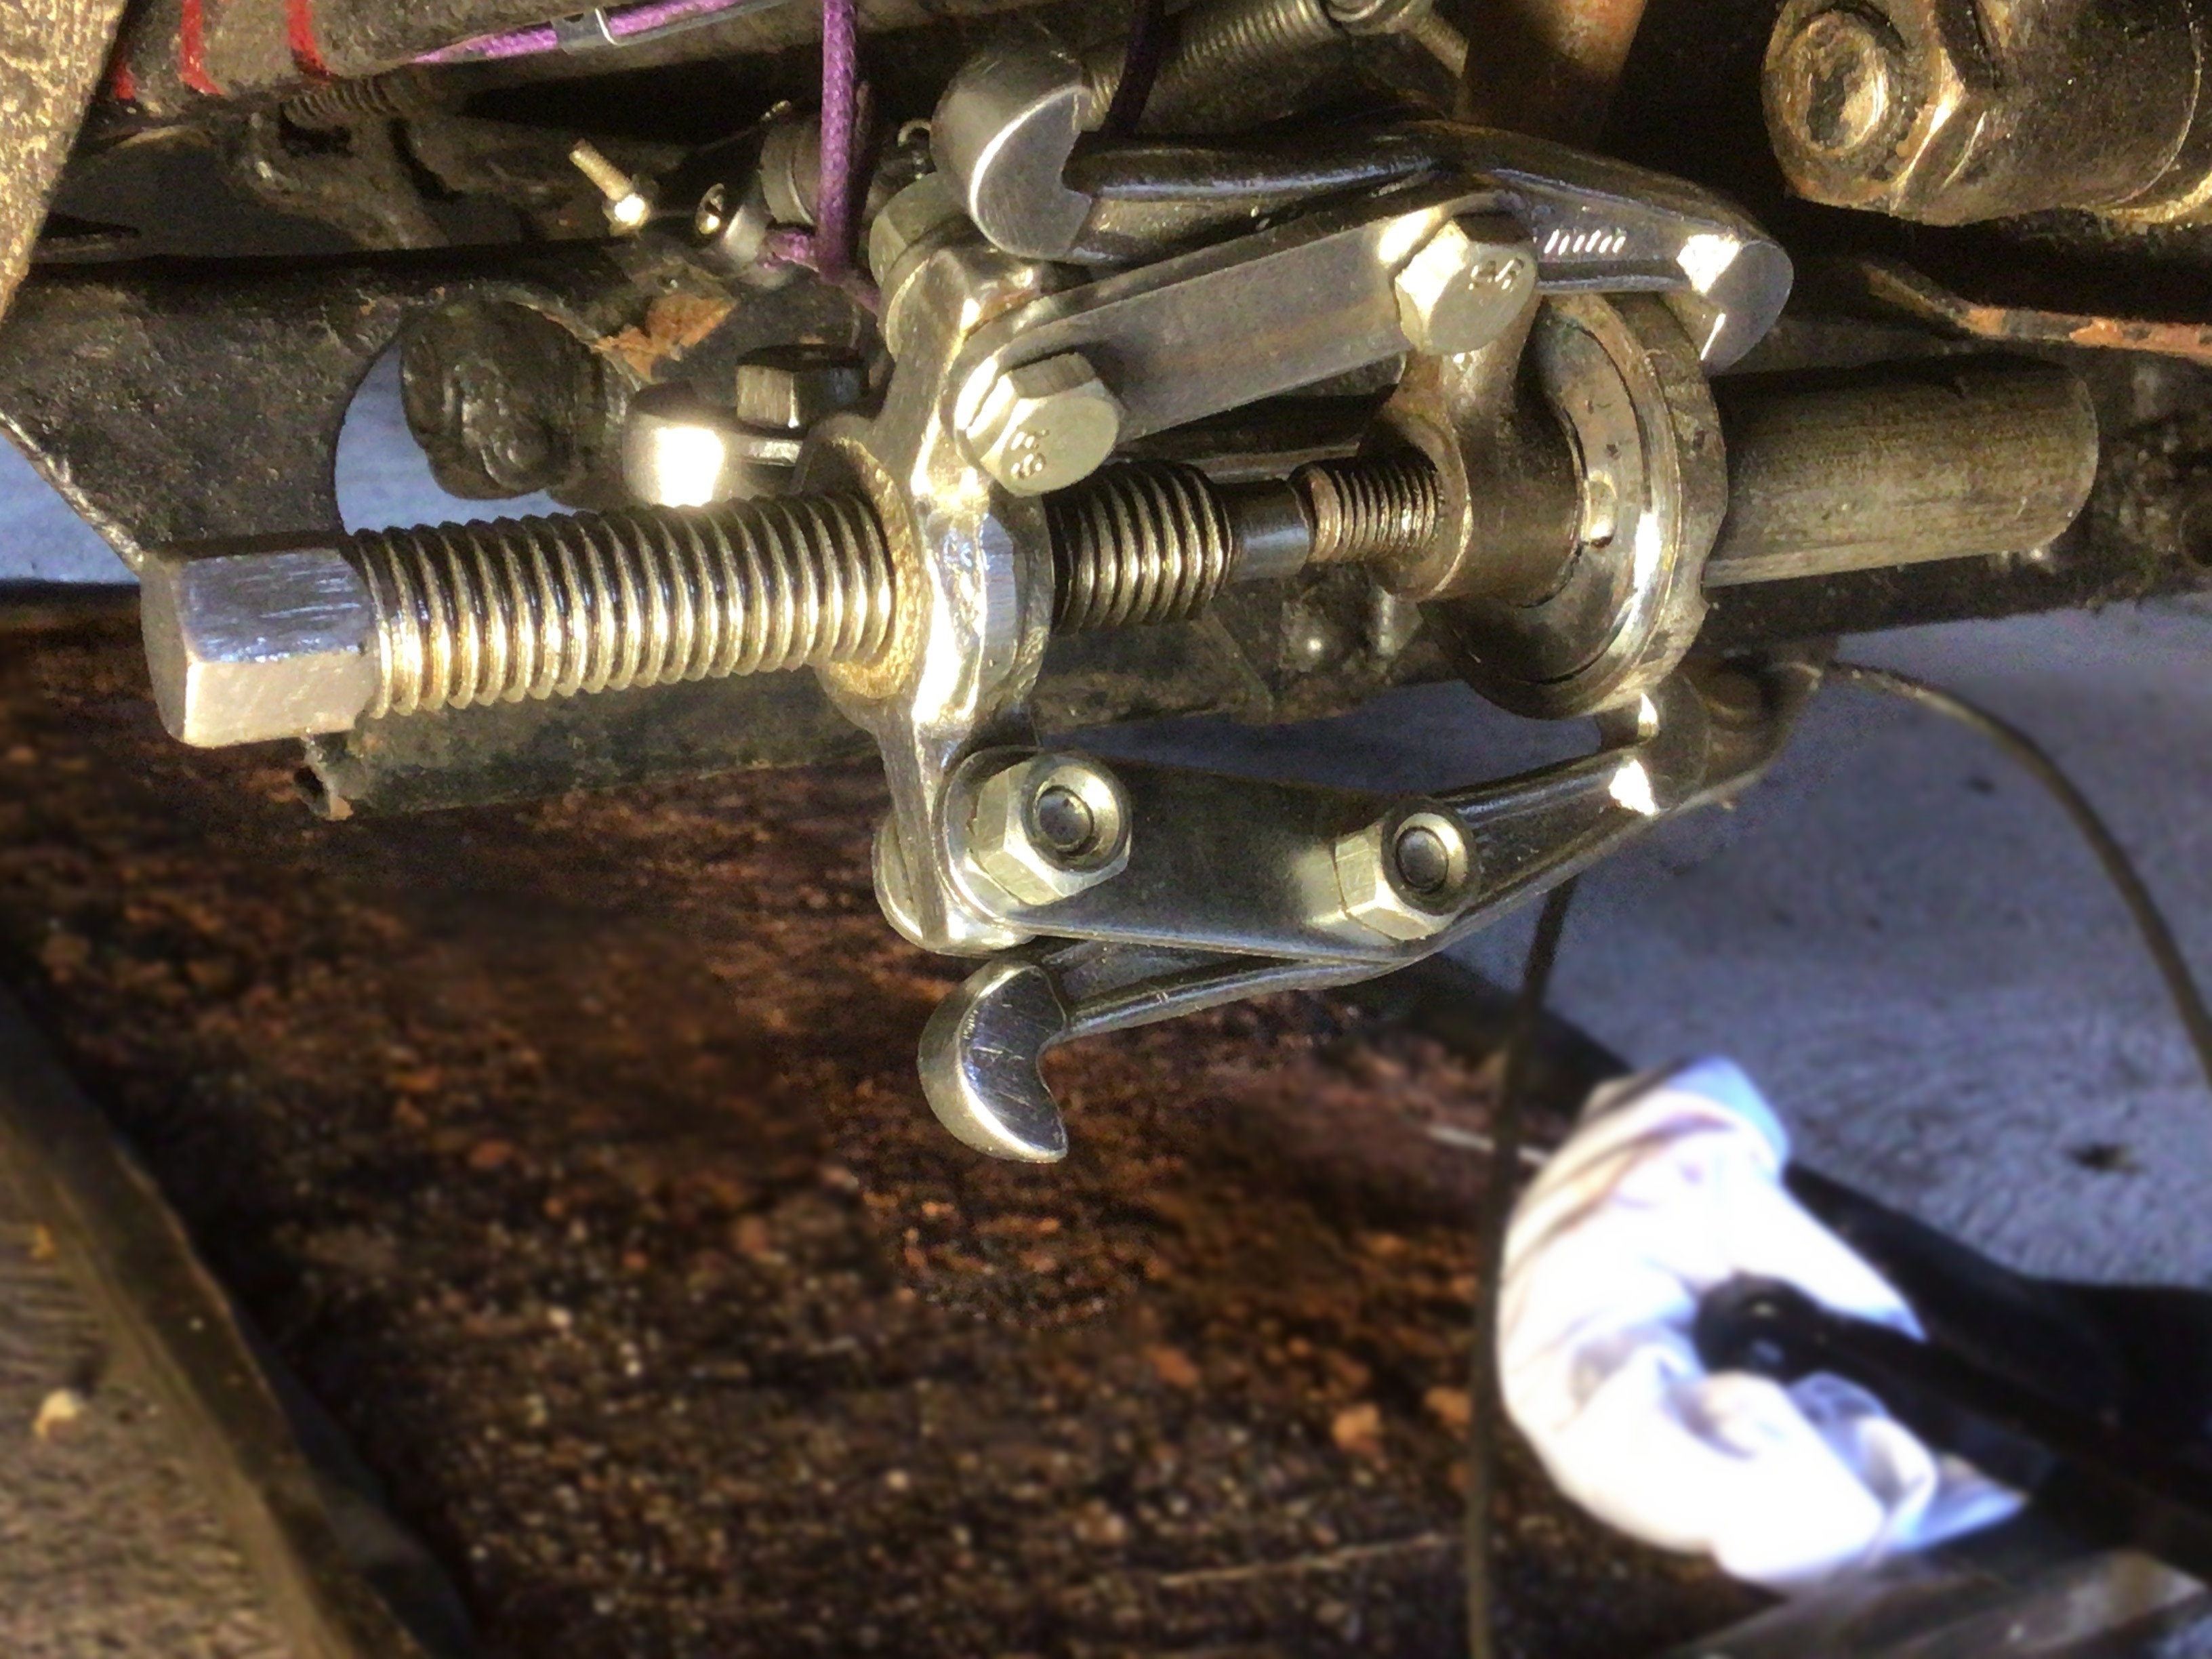 lacing as it was seriously worn.
The ball joint is tapered and a tight fit but of course one is not able to use
any force to drive it out for fear of damaging the steering box arm, what to do?
I used a piece of tube close to the diameter of the ball joint and turned up on
the lathe a ring bored out to fit the tube which I then welded together. This
enabled me to put a small three legged extractor in place to force out the ball
joint, it worked! Having successfully extracted the old ball joint and the new
one now in position it was time to fit the drag link complete with new cups and
springs. This can be a bit of a fiddle as the end cap has to squeeze the spring
enough for the bolt to be fitted in place, I resorted to vice grips positioned
on the tube and a clamp to do the necessary squeezing! Everything went to
together well and I was then able to use the new grease nipples to apply grease
straight to the ball joints.
lacing as it was seriously worn.
The ball joint is tapered and a tight fit but of course one is not able to use
any force to drive it out for fear of damaging the steering box arm, what to do?
I used a piece of tube close to the diameter of the ball joint and turned up on
the lathe a ring bored out to fit the tube which I then welded together. This
enabled me to put a small three legged extractor in place to force out the ball
joint, it worked! Having successfully extracted the old ball joint and the new
one now in position it was time to fit the drag link complete with new cups and
springs. This can be a bit of a fiddle as the end cap has to squeeze the spring
enough for the bolt to be fitted in place, I resorted to vice grips positioned
on the tube and a clamp to do the necessary squeezing! Everything went to
together well and I was then able to use the new grease nipples to apply grease
straight to the ball joints.
The fitting of the track rod was
easy and I did use Loctite on the large nuts atta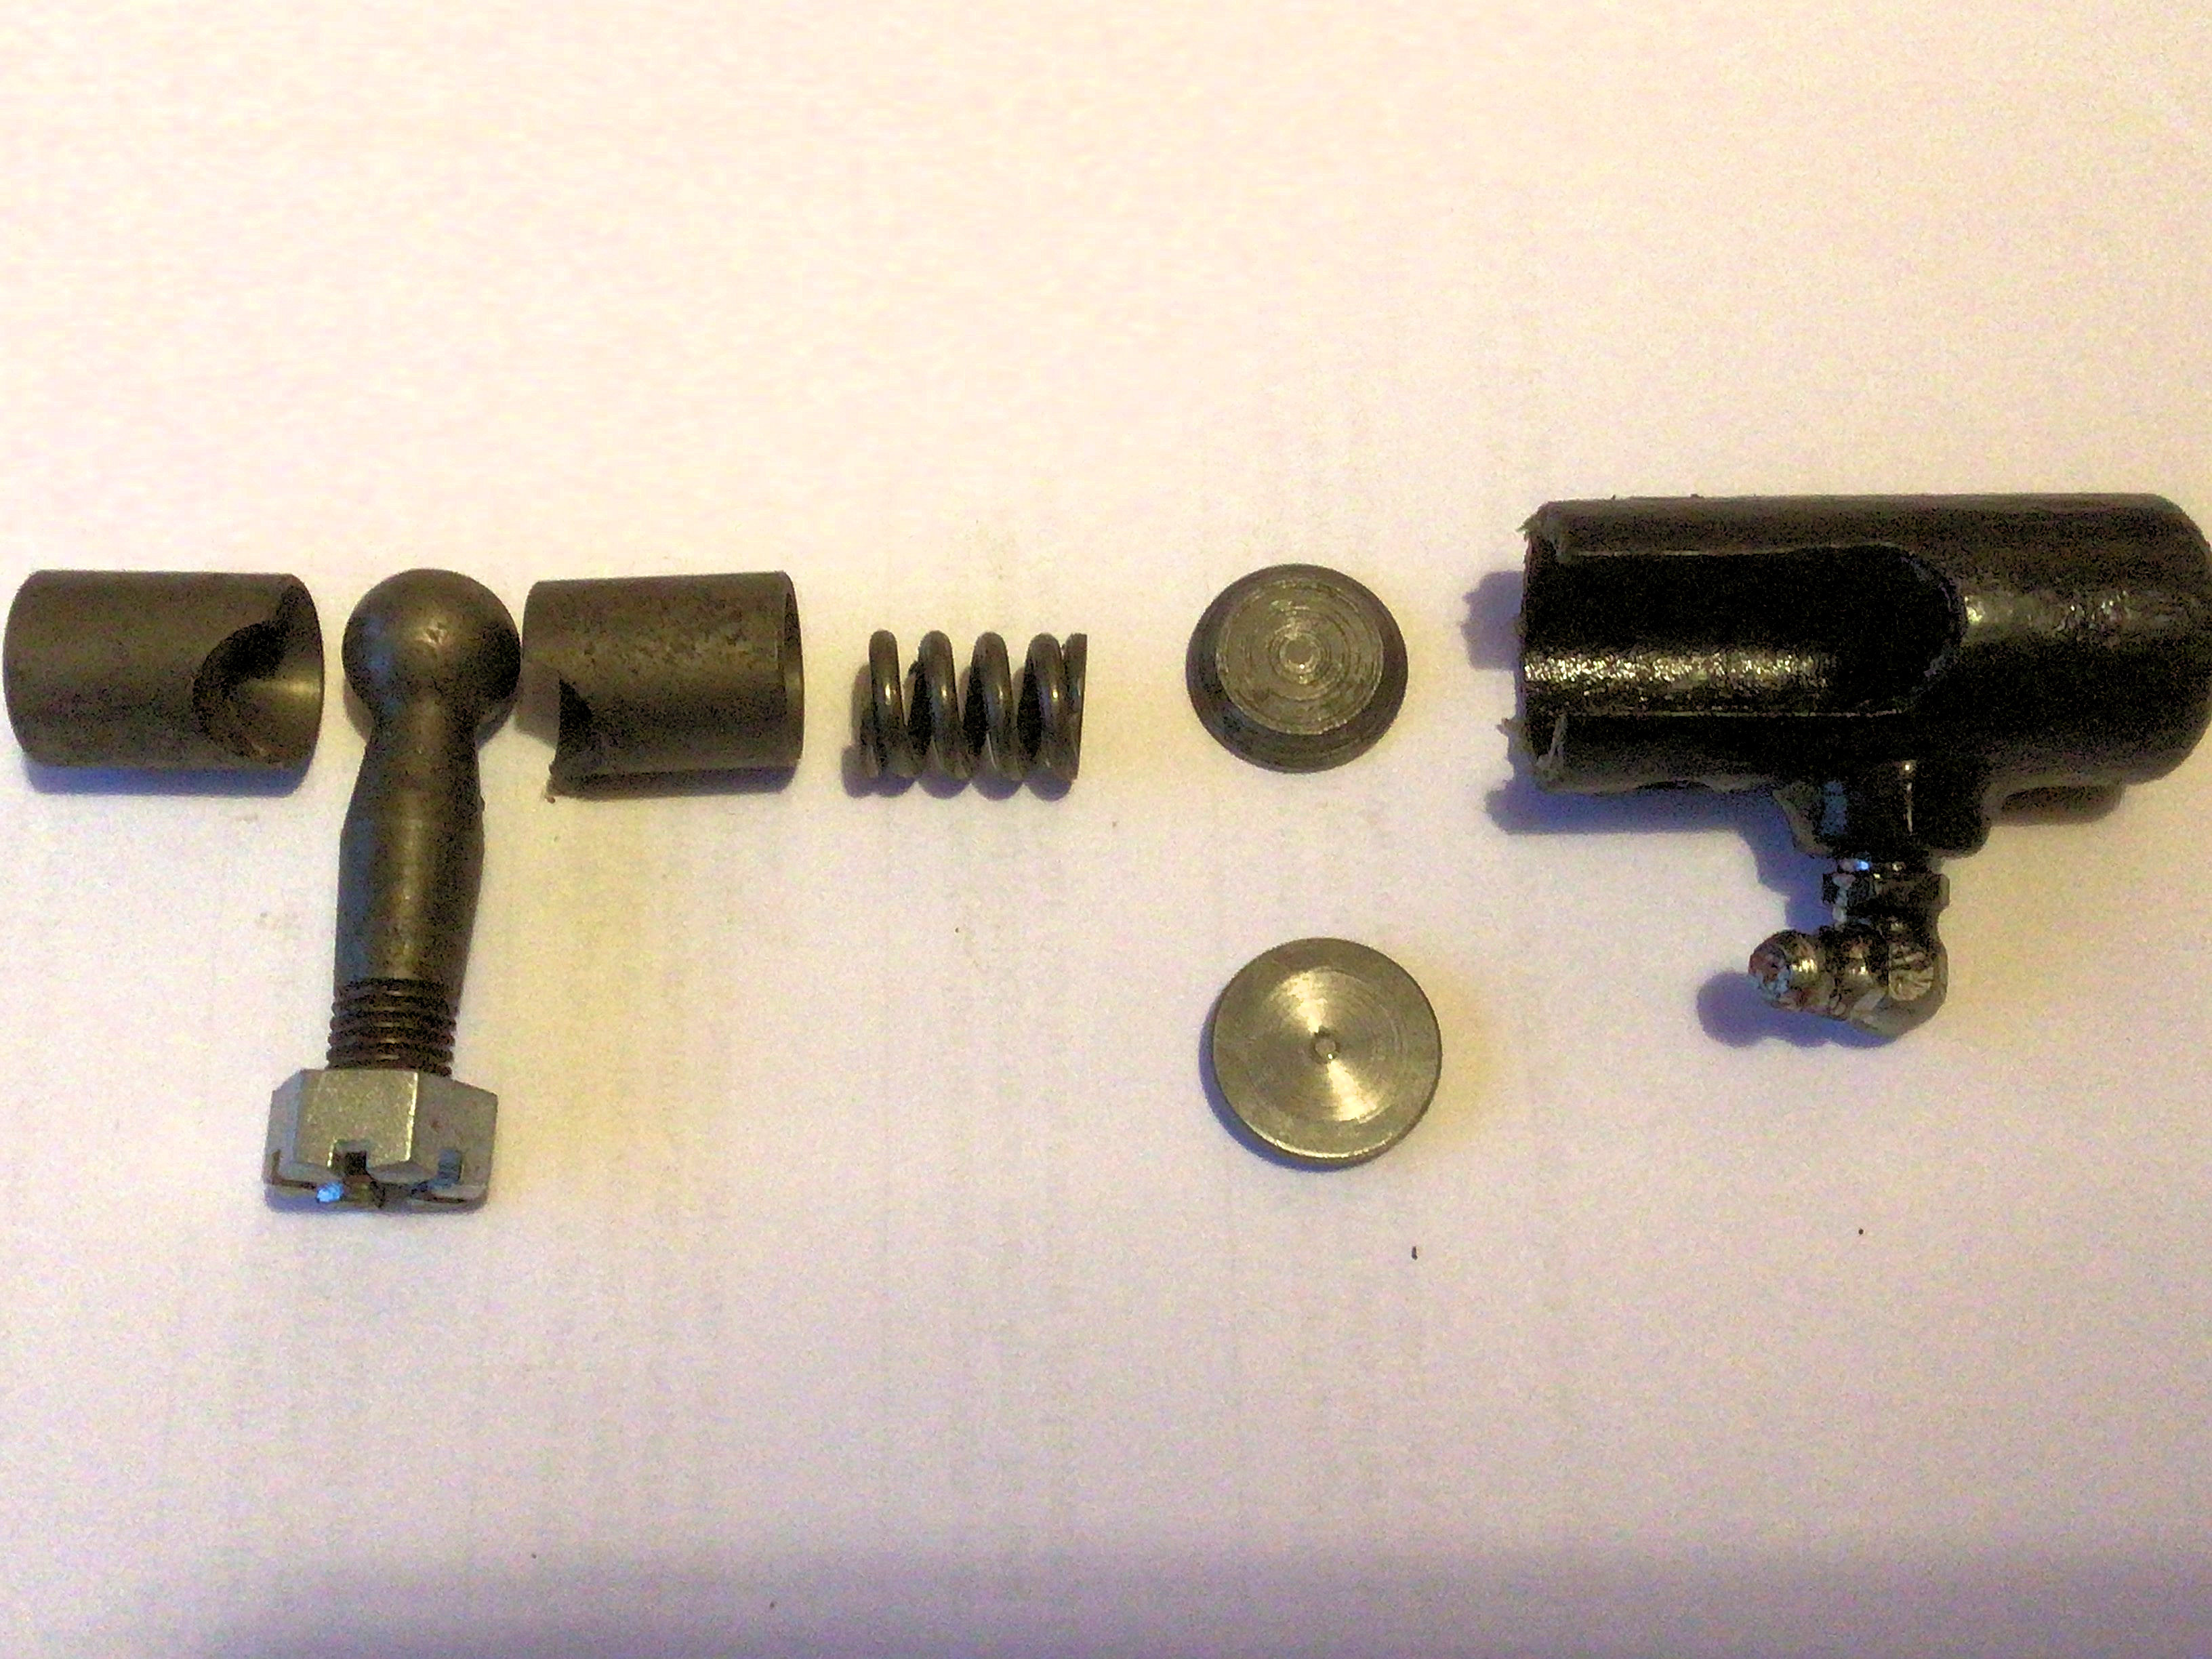 ching the rods to the stub
axles. Nearly there! Finally, the radius arms to be fitted complete with new
brass cups and bolt with it’s spring. This proved to be quite a struggle as the
bolt just did not want to go all the way through and I had to rig up G-clamps
onto the arms giving a base for a clamp to pull everything together. I still had
to use a nut to pull the cups in really tight and then I was able to move to the
front and Loctite the large nuts in place, back to the rear and fit the spring
and lock with double nuts, everything successfully completed.
ching the rods to the stub
axles. Nearly there! Finally, the radius arms to be fitted complete with new
brass cups and bolt with it’s spring. This proved to be quite a struggle as the
bolt just did not want to go all the way through and I had to rig up G-clamps
onto the arms giving a base for a clamp to pull everything together. I still had
to use a nut to pull the cups in really tight and then I was able to move to the
front and Loctite the large nuts in place, back to the rear and fit the spring
and lock with double nuts, everything successfully completed.
A really interesting project made
all that more possible by having the kit that made things just that bit easier
and of course enjoyable. The lathe was probably used the most, followed closely
by the fly press then the arc welder. Surprisingly, with hand tools I used my
set of parallel punches an incredible number of times, also the copper faced
hammer, and then just the general run of tools. I hope my report has been of
interest and perhaps is useful to members who may be faced with the same
project.
Richard Bishop DA7C