RADIATOR MAINTENANCE
(By Eddie Loader)
All Austin Seven radiators were designed to provide the engine with adequate cooling under all working conditions. With this in mind they are constructed with top and bottom collection tanks to hold the water capacity and the facility to abstract heat from the cooling water via the air flow through the core. Whilst all Austin Seven radiators look similar they can be classified into two types.
1) All Pre-Ruby Models:
These are originally of honeycomb construction and generally live a long and trouble free life. The very early models have the problem of insufficient cooling area but this was rectified by increasing the radiator height. The only other problem concerns the method of mounting the radiator to the surrounding cowl.
The original mounting consisted of two felt lined metal brackets supporting the bottom tank with the filler neck supported by a rubber ring to prevent it chafing where it passes through the cowl. This method provides excellent support providing the felt and rubber wearing devices are in good condition. Any deterioration or wear will result in damage to the bottom tank or radiator neck. These points need careful monitoring in original undisturbed radiators.
Early types with honeycomb cores can give many years of trouble free motoring with the advantage that if severely blocked the top tank can be removed and the core tubes manually cleaned. This cleaning method cannot be employed on the later type replacement cores. These are called “film sections” a term which relates to the method of construction.
2) Cowl-Fronted Ruby Derivatives
These again, if still in original condition, are trouble free and being of increased height do not suffer overheating problems.
However after many years of use one problem can arise with the method of mounting the bottom tank. The method employed was to soft solder two mild steel threaded rods straight into holes in the bottom tank. These threaded sections then locate onto pressed steel brackets in the engine bay. The radiator bottom rests on felt pads with springs, nuts and washers completing the location of the threaded sections. Everything is fine until the mild steel rods corrode and drop out with a resultant loss of cooling water. A suggested modification to the bottom mounting points is set out below and in the accompanying diagrams. It has the advantage of completely sealing the holes on the bottom tank.
The top support for the radiator is provided by a combined radiator and bonnet support bracket. This is very robust and gives few problems.
3) All Models — Coolant
To fill your cooling system use only the highest quality antifreeze. It is beneficial to leave it in all the year round as most modern antifreeze contains additives to reduce corrosion of aluminium and iron and to inhibit the build up of sediment in the cores.
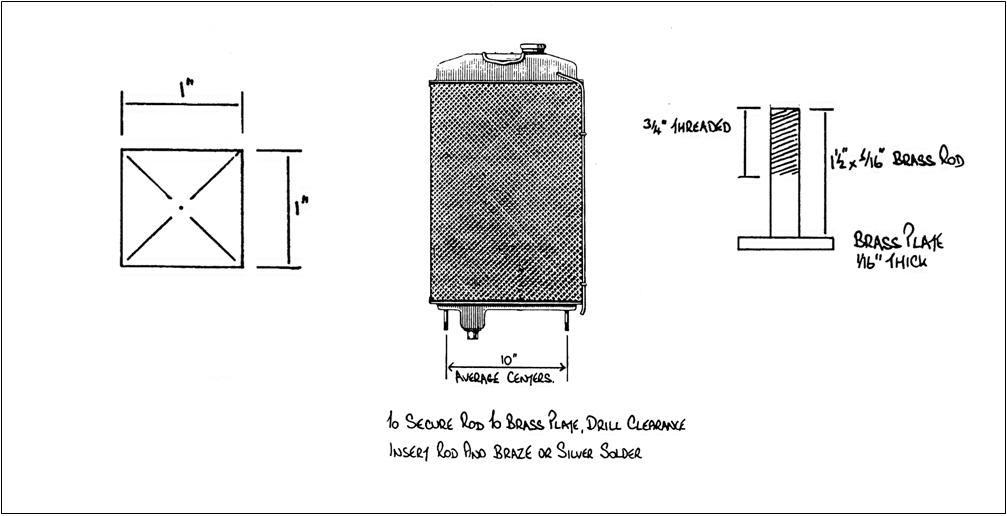
4) Modification To Ruby Type Bottom Mountings
1. Obtain two lengths of threaded brass rod 5/16” in diameter and 1 1/2” long.
2. Braze or silver solder these rods centrally onto a brass backing plate 1” square and 1/16” thick.
3. Carefully mark out the measurements of the engine bay support brackets onto the bottom tank, thus ensuring that the brass plates correspond with their counterparts in the engine bay when they are soldered into position.
4. The soldering of the brass plates to the bottom tank requires a certain amount of care and skill because of the risk of melting the solder joint between the radiator core and the bottom tank. Excessive heat should not be employed. If in doubt take the prepared plates and the radiator along to your local radiator specialist.
Eddie Loader