OIL PIPE PROBLEMS
(See below for how to do the
job properly!)
Having had the engine out for
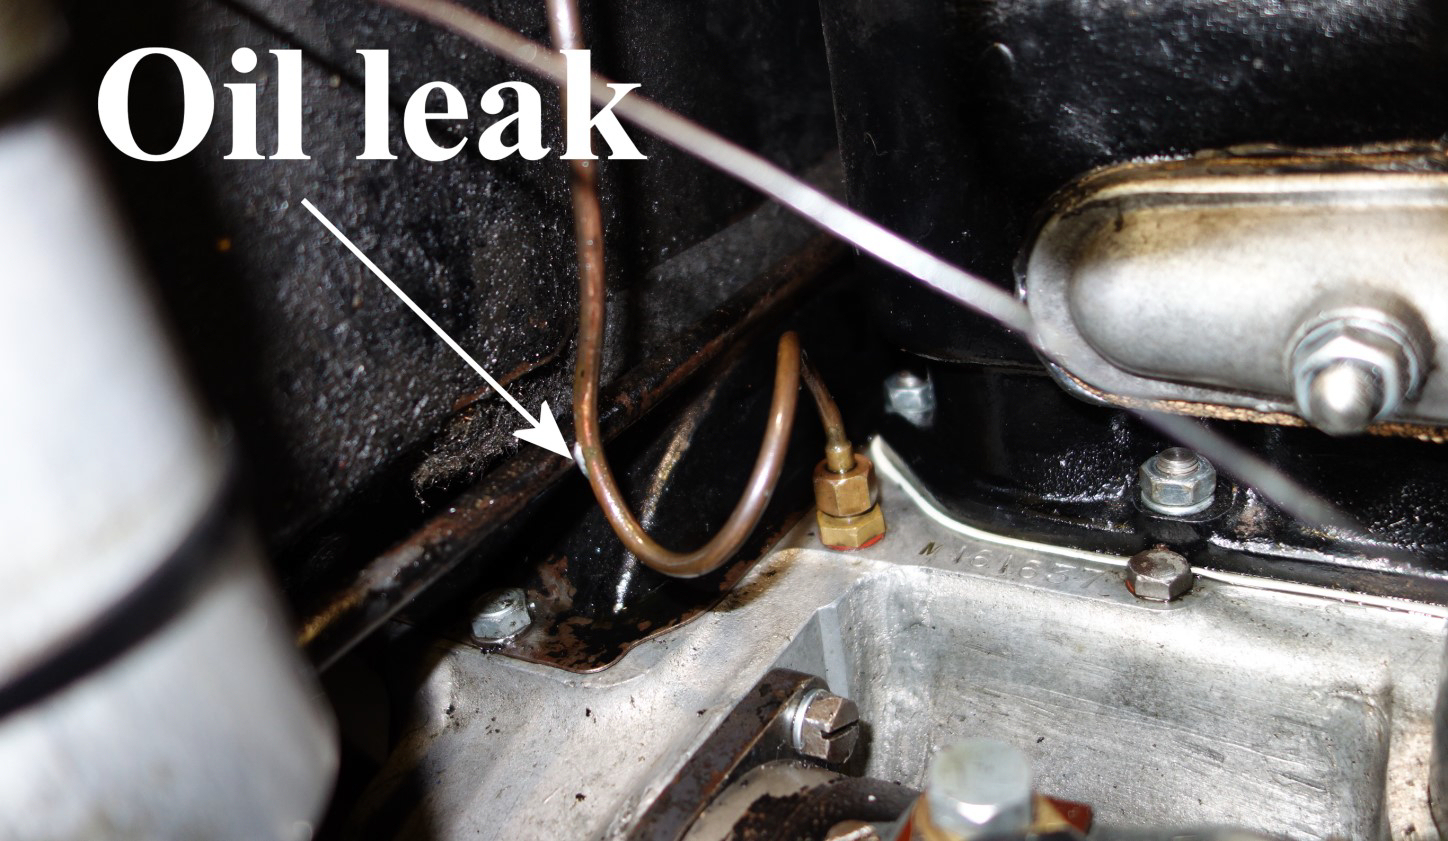
major work, after putting it back I noticed an increasing amount of oil round
the starter motor area, steering box and garage floor! My dear old Dad told me,
to find where an oil leak emanates from, find the highest point where you can
see the oily bits. This was a drip at the bottom of the curly bit of the oil
pipe up to the oil pressure gauge before it screws onto the crankcase. Further
investigation revealed the problem – and a warning to us all. On reinstatement
of the engine, the oil pipe had got pushed backwards slightly to rest on the
accelerator cross-bar. It had taken only a surprisingly short time for the
cross-bar to wear a small hole in the oil pipe.
This presents us with two solutions – repair or
replace and I tried both.
REPAIR. As the photos show,
 find a piece of copper pipe bigger in diameter than the 3/16” original that
will, ideally, wrap completely round it. Saw a 1” section of the repair pipe in
half lengthwise, open and close around the damaged area. Flux and solder the
repair and -bingo! – job done. Well, no, really. Roger warned me it wouldn’t
work. If there’s even the tiniest way out, oil will find it. The trouble is, the
only way to find out is to put the whole thing back in place, go for a ride and
come back home weeping.
find a piece of copper pipe bigger in diameter than the 3/16” original that
will, ideally, wrap completely round it. Saw a 1” section of the repair pipe in
half lengthwise, open and close around the damaged area. Flux and solder the
repair and -bingo! – job done. Well, no, really. Roger warned me it wouldn’t
work. If there’s even the tiniest way out, oil will find it. The trouble is, the
only way to find out is to put the whole thing back in place, go for a ride and
come back home weeping.
REPLACE. In the end this would
have been the simplest and quickest sol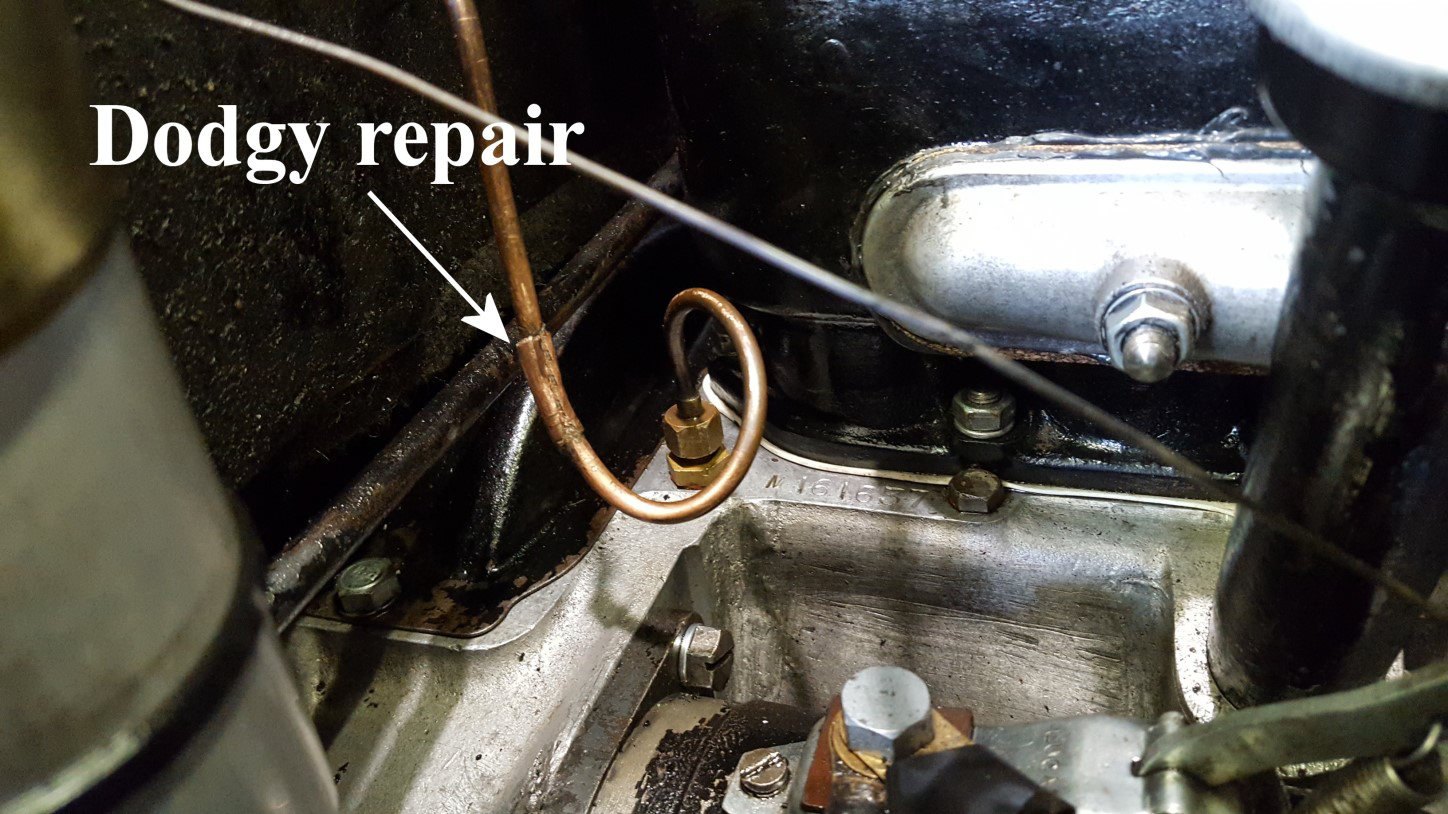 ution. Jamie at Seven Workshop sells the
correct nipples and nuts (1/8” BSP part no. E0571) and new copper pipe for small
change. (On a Box, you need a metre of pipe but check your length against the
old one before ordering). Also, soldering brand new parts was a doddle
and 100% successful even for a bungler like me. TIP: Before trying to bend the
new copper pipe into its wiggly shape, to save it cracking you must anneal it
first. In the case of copper this process is performed by heating the material
with a blow torch, until glowing, for a while and then slowly letting it cool. I
don’t think I got mine really hot enough and it was still quite stiff to bend
afterwards. Don’t be afraid of it melting, it won’t!
ution. Jamie at Seven Workshop sells the
correct nipples and nuts (1/8” BSP part no. E0571) and new copper pipe for small
change. (On a Box, you need a metre of pipe but check your length against the
old one before ordering). Also, soldering brand new parts was a doddle
and 100% successful even for a bungler like me. TIP: Before trying to bend the
new copper pipe into its wiggly shape, to save it cracking you must anneal it
first. In the case of copper this process is performed by heating the material
with a blow torch, until glowing, for a while and then slowly letting it cool. I
don’t think I got mine really hot enough and it was still quite stiff to bend
afterwards. Don’t be afraid of it melting, it won’t!
OIL GAUGE. It is possible to replace the oil pipe
without removing the oil gauge from the dashboard. However, I wish I had. On
tightening up the new fitting, I damaged the gauge because, unseen behind the
dashboard, the two little screws holding the gauge together at the back had
become loose with vibration over time and so allowed the internal parts to be
twisted round as I tried to tighten the holding nut. Moral – take the gauge out,
inspect it, and tighten all the little screws (4). On my Box, the hole in the
dashboard has two small cut-outs through which the two side screws on the gauge
will slip by rotating the gauge at an angle. The second time, with a spare, I
took the opportunity whilst the gauge was out of the car of putting a smear of
white Tippex along the pointer.
AND FINALLY. To check I had fitted everything correctly
and my soldering had worked, after a short run I did Daddy’s fingertip test
under the bend in the pipe and to my horror I was left with some oil on my
finger. However, only just before I had read an article in another club’s
magazine about oil vapour escaping from under the oil filler cap. On inspection,
of course there was no longer a rubber seal under the cap. With a quick use of
scissors and silicone rubber mat left over from re-building the engine, I
fashioned a ring, almost round, which served the purpose and the engine is now
(almost) oil-tight. Well, it is a Seven after all. What do you expect –
miracles? David Whetton DA7C
REPAIRING THE OIL PRESSURE PIPE
A LESSON LEARNED
Soldering the old nipples back
on:
1. Clean everything with brake
cleaning fluid and light abrasive paper to
 a
shiny finish.
a
shiny finish.
2. Apply load of flux both
inside the nipple and out.
3. Make sure both nuts are
still on the pipe and the right way round.
4. Push the nipple firmly over
the end of the pipe.
5. Apply heat from the bottom
of the nipple whilst touching the top of the nipple with solder wire and the
solder will disappear in between the nipple and pipe by capillary action.
Simple!
6. This is where my troubles
started! It didn’t look as if there had been enough solder so I put a load
more around the top of the nipple where it met the pipe just to be sure.
7. I then spent a good half
hour re-threading the pipe up through the instrument panel and was ready to
attach the nipples with their nuts.
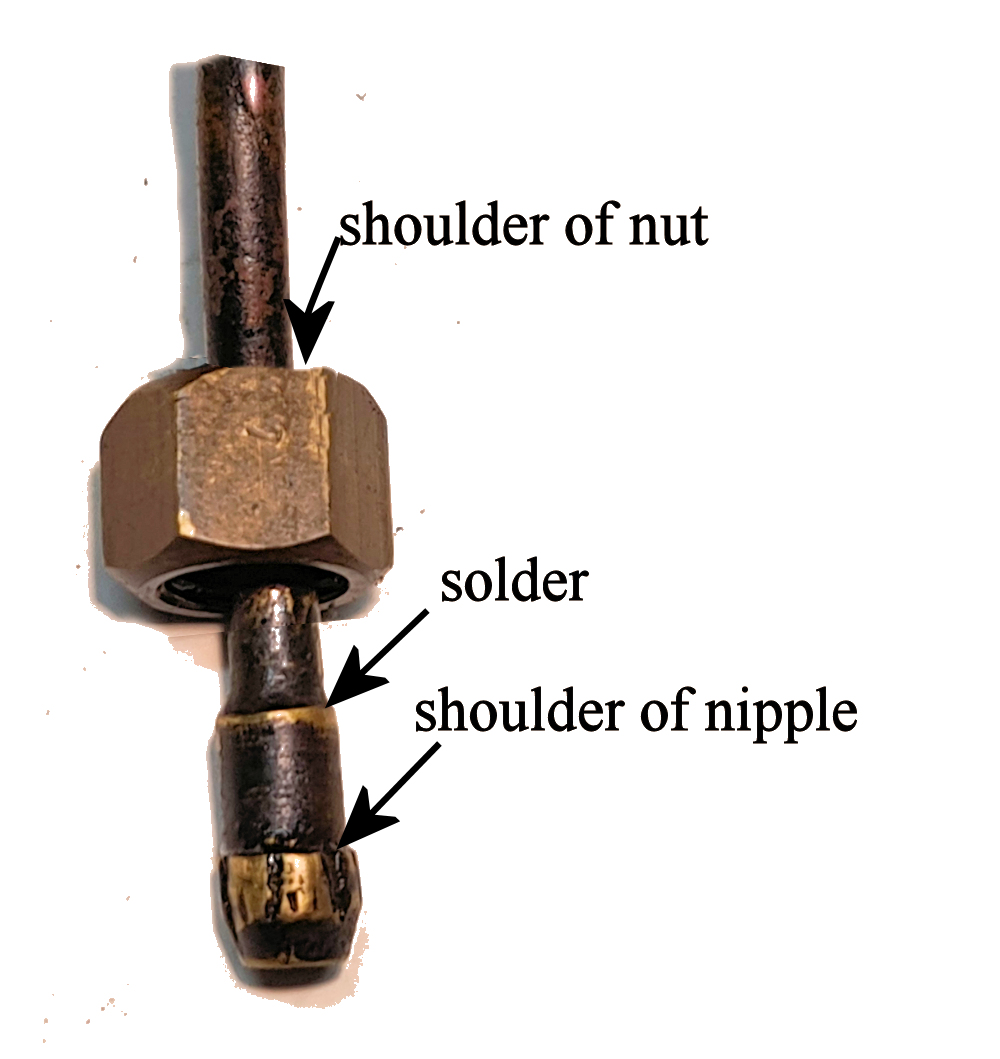
8. NUTS WON’T FIT. What
I hadn’t realised was that the inside shoulder of the nut slides over the shank
of the nipple right down to the shoulder of the nipple, not where it joins the
pipe. Having put on an extra layer of solder, the nuts couldn’t now go
over the top of the nipples as it’s a very tight fit. At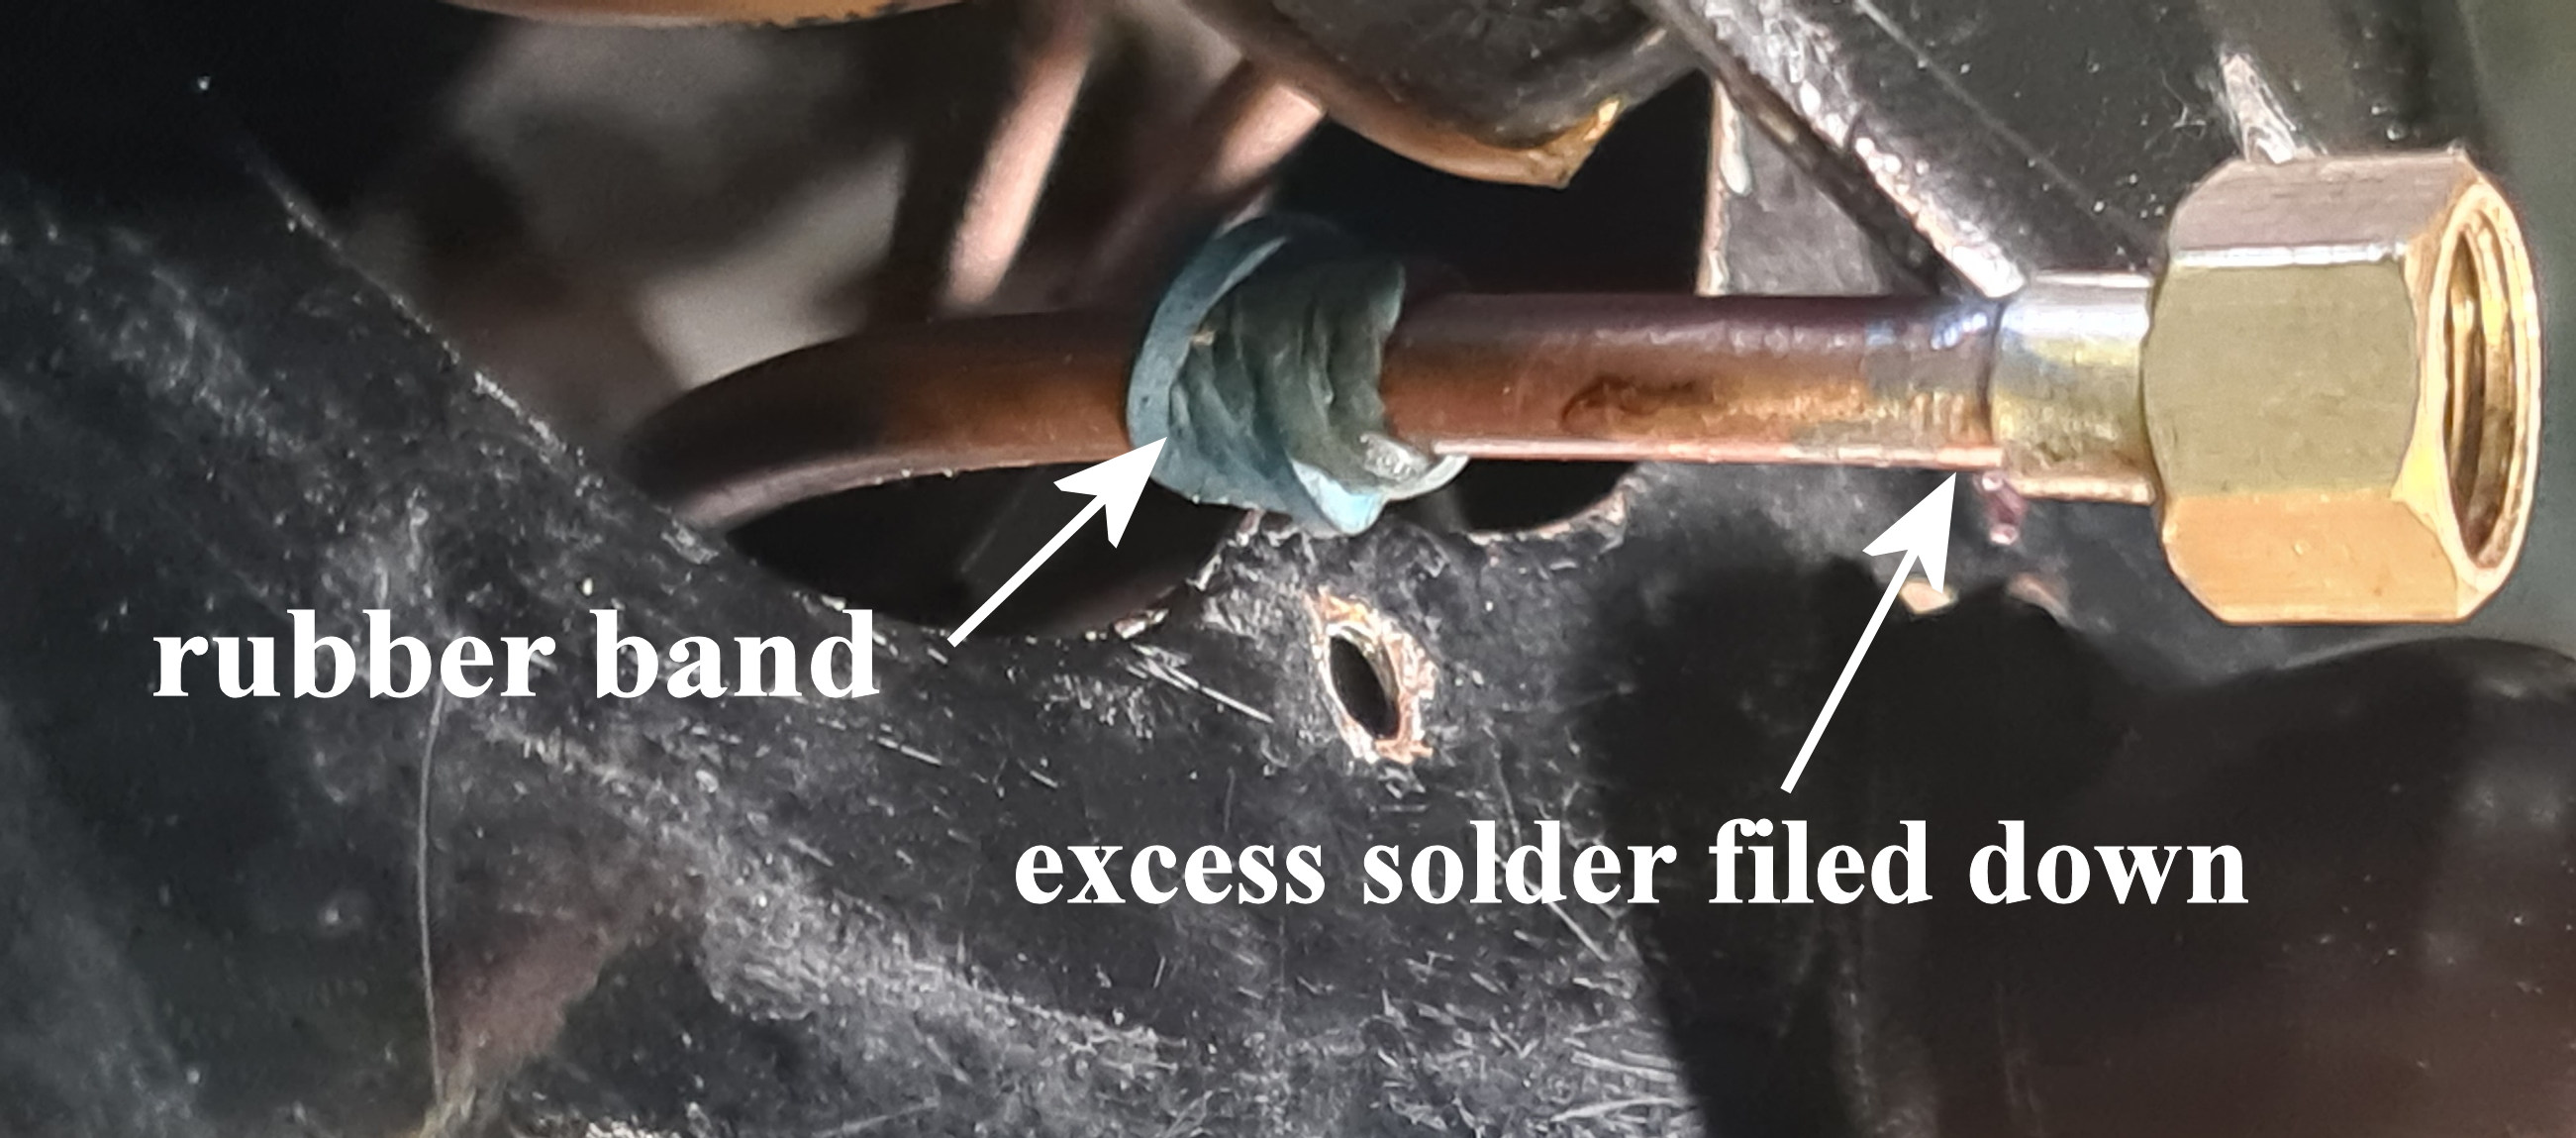 this point there are two options – take out the pipe and start again (the proper
way to do it) or try to file down the excess solder with a needle file until the
nut could slide over the shaft of the nipples (the bodger’s way). I won’t
say which way I chose but just to say it probably took a lot longer than the
‘proper way’).
this point there are two options – take out the pipe and start again (the proper
way to do it) or try to file down the excess solder with a needle file until the
nut could slide over the shaft of the nipples (the bodger’s way). I won’t
say which way I chose but just to say it probably took a lot longer than the
‘proper way’).
9. One little tip that
probably everyone else knows – to stop the nut sliding back down the pipe whilst
trying to match the nipple to the oil pressure gauge behind the instrument
panel, twist a rubber band over the pipe once you’ve got it through the grommet
and where you can get to it behind the panel.
10. It’s easy once you know how!!
David Whetton DA7C