Synchromesh has always been the biggest mystery in the gearbox. The objective is to ensure that gears that are about to be meshed, (by moving the gear lever) are actually rotating at the same speed so that there is no relative motion between them. Chamfers on the synchro teeth then gently nudge the gears forward or backward so that the teeth align with the gaps, (or roots). The gears then slip together without fuss.
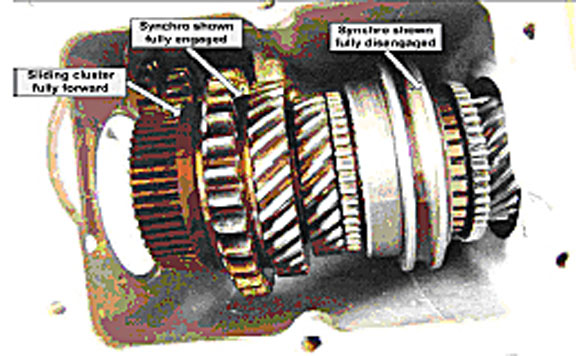
The top photo shows the reassembled gearbox with the selector forks removed. Here you can see the left hand gear pair fully engaged,(as the synchro ring teeth are completely invisible) whilst the right hand pair are fully disengaged.
When the gear lever is moved, the driver attempts to mesh a new combination of gears together. For this to happen, the teeth must engage with each other such that they have the maximum of contact area. To do this, they slide such that the centre line of one gear matches up with the centre-line of its mate. This is all very well when the gearbox is stationary, but when the car is moving, it’s a bit more complicated. In order to get the teeth to mesh, the tooth of one gear must align with the gap between the teeth, (the root) of its twin. As these are rotating at different speeds, (i.e. one is driven, one is still in neutral), we get the all too familiar grinding noise. Unless you have synchromesh.
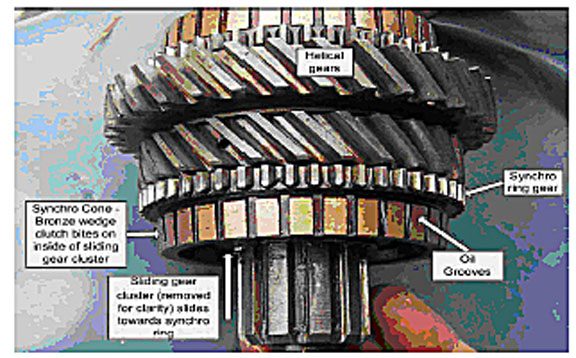
This is a mechanism that ensures that the teeth are not only rotating at the same speed, (and are therefore stationary with respect to each other), but are in the correct orientation for smooth engagement. The synchromesh acts as a separate clutch on each gear that is operated as the gear lever is moved. This “clutch” is made up of a segmented bronze cone which is pushed up against a matching hollow cone in the sliding gear. The cone is segmented so that the oil in the gearbox can flow around the chamfered faces and escape when they are fully engaged. (see
photo).
As the sliding gear is moved towards the fixed gear, the bronze cone comes close to the inside face of the sliding gear cluster . At this point, the drag from the oil in the gap starts to spin up the sliding cluster, reducing their relative speeds. As the bronze face is allowed to touch, the speeds of the two gears is the same, although the teeth might not be in quite the right position. The sliding gear moves a bit further, and now comes up against the wedge shaped teeth of the synchro ring.
The wedges nudge the gear round just a few degrees, to ensure that they are in alignment. Now the gear can be pushed fully home without any crunching.
In a tip-top gearbox, the synchros have small grooves machined in them. The objective is to increase the torque available at the bronze face by giving the oil an escape route. (Most of our cars may have lost the grooves, but this is not too serious). When the next gear is selected, the operation repeats using a separate synchro ring. Earlier boxes only have this capability on 3rd and 4th, though the box shown includes this in 2nd.
Gearboxes have always been one of the great mysteries of the power train. So we were very lucky in being able to attend Malcolm Watts and Andrew Jarmin's most excellent teach in. Especially having the chance to pull one apart with a safety net means that tackling a refurbishment and rebuild is a whole lot less daunting. Since the teach-in, Mike Davies and I have rebuilt a 2Syn box, (synchro on second gear as well as third and fourth) for his APD. I’m not going to give a blow by blow guide here, but we did encounter a couple of useful tips whilst doing it.
The box was stripped out completely, front and rear bearings replaced, together with a new bush between the 1st and 3rd motion shafts, drilled out to aid oil flow. The layshaft was put back in the box, and the 1st and 3rd motion (input and output) shafts refitted. The selectors were refitted, using new springs and balls in the selector forks.
First
tip: lubricate the springs with some light
grease but beware of overdoing it. The reason is that you have to push the ball
into the selector fork to allow the selector slide to pass over it. Too much
grease means that you have to force it around the ball to get the ball far
enough into the hole in the fork. You get a backpressure in the grease that
needs an almighty shove to displace! Ok, so far so good. All three selector
forks and shafts in place.
Second tip: drizzle a little 30 grade oil over the gear clusters, because with new springs and balls, you are going to need all the help you can get to change gear just by sliding the forks, (remembering to try this out before fitting the gear lever and gate).
Third Tip: Now, the VITAL part about setting up the positions of the gears by adjusting the positions of the selector slides. It is absolutely essential that when the gear selection is in neutral, NO LOAD is applied to the synchro cones. This is best felt by turning the box over by hand and checking for free running of the output pinion without turning the input shaft. Failure to do this properly will result in the synchro cones being worn away extremely quickly once the gearbox is back in the car. I found that it isn’t adequate just to set the slides so that neutral was in the middle of the gate; you need to be a bit more careful in setting the positions.
Fourth tip: If you have a mod to include input or output shaft oil seals, (as Malcolm has described in an earlier article), it is very much easier to set up the adjustment BEFORE the lip seals (or rather the housings holding them) are refitted. The reason for this is that I found it too easy to convince myself that the resistance to turning I felt through the box was caused by the nice new seals, when in fact I was feeling some resistance due to the synchros dragging, (not properly releasing in neutral). This is the rapid wear position that must be avoided. The slides were carefully moved (with the gate in position) so that there was very little resistance to turning. The slides were then centred so that they were midway between the two positions where the gearbox starts dragging. I found these two positions to be about a half a turn apart, meaning that the setting was done to about +/- a tenth of a turn. This takes a little longer with a 2Syn box, as you need to ensure that the synchromesh doesn’t drag on either shaft; non 2Syn boxes only have this situation on 3rd/4th. I went round this a couple of times, each time getting less drag.
Fifth tip: When adjusting the selector slides, refit the lock nuts and just keep them nipped up. This is important for the type with the flat on the slide for 1st/2nd, as failure to do so means that the gearbox keeps jumping into 1st as well as 3rd - and the whole thing locks solid! Obviously this can’t happen once the gate is refitted, but it is a bit frustrating during set-up. After setup, don’t try to tighten the nuts without holding the slide in position with a screwdriver – or it all goes out of adjustment again.
Sixth tip: Rather than chew off the end of your finger, slide the clutch plate back into the input shaft and use this to turn the gearbox over. You can still feel any drag but it is much easier to control. You’ve got this right when it spins easily under finger pressure.
All set up, the gearbox now had its end plates refitted, one for the clutch thrust bearing and the other for the speedo drive. When it comes to refilling the box prior to driving, there is one other important consideration.
Seventh tip: DO NOT use a Molyslip / Wynnes / STP additive in the gearbox oil. The reason for this is that these additives are designed to cut down on friction. Perversely, the synchros actually operate by friction, as they form little clutches that connect pairs of gears as they are moved together. Adding a very slippery lubricant simply means that the synchros won’t do their job. Instead of spinning up the gears so the speeds match, they’ll just slip. Also, these additives are very difficult to get rid of once they are on the faces of the gears – you can’t just drain and refill. Incidentally, on my Box saloon, I’ve found that the gearbox benefits from having a single weight (SAE30 – Penrite) oil, rather than multigrade oil, as the multigrade is a little too thin.