The Art of GRINDING A DRILL
Sourced by member John Pearce from the Motor Digest 1946
A
TWIST drill is perhaps one of the most commonly used cutting tools in the workshop, yet one can safely wager that the drills found in the average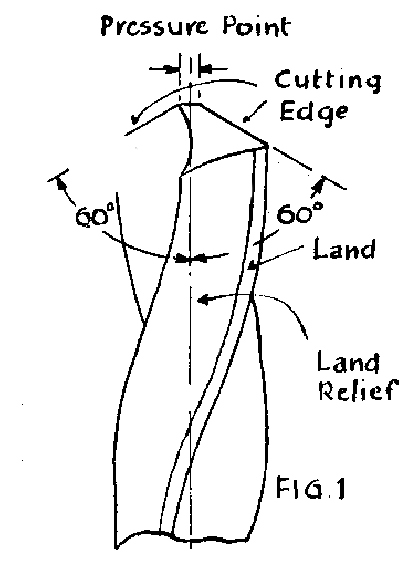 garage repair section are comparatively well cared for if 50% have anything like
a present able form and edge. Very few mechanics seem to acquire the art of
grinding a drill correctly, while it is universally admitted that a blunt,
ill-shapen drill wastes energy and time, and can cause much spoiled work. Most
old hands learned to grind drills originally by verbal instruction from one who
knew, and subsequently by long practice. The " one who knows " is not always
available, and the " long practice " must be condensed into a short time under
modern conditions, so we must see how far the employment of logical commonsense
can help in enabling a beginner to master this achievement, so that his drills
are always in good condition. Our best guide is, therefore, careful observance
of the features in a new drill, ground by the manufacturers, so that our
reground drill possesses the same efficient cutting edge. ' Fig. I shows the
working end of a standard drill, from which we see that the two cutting edges
are each 60° from the axis line, the central pressure point is on a line at 90o
to the axis and is short, compared with the length of cutting edges.
garage repair section are comparatively well cared for if 50% have anything like
a present able form and edge. Very few mechanics seem to acquire the art of
grinding a drill correctly, while it is universally admitted that a blunt,
ill-shapen drill wastes energy and time, and can cause much spoiled work. Most
old hands learned to grind drills originally by verbal instruction from one who
knew, and subsequently by long practice. The " one who knows " is not always
available, and the " long practice " must be condensed into a short time under
modern conditions, so we must see how far the employment of logical commonsense
can help in enabling a beginner to master this achievement, so that his drills
are always in good condition. Our best guide is, therefore, careful observance
of the features in a new drill, ground by the manufacturers, so that our
reground drill possesses the same efficient cutting edge. ' Fig. I shows the
working end of a standard drill, from which we see that the two cutting edges
are each 60° from the axis line, the central pressure point is on a line at 90o
to the axis and is short, compared with the length of cutting edges.
Now, observe that each cutting edge is ground back, or relieved so that the actual end surface in contact with the material being drilled is confined to the edge only. The land of each cutting surface extends right down the drill, and each is also relieved so that only the land surface is in contact with the side of the hole being drilled-the function of the land edges being, of course, the' sizing and burnishing, of the hole. Worn lands cannot be reground.
In course of usage the cutting edges wear and become rounded, so
that grinding is necessary. In doing this we must remove a small amount of metal
to restore the edge, as shown in Fig. 2. If a drill is broken, the end must be
reground and this calls for a little more care and skill, as we have no guiding
contour to follow. The web thickness of a drill increases along its length, so
that a broken drill will need thinning at the web to narrow down the pressure
point to its correct width.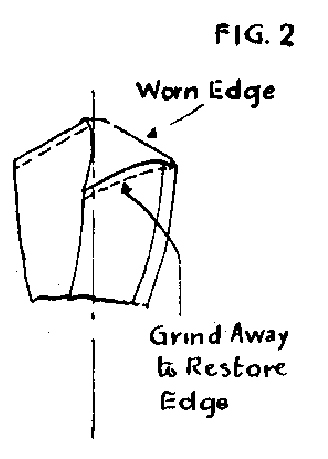
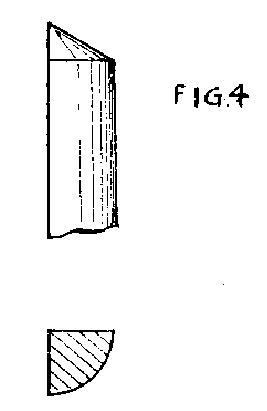
Firstly, then, let us analyse how the edge contour is determined. Imagine the drill having no flutes milled along its length, but the end ground to the correct angle. We now have a geometrical cylinder with conical end, the side of the cone being 60° from the axis, as outlined in Fig. 3. If we now quarter the cylinder down its axis we have a form as shown in Fig. 4,the plan view of which fairly represents one of our drill cutting edges, but without the relief ground away from the edge proper.
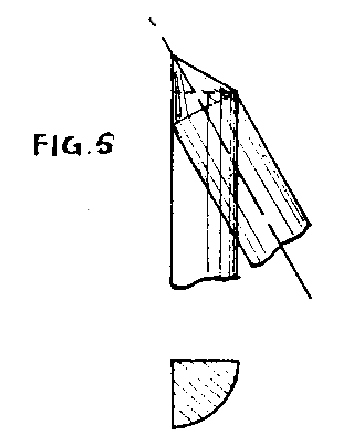
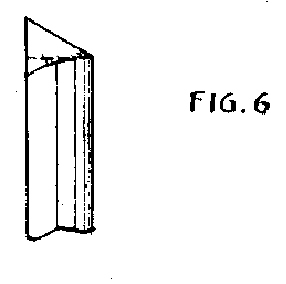
The shape of this relief can best be visualised by imagining another cylinder of smaller diameter and having a sharper conical end, merged into our first cylinder in such a way that its conical edge aligns with the cutting edge on one side and with the trailing edge on the other, as sketched in Fig. 5. If the conical surface of our first cylinder is ground away until it coincides with the conical surface of the second cylinder the resulting contour is something like the form we must produce, the general shape being indicated in Fig. 6.
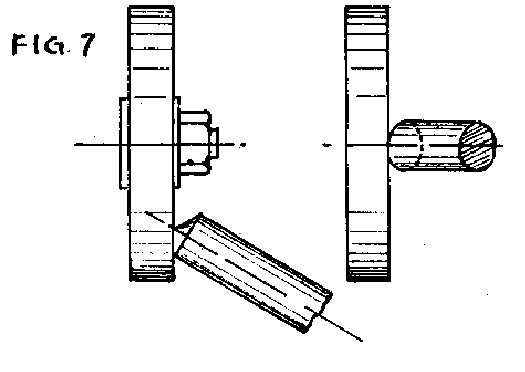
Now, to transfer this idea into practice the beginner should take a
piece of round mild steel (say t in. diameter) and grind a true i20' conical end
on it by holding on the emery wheel in the position indicated in Fig. 7. Note
that the axis of the work must be parallel with the diameter of the wheel face.
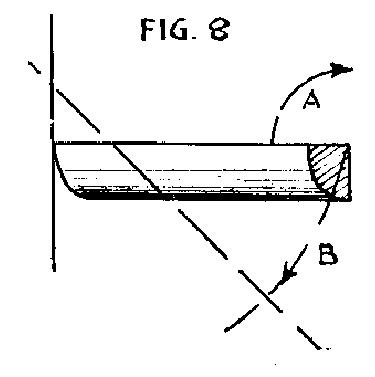
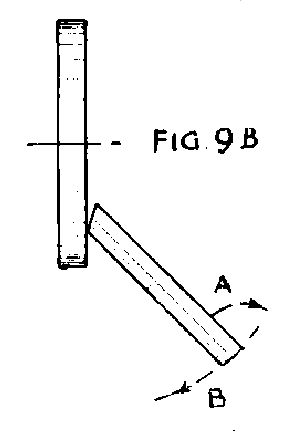
The work should now be sawn lengthwise into four quarters. Now offer the leading
edge to the wheel face, when we see that by rotating the work a quarter-turn in
direction of arrow A we are merely following the existing conical contour. If
the work is moved in an arc B at the same time as the quarter turn is
made-keeping the apex of the cone at the same point relative to wheel centre-we
find that the conical surface lifts away from the wheel surface.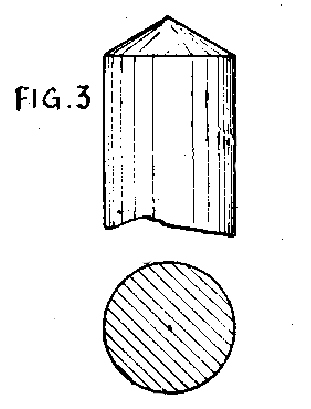
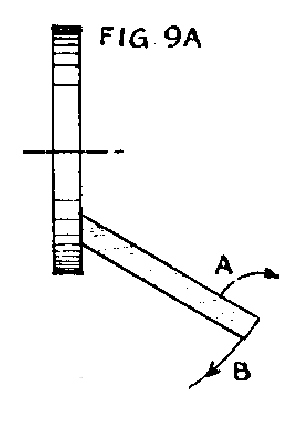
Fig. 9A shows the position of the work at commencement of movement A and Fig. 9B indicates the resultant position due to movement B at the finish of movement A. Our object now is to continue the two movements- repeating both in unison. Until the point of our quarter-cone remains on the wheel surface throughout the movement. Practise this movement with the four quarter-cylinders, until the resulting contour resembles the cutting face of the drill, gauging the extent of movement B to produce the correct shape. Too much backing-off weakens the drill and encourages breakage, while not sufficient causes friction heat.
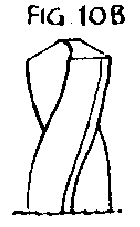
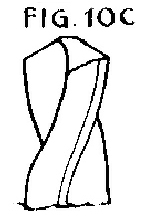
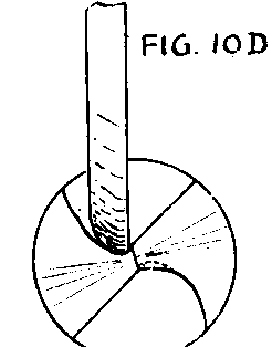
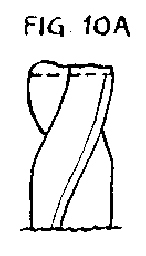
A broken drill must first be ground flat at the end (Fig. 10A). It must then be ground to correct conical shape (10B). The third operation is to form the backed-off relief (Fig. 10C), and finally, a knife-edge emery wheel must be used to thin down the web, as shown in Fig. 10D.
A little practice on these lines will be found immensely helpful in getting the hang of drill grinding. Golden rules to remember are:(1) Keep the drill cool by frequent dipping in soluble oil or soapy water. It should be always wet, as this also helps the grinding. (2) Use a smooth-grit wheel with a true surface, running at high speed. (3) Take time and do not rush the job. Once a drill has overheated through dry grinding at heavy pressure, its temper is destroyed and it will not retain a keen edge. (4) Make sure both edges are at equal angles to the axis.
 eyes
and face.
eyes
and face.