FRONT WHEEL HUBS AND STUB AXLES
(From the Scottish A7 Club’s Excellent Newsletter, Meshing Point, with many thanks)
Once the results of ‘wear & tear’ become obvious by the jacked up road wheels showing some movement out of the vertical, no matter how slight, it is time to act, pronto! Not only will it not go away by ignoring it, it can only get worse at an ever accelerating rate. Having first established that the play is not in the hub itself requiring adjustment of the bearing retaining nut, the Kingpin & Bushes are our objective.
Dismantling
Dismantling the hub is a relative simple procedure provided certain precautions are observed and you have the essential hub puller. First, a thorough cleaning operation of the whole hub is helpful, remove and bin the split-pin from the bearing retaining nut, (I never re-use split-pins) remove the hub filler plug before removing the outer part of the hub to avoid possible collision with the ball race. Slacken off the brake adjuster before removing brake shoes. After removal of track rod & steering arm links, brake cable and brake back plate, slacken off the kingpin cotter nut two or three threads and apply a sharpish thump via a suitable drift sufficient to loosen the cotter. Do not try to remove completely. The cotter face has a half-moon shape surface so will only move a very short distance to free the kingpin. Hopefully, the kingpin will be found to be an interference fit which can be driven upwards with the aid of a suitable punch along with the top core plug on later cars. On cars earlier than ’36 the top of the kingpin may be covered by a screwed brass plug. The cotter pin can now be removed.
Replacing
With the stub axle now in the bench vice, remove old bushes driving the top one
down and the bottom one upwards. Before fitting the new, well-oiled bushes,
you’ll find it easier if you slightly taper one end of each up to 1/8in. Do not
hammer in, they should be pressed in with the aid of a G-clamp or similar. They
will then require to be reamed out with a parallel reamer to accommodate the new
kingpin. During the process of reaming, repeated attempts at fitting the kingpin
should continue until an easy free fit is obtained, leaving only sufficient room
for grease. Don’t forget to refit the kingpin cap and drill a hole in line with
the grease nipple.
Yes, but what if the kingpin was anything but a snug fit in the axle? Whatever required action now will depend on how much wear has taken place. This could range from boring out the axle eye to accommodate an oversize kingpin and appropriate bushes, or, if the amount of wear justifies it – boring out the axle eye to accept insertion of a hardened steel 9/16in bush and reamed to take a standard size kingpin. The next alternative hardly bears thinking about, the wear being such that the axle eyes will require to be shrunk, requiring the attention of a specialist. Hopefully, that scenario does not apply, and we can start re-assembly.
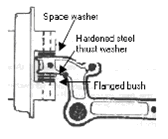
Re-assembly
The first priority is to ensure that there is no vertical play in the stub axle. After fitting the hardened steel thrust washer on the flange of the bottom bush, fit a space washer of a suitable thickness to take up any space at the top of the axle eye. Ensuring the half-moon shaped recessed cotter pin is in good condition, or better still, a new hardened steel one is in position, the kingpin can be inserted into the graphite greased bushes. The cotter should be tightened firmly. Thereafter, replace the components in the order they were removed. Having assembled both hubs, connect the track rod arm assembly and check the steering lock extremes for free and easy movement. Finally, with the wheels back on the ground, check and adjust the front wheel alignment if necessary, to ensure it is as near to but not more than 1/8in toe-in as can be achieved.
Travel safely, John Mckay.