 In
action, the main body of the drill has a working clearance of only the two lands
making contact.
In
action, the main body of the drill has a working clearance of only the two lands
making contact.
From The Light Car May 18, 1940.
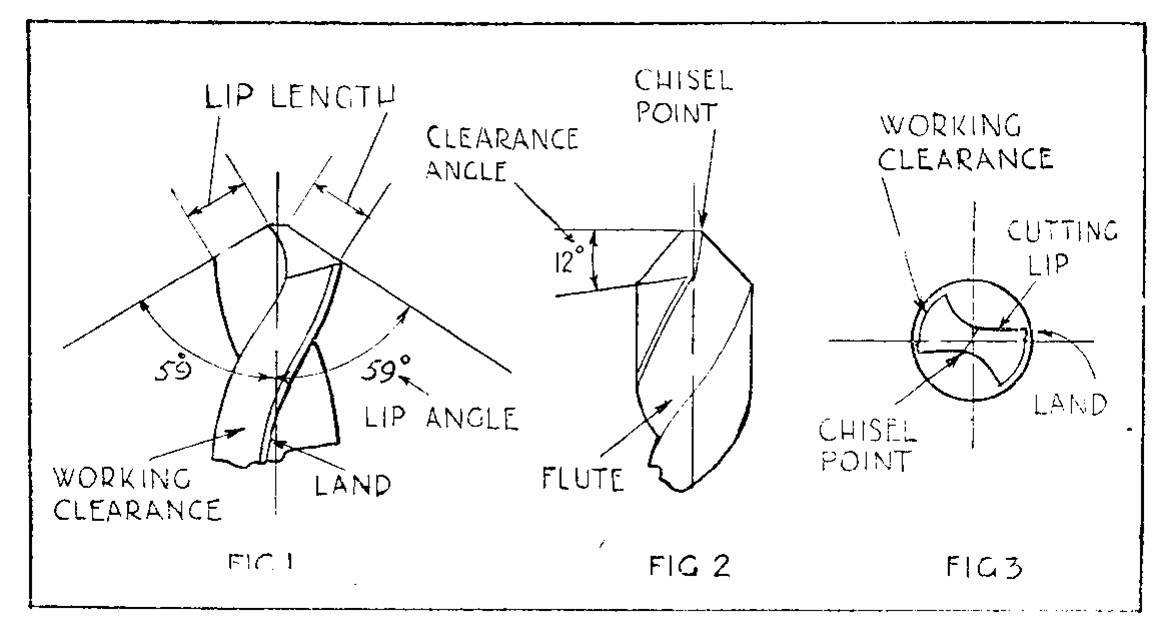
DETAILS of a Twist Drill.
Lip angle and clearance angle
are important and the lips must be of equal length or the chisel point will be
out of centre with the axis.
In
action, the main body of the drill has a working clearance of only the two lands
making contact.
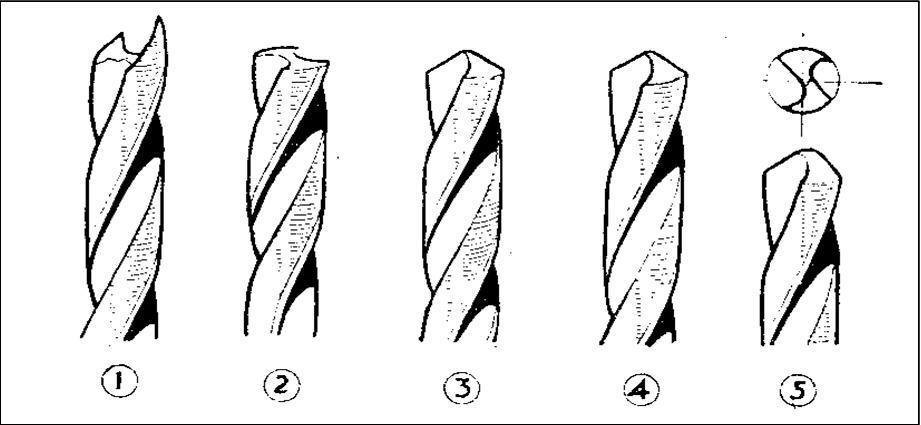
Sharpening the Drill
Whatever the quality of a drill, however, it will require sharpening occasionally, and that is an extremely tricky business. The work is done by holding the drill against a high-speed abrasive wheel, but the manner in which it is held and the twisting motion that must be imparted to it whilst in contact with the wheel are of a nature most difficult to describe - and even more difficult to acquire.
There are plenty of experienced mechanics who cannot correctly grind a twist drill, in spite of knowing exactly how. Because of this, special drilling machines, in which the movements are mechanically controlled, are almost invariably used in factories where perfection is essential to production.
We will be content, however, with something a little short of perfection, so let us see what we can do. Sketches on these pages show the end of a correctly ground twist drill; they should be studied in conjunction with an actual drill so that the various features may be clearly understood.
The two cutting lips (Fig. 1) should slope at an angle of 59 degrees and, to provide clearance, they are backed off (Fig. 2) 12 degrees, i.e., the surface has a kind of backward slope so that only the cutting edges of the lips make contact with the work.
With the lip and clearance angles correctly formed, the drill "point" will be chisel-shaped and sloping as shown in Fig. 3 and the drill will cut equally with both lips, producing long curling shavings. If the lips are not of the same angle only one will cut and an oversize hole will result; if there is no clearance angle the edges cannot make contact with the work, thus they will not cut at all.
Grinding should be done on the side of the abrasive wheel as to use the periphery would result in a hollow-ground effect. The ideal cutting angles already mentioned are by no means easy to produce by hand; if possible a gauge should be used for checking them. One can buy a drill-grinding gauge quite cheaply and it will well repay its cost.
Great care must be taken when grinding a drill to avoid overheating it. The small sizes heat up very quickly; one should therefore take only light cuts and have a pot of water handy into which the drill can frequently be dipped for cooling. A drill that has been overheated will be soft and no more use. An assistant will be needed to turn the handle of the grinder as two hands are required to hold and manipulate the drill.
Drilling
We can now turn to actual
drilling operations. By reason of its chisel "point" a drill must be guided at
the beginning of the cut, otherwise it will wander. One therefore uses a centre
punch to indent the metal at the spot where the hole is to be made; this gives a
true start to the drill. Sometimes, however, it will still try to “run out." A
larger centre punch indent
 may
cure the trouble, or it may be necessary to make another indent at the edge of
the existing one. There are, in fact, many ways of "drawing" a drill when the
hole is being started - one can hardly detail them here but they must be
employed before the countersink of the drill gets below the surface of the
metal. When once the parallel portion comes into action it is practically
impossible to make any correction.
may
cure the trouble, or it may be necessary to make another indent at the edge of
the existing one. There are, in fact, many ways of "drawing" a drill when the
hole is being started - one can hardly detail them here but they must be
employed before the countersink of the drill gets below the surface of the
metal. When once the parallel portion comes into action it is practically
impossible to make any correction.
When drilling large holes it is a good plan to make a pilot hole first with a small drill. This will prevent the larger drill's tendency to wander and will also reduce the effort needed to turn and push it. The pilot drill should be about equal in diameter to the width of the large drill's chisel point. An oversize pilot hole may cause the bigger drill to judder and make an irregular-shaped hole.
The rotational speed of a drill depends upon its diameter and upon the class of metal being drilled. One has not much choice of speed with a hand brace, but one can at least turn it faster when drilling brass and other soft metals than when operating on steel or cast-iron. The normal speed for ¼ -in. carbon steel drill in brass is 855 r.p.m.; in cast-iron 565 r.p.m., and in steel 397 r.p.m. With a 1/16 in. drill the speeds are greatly increased, being, in the order given: 3,544 r.p.m., 2,383 r.p.m. and 1,712 r.p.m.
These last-named speeds cannot be attained with a hand brace, but something very much lower will serve equally well for ordinary work. Steady turning and an even pressure should be the chief aims, but the pressure must be reduced when the drill begins to break through the other side of the work, otherwise the lips may catch and the drill will be broken. The tendency to catch can usually be felt; the drill should be drawn back a little, then advanced very gently whilst being turned slowly. It is a good plan, in fact, to turn the chuck itself by hand instead of using the geared-up drive; in that way one can “feel" the cut so much better.
Choice of Lubricants
With hand drilling the question
of lubrication is not very important; it does not matter much if the drill is
run dry. Better, and easier, work will be done, however, by the use of a little
lubricant when drilling steel. Thin engine oil will serve quite well; for very
small drills saliva has its merits, and is always handy, but it has rather bad
rusting tendencies. Kerosene is a good drill lubricant for aluminium, and
beeswax should be used on copper. Brasses, bronze and cast-iron are drilled dry.
Hardened metal cannot be drilled by normal means; to attempt such work will
result merely in blunted drills. If a hole is essential the metal must be
annealed (softened); it can then be drilled and re-hardened. This, however, is
usually a job out side
the scope of an amateur.
side
the scope of an amateur.
Never try to work with an obviously blunt drill; it may break off in the hole and great difficulty will be experienced in extracting the broken piece. A blunt drill also tends to overheat and, if forced, may have its temper drawn so that, even when re-ground, it will be too soft for further use.
When drilling a hole of any depth, or right through a thickish piece of metal, the drill must be carefully guided by keeping an eye on the angle at which the brace is held. It is not easy to drill accurate holes by hand, but with a bench drill there should be no trouble, provided that the work is set up flat on the table of the machine. For drilling round material - rods and so on - at right angles to its length a pair of vee-blocks will be found invaluable. They stand on the machine table and hold the work perfectly steady. If the pocket will run to it a drilling vice for bolting to the table will prove of
AIDS TO ACCURACY
A scribed circle, dot punched as shown (left), should be used as a guide to accurate drilling. If the drill wanders it can be drawn back by making a new indent and grooving the countersink (right).
 great help with some jobs.
Other worth-while drilling aids are a steel try-square, a scriber and a slide-gauge for measuring drill diameters. These things are needed, however, only if serious repair work is in view, and if the amateur is prepared to learn how to use them. For the odd holes that may have to be drilled once in a blue moon a hand brace and a few cheap drills will be ample equipment.