Converting a 1932 RN to semi-Girling brakes
By Roger Bateman DA7C
The
semi-Girling brakes that were standard on late Rubies are generally considered
to be superior to those fitted to earlier Austin
Seven models in order to handle the greater weight of the later car.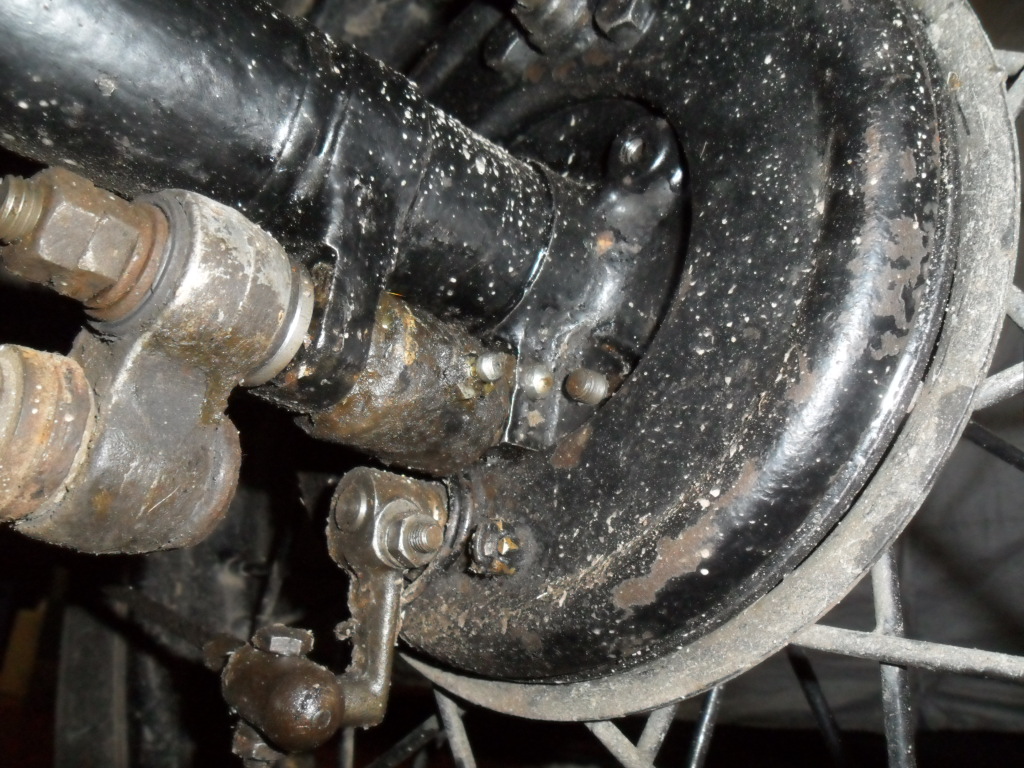 This was
achieved by using the successful Girling system of expanding plungers to operate
the shoes. They were called ‘semi’ because they only actuated one end of each
shoe, whereas ‘full’ Girlings (on other makes of car) had actuators at both
ends. Other changes from the earlier type of Austin Seven brake included greater
leverage from the cams, cast iron brake drums, adjusters on the back plates and
a cross shaft that incorporated a compensation system.
This was
achieved by using the successful Girling system of expanding plungers to operate
the shoes. They were called ‘semi’ because they only actuated one end of each
shoe, whereas ‘full’ Girlings (on other makes of car) had actuators at both
ends. Other changes from the earlier type of Austin Seven brake included greater
leverage from the cams, cast iron brake drums, adjusters on the back plates and
a cross shaft that incorporated a compensation system.
I decided
to upgrade my 1932 RN box saloon to take advantage of all these benefits. After
all, on modern roads one needs the best brakes possible on one’s Austin Seven!
However, this wasn’t as straightforward as I had imagined it would be. I
encountered a few problems, which I am happy to report are now solved. Here is
what I did:
First it
was necessary to obtain front and rear axles with semi-Girlings and the matching
heavier radius arms. On the front I could have fitted just Ruby stub axles and
brakes to my earlier axle, but then I would not have the benefit of the heavier
radius arms with double axle fittings of the later car which go a long way to
eliminating axle twist and maintaining the castor angle. At the rear, Girling
back plates cannot be fitted to the earlier axle without specialist machining,
so it was easier to obtain a later ‘D-axle’ complete.
I found the
front axle in Wiltshire on eBay. It was complete with the exception of the
all-important brake drums (but George Mooney came up with a pair). Glyn
Llewellyn had a rear axle lurking in his garage which I snapped up. This one did
have brake drums but the hubs were missing.
The axles
and brakes were all overhauled as necessary. The front axle beam had one kingpin
eye worn oval so it was bored out and sleeved. The rear turned out to be a bit
more complicated; I had originally thought I would use the hubs from my original
axle, but then I decided that the hub/half shaft taper joint is so important
that I would not risk fitting my hubs to unknown tapers (even after lapping) and
I would use both hubs and half shafts from my original axle. Having partially
dismantled the D-axle to fit the replacement half shafts, I decided to bite the
bullet and fully-overhaul it with new bearings and modern lip oil seals.
When all
the rectification work was completed, both axles were fitted onto the car. At
the front I had to fit an adjustable front brake cable from the Seven Workshop
as the original was too short for the new axle set-up. The quadrant compensator
had to be eased a little with a round file because the new cable is metric
instead of imperial.
At the
rear, to ensure a clear cable run, the backplates were turned through 180
degrees, placing the brake levers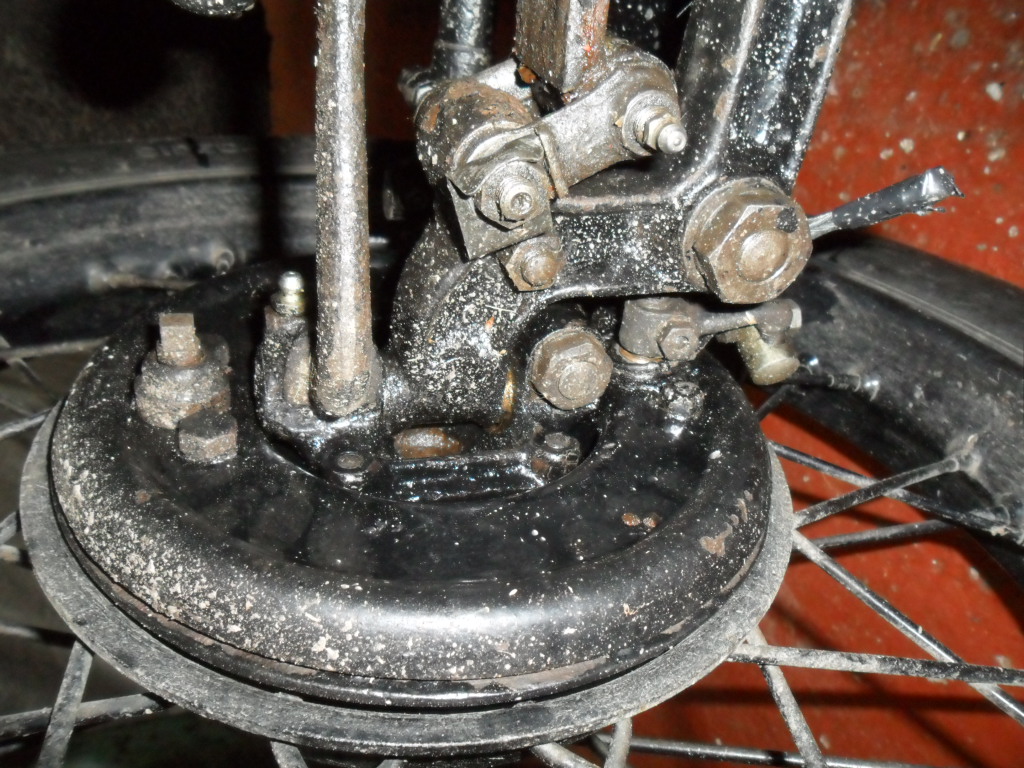 at the 6 o'clock position with the cable
running via the original brass guide bush in the rear cross member down to the
brake lever. The levers hang down and lean backwards to ensure that the
operating angle does not exceed 90 degrees. This is achieved by using front cams
in the rear brakes, but switched offside to nearside & vice versa.
at the 6 o'clock position with the cable
running via the original brass guide bush in the rear cross member down to the
brake lever. The levers hang down and lean backwards to ensure that the
operating angle does not exceed 90 degrees. This is achieved by using front cams
in the rear brakes, but switched offside to nearside & vice versa.
By the way,
it is important to note that Girling cams are marked with their correct position
on the car. I’ve seen some that are not marked at all. If they are fitted
incorrectly, the brake levers will not be at the correct angles.
The
original uncompensated RN cross shaft was checked over and encouraged to work
properly. It would have been a step too far to try to fit a Ruby compensated
cross shaft.
I
originally used standard Girling ball-ended brake levers both front and back.
These are much longer than the RN type. The rationale here, at the front, was
that these levers had been fitted at Longbridge and should therefore work; and
at the rear, well, they are a similar length to Girling clevis rear levers but
they had the advantage that they could be used with the RN ball-ended cables (so
I didn't have to buy new ones, thus saving some £60). So far, all made sense to
me.
The
problems started when I tried to set the brakes up. I could not make them work
properly at all! Not even if I tried to set up the front with the rears
disconnected and vice versa.
In the end
I stumbled upon the idea that the leverage produced by the RN cross shaft must
be different to that of the late Ruby compensated cross shaft, and therefore the
pull on the cables is different. This was proved to my satisfaction by the fact
that the front brakes would not work alone – if they work on a Ruby, why not on
the RN? The only difference from the Ruby from whence they came was the cross
shaft, so that must be it.
So I
considered the idea of matching the brake levers to the cross shaft by using the
original RN short levers all round, keeping the rear ones in the 6 o’clock
position but fitted with the balls inwards to avoid contact with the edge of the
backplates.
Hey presto!
Problem solved!
I now have
strong brakes with a really decent pedal height. I used the normal spreader-type
cable adjusters to get the cable lengths spot-on, so from now on the brakes are
adjusted at the backplates. Simple!
I was
warned that I might experience rear brake actuation on bumps and bends, due to
the different arcs of cable and spring, but so far I've noticed nothing amiss.
Roger
Bateman (DA7C)