CHANGING FROM A 4-SPEED
CRASH GEARBOX TO A 4-SPEED SYNCHRO 'BOX
(IN A 1932/34 BOX SALOON)
Changing the four
speed crash gearbox in a 32/33 Box for a syncro ‘box is quite a straight forward
improvement mod. providing you take three or four points into consideration.
When yo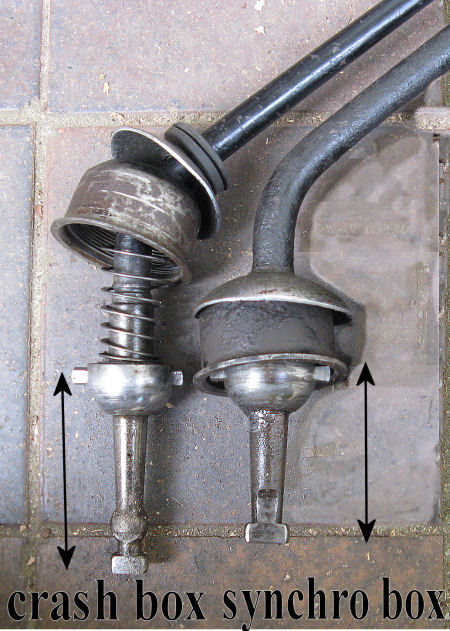 u
obtain your replacement syncro gearbox, make sure it is complete with the top
cover and the gear stick. These are different from the crash box and your old
one will not work with your new synchromesh box. The early syncro boxes had
synchromesh on third and top gears, the later one has syncro on second, third
and fourth gears and is therefore the favourite one to go for. Before you start
the job you will need to decide whether you wish to also change to the later
propshaft which incorporates the more modern Hardy Spicer universal joints
(U-Js). This is a very worthwhile modification doing away with the fabric
coupling at the front, and the earlier universal joint at the back for which new
parts are unobtainable.
u
obtain your replacement syncro gearbox, make sure it is complete with the top
cover and the gear stick. These are different from the crash box and your old
one will not work with your new synchromesh box. The early syncro boxes had
synchromesh on third and top gears, the later one has syncro on second, third
and fourth gears and is therefore the favourite one to go for. Before you start
the job you will need to decide whether you wish to also change to the later
propshaft which incorporates the more modern Hardy Spicer universal joints
(U-Js). This is a very worthwhile modification doing away with the fabric
coupling at the front, and the earlier universal joint at the back for which new
parts are unobtainable.
First of all remove
the engine and gearbox as a unit from the car then separate the gear box from
the bell housing. You may wish to check the clutch linings at this point while
everything is stripped down. This will mean removing the clutch assembly by
undoing the set screws around the flywheel. Assuming the linings are in good
condition and not covered in oil, replace the clutch assembly and centre plate
using a centring bar, available from Willie Mckenzie. Now turn the engine over
using the flywheel until the missing spine on the centre plate is on the top.
Put your new syncro gearbox into top gear and turn it until the missing spline
groove is on the top, to line up with the centre plate. Fit the gearbox onto the
engine, this usually has to be wiggled into place, and bolt them together.
You now have to decide
whether you are changing to the aforementioned later propshaft. If you decide to
retain the original propshaft you will now need to remove the U.J. flange from
your original gearbox and fit it on to the new one, as the old flange has a 3
bolt finger fixing and the new one is a four bolt wheel flange. Should you be
changing to the later shaft you will not have to change the gearbox U.J. flange,
but you will have to change the rear six bolt flange for the later 4 bolt flange
on the torque tube. This is fitted with a single nut and is keyed on to a taper,
it will be very tight on the taper and requires a steel drift and heavy hammer
blows to remove. Having made the decision on the prop shaft and done the
necessary modifications, you can now replace the engine and gearbox into the car
and reconnect the propshaft.
Occasionally the
handbrake may foul the U.J. This is because the syncro gearbox is very slightly
longer than the crash version. This is overcome by drilling out the two rivets
holding the handbrake to the centre rail on the chassis and removing the two
"cotton reel " type spacers. Replace these with shorter spacers and bolts and
nuts.
Glyn Llewellyn.
ADDITIONAL
NOTES FROM THE EDITOR WHO HAS JUST COMPLETED THIS ‘LITTLE’ JOB.
I followed Glyn’s
instructions and everything went very well except for a couple of points:
Firstly, I didn’t have the top cover or gearstick for my ‘new’ gearbox and had a
problem trying to find a suitable part—resolved eventually thanks to Ian
Mason-Smith’s apparently inexhaustible supply of odd bits. The top cover on the
old crash ‘box has a large forward-facing nut and is much taller than the
synchro ‘box hence the crash gearstick also has to have a longer reach and has a
ball effect. (See photo)
My ‘new’ ‘box didn’t
come with a clutch pedal and so I had to transfer it from the old to the new. If
you have trouble getting yours off, check the previous owner hasn’t welded the
clutch pedal to its shaft! ‘Nuff said!
If you are retaining
the old fabric joint, new ones are readily available from the Seven Workshop and
it is well worth changing it. Any sign of the fabric separating spells future
trouble! Also, if you are retaining the flexible joint, as Glyn says, the
coupling flange will have to be swapped over. Before you begin the whole job,
make sure you have a thin enough socket or, preferably, box spanner to get at
the nut which holds the flange in place. It is also worth undoing this nut when
the engine and gearbox are still attached as much torque is needed and,
otherwise, the gearbox swings around very awkwardly.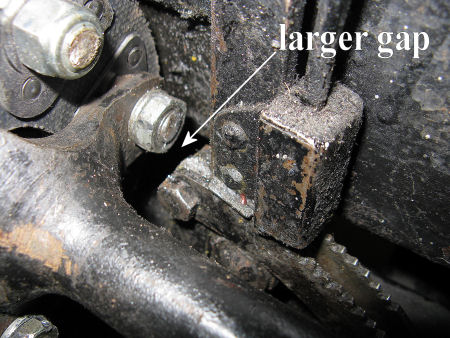
The longer synchro
’box: I decided to leave the old fabric coupling in place and it was the devil
of a job to get the propshaft to mate with the fabric coupling which I had
attached to the new ‘box as it seemed to be just 1/2 inch too long now! I had to
ease the engine and gearbox forward until it had mated so don’t be too eager to
bolt down the engine before everything else has been completed. Once mated, the
engine can be slid back into place.
The longer reach also
caused the fabric coupling to foul the handbrake mechanism as described by Glyn.
The Green Bible also describes removing the two rivets holding the mechanism to
the chassis but it looked like an impossible task to me so I opted for the
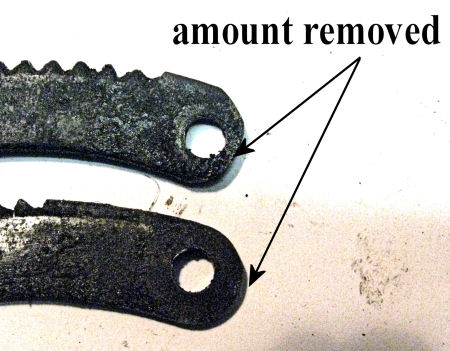
‘Bodger’s Way Out’. The bit that fouls is at the top end of the ratchet and this
is only held on with a single bolt. (The bolt at the rear end of the bracket
doesn’t have to be undone, as I found out later!) On inspection, the bolt is
drilled through the bracket well back so there is loads of metal that can be
removed with a bench grinder. (See photos) Ian has done a similar job but he
fabricated a bracket that attaches to the chassis to draw the ratchet sideways
out of the way of the U-J joint. Finally, I can testify that the job is well
worth doing. Changing gear is now a breeze and the gearbox seems quieter, too.
Many thanks to Glyn for preparing this article.—Ed.