CHANGING BRAKE SHOES WITHOUT REMOVING HUBS
Reproduced with permission of the Bristol A7C
(See Vince Leek's solution below)
MAKING THE TOOL
Removing the hubs to reline the brakes is a drag and really not necessary,
especially risky if you have well fitted and leak free hubs. I soon learnt that
the recommended method of using a piece of wire, sometimes even fitted with a
handle, will at best waste a complete afternoon achieving nothing, or at worst
cause a nasty injury. I well remember using a piece of electrical cable to pull
the spring into the hook on the brake shoe, only to find the copper core cut
through the plastic sheathing and two of my fingers, that was over 50 years ago
and it still makes me wince. Anything you make to pull the spring just pulls it
away from the shoe, a second person is needed to push it in as you pull it over
the hook.
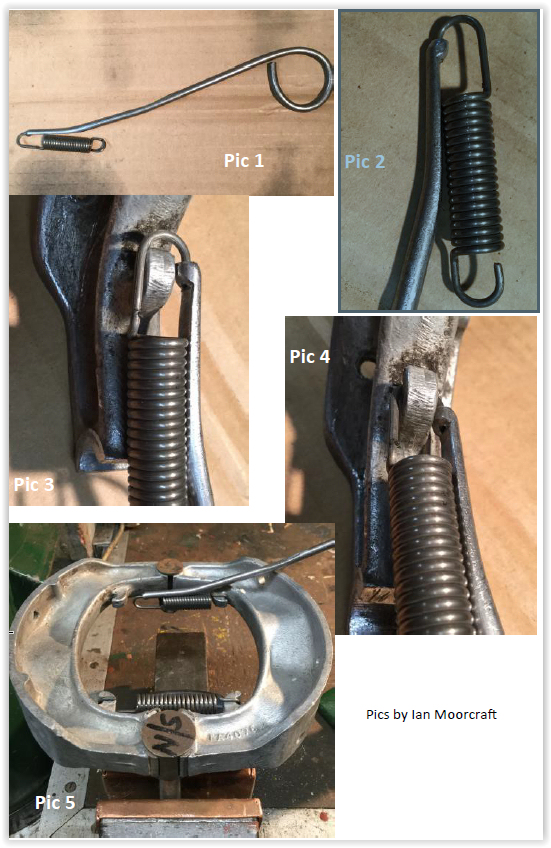
If you make up this tool (pic 1) you will be pushing
instead of pulling having much more control. You can fit a pair of relined shoes
in five minutes. The pictures should be self-explanatory; however a little
detail would be useful:
You need a piece of 3/16” mild steel rod about 12” long,
put a smooth kink 1 1/4” from the end and another 2” from the first one. Try to
replicate the bends from pic 1, you will finetune it later, form a loop on the
end about 1 3/4” diameter. File away half the thickness of the rod back to the
first bend, leaving the end 3/16” full diameter. Drill. 5/64” hole 5/32” deep in
the end biased towards the flat as much as possible, do not drill right through.
Dress with a fine file as much of the lump around the hole as you can without
compromising strength.
Finish off as in pic 2. Do a trial fit (pics 3 & 4) to check the spring will go
over the hook with the tool fitted. If tight, remove metal from the tool,
not the hook. Rig up a pair of brake shoes as in pic 5, rework the bends so they
rest on the shoe when the tool and spring are presenting level towards the shoe
hook. Note there is a flat filed near the edge of the shoe to give extra
clearance for the edge of the hub when fitting 1 1/4” shoes, 1 inch shoes have
more room between hub and shoes.
REFITTING THE SHOES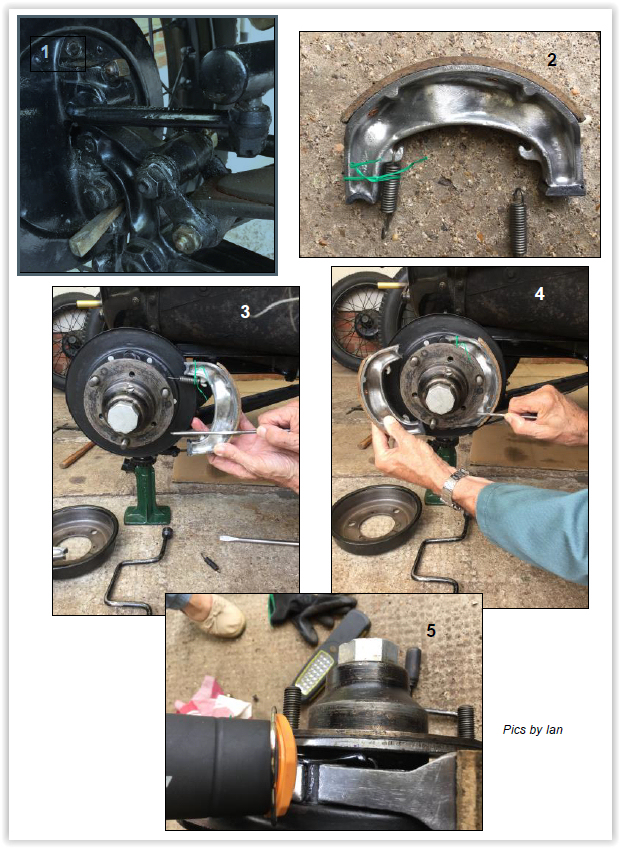
The first step for refitting shoes on the front is to push back the brake lever
on the opposite side to that which you are working on, knock in a small wooden
wedge as shown in picture 1 to jam the lever fully on. The reason for doing this
is that the cable will be fully slack taking the pressure off the brake cam on
the side you’re working on.
Next bind the top spring with a thin wire tie as shown
in picture 2 making sure the long hook will be the one to be connected and is
open side outwards; if you don't do this you will be fishing around for the
spring as it will swing inwards out of sight.
Hook the bottom spring on to the bottom of the shoe, fit the tool on to the hook
as shown in picture 3; keeping light pressure on the hook, slide the assembly
into place until the shoe is fitted into the cam and post. Keeping the tool
pressed against the hook will keep the shoe in place - picture 4. Slide the
second shoe into position then hook the spring on to the shoe.
Note in pictures 3 & 4 the portion of the tool that is filed down for extra
clearance on the edge of the hub.
I have upgraded my car to 1 1/4” shoes but if the original 1” shoes were fitted
the job is much easier as there is more space between the shoes and the hubs.
Now for the tricky bit - looking down from the top you
should be able to see the end of the top spring hook, a torch is handy here to
connect your tool to it (picture 5) hook it on to the shoe. Remove the wedge and
the wire and the job is complete.
Fitting the rears is the same procedure other than you won’t need the wedge as
you won’t be fighting the springs on the other side pulling the cams around.
A very light countersink for the hole in the end of the tool will make
connection to the spring hook easier.
Once you've done this a couple of times you can remove and fit a pair of shoes
in a couple of minutes.
Ian Moorcraft
AUSTIN SEVEN BRAKE FITTING TOOL - 2
I was interested to read about Ian’s
gadget for fitting brake springs and attach a photo of a simple tool I made for
fitting the springs to Girling brake shoes. (Above).jpg)
Simple tool made of odd bits in the workshop. It could be developed/improved further. It is in three parts:-
Pt.1. Tube 3" long 3/8" o/d Threaded 1/4" BSF. Peg welded on one end.
Pt.2. Rod 5" long 5mm (approx o/d). End suitably bent to form peg at one end.
Pt.3. Screw 3" long threaded 1/4" BSF
OPERATION
Place rod in tube and pegs in loops in spring ends.
Fit screw and wind in to push pegs apart.
Hook springs on to shoes, remove 'spring fitter'.
Obviously this cannot be used on the earlier shoes where the springs do not have the necessary loops.
Vince Leek