IMPROVING THE STEERING ON
PRE-RUBY MK.II SEVENS
BY INCREASING THE CASTOR
ANGLE
WHAT IS CASTOR ANGLE?

Castor angle is the angle
the kingpins are off-set from vertical. It’s the small amount of Castor Offset
on the ground that allows for self-centring steering of cars and the
straight-line stability of bicycles. It is generally believed that the optimum
castor angle for Austin Sevens is 6.5o.
HOW CAN THE CASTOR
ANGLE BE MEASURED?
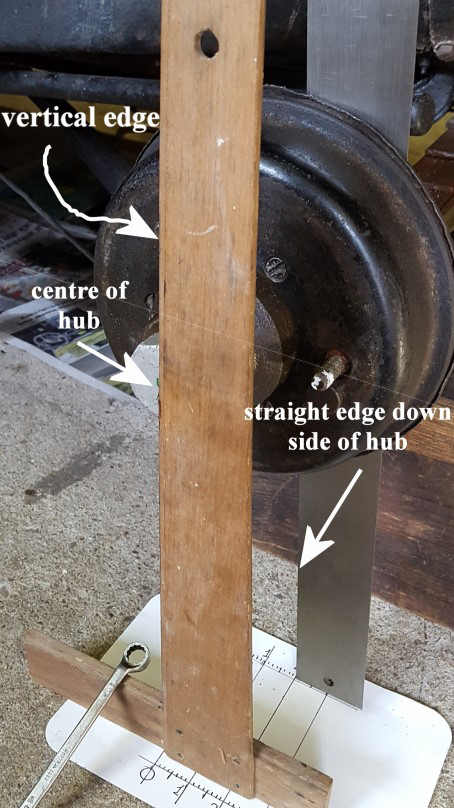
Usefully, the front of the inside of the
front hub, around the kingpin, has a flat face that is parallel to the kingpin
and this can used with a suitably long straight edge. It can be measured with a
large protractor and plumb-line or, as this article describes, by measuring the
offset on the ground.
HOW CAN THE CASTOR
ANGLE BE ALTERED?
The best, and most accurate and permanent
way, is to completely dismantle the front hub, remove the kingpins, insert a
tight-fitting rod into the axle, heat the axle to red hot and twist the end of
the axle to the correct alignment.
Another method entails lowering the central ball joint
at the pointed end of the radius arms so as to rotate the axle. However, this
entails some clever engineering. A much simpler method, described here, simply
twists the A-shaped radius arms which induces a change of angle of the front
axle without removing anything except the wheels.
However, this can only be done with early pre-Ruby
Mk.2 axles where the radius arms are fixed to the front axle with a large,
single, nut around which they can be twisted. Later axles have two fixing nuts
which obviously won’t twist. The other two methods do not involve twisting the
radius arms and so can be used on later axles.
METHOD:

As we are going to measure the angle between
the kingpins and the vertical, it is essential that the chassis is absolutely
horizontal. Jack up the front of the car and remove one front wheel starting
with the offside front as it’s easier and will give you practice. Measure the
height of the hub/centre of the rear wheel sitting firmly on the ground and
lower the front hub until it is exactly the same height as the rear so ensuring
the chassis will be horizontal and in the running mode.
As the front axle is going to be twisted it is
necessary to slacken-off the front brakes at the foot pedal screw.
Now slacken-off slightly, but don’t remove, the large
nut (5/8W) at the front of the radius arm. Using a very large adjustable wrench
(or similar) twist the radius arm downwards as far as you can. Unless you’re a
heavyweight boxer or weightlifter, this will be approximately the correct 6.5o
required. Now for the tricky bit – holding the wrench in your left hand without
letting up the twist, tighten the large nut with your right hand (or have an
assistant) as hard as you can. That’s it!
Obviously, the method is the same for the nearside
wheel, also twisting the radius arm downwards. Looking at the front of car, you
twist the offside arm anti-clockwise and the nearside arm clockwise. Don’t
forget to re-adjust the front brakes.
MEASURING THE CASTOR
ANGLE:
You can measure the castor angle before you
start as well as afterwards. With the front wheel off and the chassis absolutely
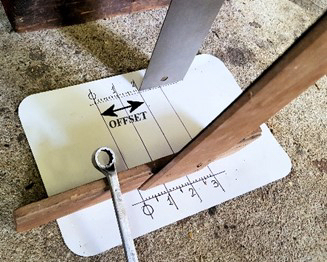
horizontal as above, drop a plumb line down from the centre of the hub, place a
long straight edge down the front, inner face of the hub and measure the offset
on the floor. I made a chart on the back of a Kellogg’s cereal box beforehand.
This is the table of values of the offset:
FEW TECHNICAL
BITS:
|
HEIGHT OF FRONT WHEEL CENTRE |
|
OFF THE GROUND WITH |
|
CAR WEIGHT ON REAR WHEEL |
|
DISPLACEMENT GIVES 6.5O
CASTOR |
|
height (ins.) |
displacement |
|
|
(ins.) |
(mm.) |
|
12.00 |
2.0 |
51 |
|
12.25 |
2.04 |
52 |
|
12.50 |
2.08 |
53 |
|
12.75 |
2.125 |
54 |
|
13.00 |
2.17 |
55 |
Twisting the radius arms is actually twisting
the front axle forward at the bottom. This, in turn, puts a strain on the front
spring which remains firmly attached to the chassis. The ideal solution is to
put a suitable wedge between the top of the front spring and the underside of
the chassis to restore the spring to its natural line. 4mm at the thick end of
the wedge will give 6 degrees. However, it seemed to me that to slacken-off the
U-bolts attaching the spring to the front of the chassis in order to knock-in
the wedge would involve raising the engine to get access to the nuts.
The other problem is that the twisted radius arms are
only held twisted by the friction of the large nuts at the front of the axle.
Members have suggested several solutions including drilling and tapping a grub
screw through the nut; but the general opinion, based on experience, is that
it’s not a problem. The radius arms stay twisted just by friction (of a very
tight nut!).
CONCLUSION:
The road holding and steering stability has
been unbelievably improved. And, if it hadn’t been, at least the whole operation
can be easily undone.
David (Bodger) Whetton