
Setting The Ignition
Magneto (pre-í28 only) and coil ignitions are set the same way. The only difference being the contact breaker gaps: 16 thouí for magneto and 12 thouí for coil
1) First
make sure the contact breaker gap is correct.
Remove the distributor cap and turn the engine on the starting handle until the
gap is at a maximum on the cam. Check the gap and adjust by loosening the
back-plate if necessary. If it has been some time since youíve done this, use
an emery board to clean between the points to remove any blips.
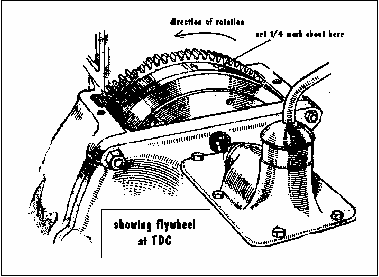
2) Then get the engine at the right place. Take off the flywheel cover and turn-over the engine on the handle until the 1/4 mark is at the top. At the same time, it is necessary to feel that no.1 piston (at the front) is on its compression stroke. There are several ways of doing this: remove no.1 plug and stick your thumb (or someone elseís) over the plug hole, when the piston is coming up on its compression stroke it tries to push against your thumb; in the April Ď01 Newsletter we showed a simple device made from an old plug with its middle core taken out; or, take out all the plugs except no.1 and turn the handle and only the compression on no.1 piston will be felt. Then move the flywheel about 11/2 inches to the right (looking as if from inside the car) of Top Dead Centre (TDC) by pulling on the flywheel rim.
3) Now get the distributor at the right place. Firstly, on Boxes, set the Advance/Retard lever on the steering wheel (the one on the left ) to fully advanced (although Glyn prefers to set his midway). Then remove the distributor cap and the rotor arm (with a sharp pull upwards) and slightly loosen the clamp-bolt underneath the distributor so that the distributor can be moved with a little resistance. Turn the body of the distributor clockwise an inch or so until you can see the contact breaker points are fully closed then gradually turn the distributor back, anticlockwise, until the contact breaker just begins to open. This can best be seen by first switching on the ignition then, at the exact moment of opening, a small spark can be seen across the breakerís points. Switch off the ignition, replace the rotor arm and check that the rotor is pointing in the general direction of no.1 lead when the cap is replaced. Do not tighten up the clamp-bolt yet.
4) Testing. If you havenít loosened the clamp-bolt too much, you can safely run the engine (or the car) to test the optimum position of the distributor. I wear a stout pair of welding gloves but gardening gloves would do. Non-wimps use their bare hands. With the engine running at fast tick-over, bring the Retard/Advance lever to its middle position and grasp the body of the distributor in both hands. Turn the distributor slightly right or left until the fastest engine note is heard. If you go too far advanced (to the right), the engine will start to rumble and too far retarded it will sound rough. Many a rumbling bottom-end is due to too advanced ignition rather than worn bearings! Finally, donít forget to tighten the clamp-bolt. The final test is, of course, on the road. But donít expect to hear Ďpinkingí - side-valve engines donít usually exhibit that distinctive noise.
David Whetton