 A ring spanner deals with even the remotest side-plate nut. Do not shear the
studs or you will have to take the box off.
A ring spanner deals with even the remotest side-plate nut. Do not shear the
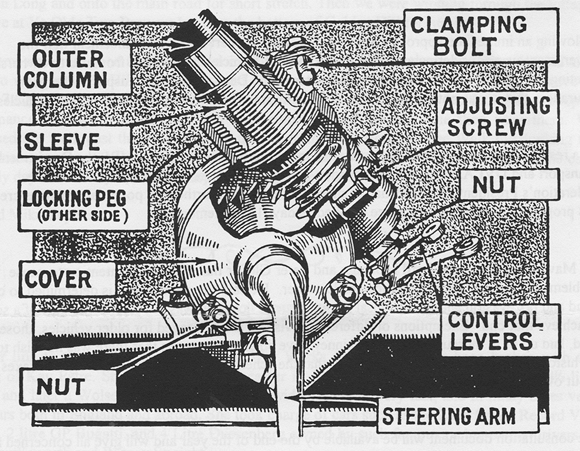
studs or you will have to take the box off.ADJUSTING THE STEERING BOX (1923-36)
The Problem: Methods of adjusting the 7 steering box on the bench are sufficiently well known to require no repetition. However, much less has been written on adjustment in situ. The two usual adjustments, i.e. column end-float and worm and wheel engagement, are straightforward and need no comment either. The problem is side-float, controlled by shims beneath the steel button in the nearside of the box.
The Method: First, remove the drag-link from the steering box drop arm. This is easy. Now extract the split pin from the footbrake clevis pin. You should now be able to push the brake operating rod aside, once the clevis pin is removed. If some goon has assembled the footbrake with the clevis pin head towards the chassis, you will have to remove the footbrake from its pivot before you can do this. I suppose it doesn’t matter, really, since the next move is to remove the footbrake anyway. This is a good time for you to go and have a cup of tea, or, if you are working outside, cocoa. On your way back to the car, make sure you are clutching a nice long drift. I use a 5/16” diameter rod about 14” long. This fine tool, used in conjunction with the Austineer’s Friend (2 1/2 lb. variety, will enable you to undo the locking tabs on the steering box side-plate nuts. Do not waste your time undoing the locking tab on the wheel to worm adjustment nut. Now get some idea of the amount of side-float present — a rough guess will do. Next, procure a drip-tray, old newspaper or a small Wellington boot. Place this beneath the steering box so that when you undo the side-plate nuts, the oil (what oil?) runs into the receptacle.
A ring spanner deals with even the remotest side-plate nut. Do not shear the
studs or you will have to take the box off.
Remove the side-plate/steering-arm assembly and put it in a safe place where it won’t get grit in it. You are now in a position to try to remove side-float. When reducing side-float, the object of the exercise is to move the steering arm (held in the side-plate) nearer the steel button or vice versa. When you remove the side-plate I hope you will find a nice thick generous Austin gasket between it and the box. If you did, discard the gasket, having examined it. It will probably be about ten thou’ thick. Replace the steering box side-plate nuts. Then turn the steering wheel. If you feel resistance, the side-float in the box was obviously less than the thickness of the gasket. Remove the side-plate, and replace it with, in addition, a gasket made of notepaper — my notepaper is about 3 thou’ thick, but then, I’m mean. This should just create enough side-float to enable the box to operate smoothly. If not, use more or thicker gaskets. You may now affect the other two adjustments (column end float and wheel to worm adjustment) in the normal manner. Whilst you have the side-plate off it might be a good idea to check the state of the bush holding the drop arm in place. Any excessive movement should be removed. I found that this made the car a little less like the Queen Mary to drive.
From an un-named source in the Midlands A7C Newsletter with many thanks – Ed.