AC FUEL PUMP SERVICING
After the roadside assistance
given by Glyn Llewellyn to change my broken fuel pump, I dismantled my fuel pump
to repair and service it. Having bought a service kit for my Type U fuel pump
from
www.vintageandclassicspares.co.uk,
I spent a little while cleaning everything in petrol with a light brush. I
cleaned the filter gauze, although kept it as a spare and fitted a new one Iíd
bought. I cleaned the fuel inlet sediment chamber and all of the base. I didnít
find how to remove the pump lever, but there was no slack in it so I was happy
this was OK. There are many different fuel pumps around, but the Austin fuel
pumps have a longer pump lever arm, which is normally marked with 856955 with
the correct lever ending in a double digit! The lever arm on my pump looks to
have been fabricated from plate and doesnít have any markings though.
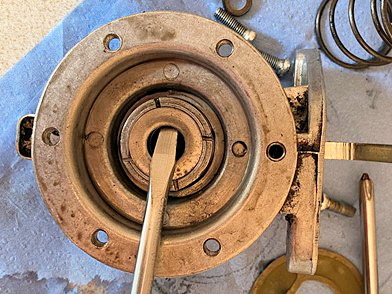
I removed the metal retainer
for the fuel pump seal in the base that the diaphr agm
pull rod moves through, by levering it out carefully from the top with a
screwdriver. I fitted the new rubber fuel pump seal in the base that the
diaphragm pull rod moves through and fitted the metal retaining disc back over
it and using an old screwdriver, re-staked the casting face to retain the disc.
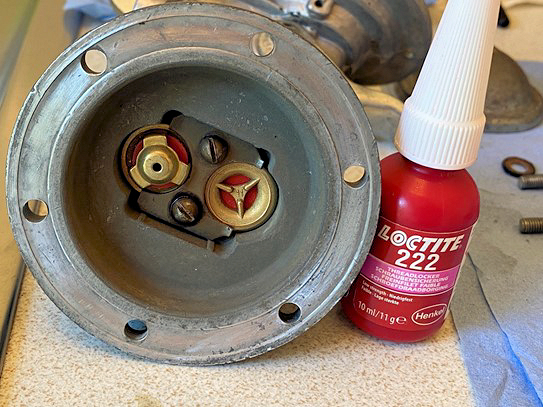
For fitt ing
the fuel valves in the upper body, there is a paper gasket (on my Type U, called
a spectacle gasket), and it is recommended using a thread locking/retaining
compound on the screws for the valve retaining bracket. I used Loctite 222,
which I had available.
It appears there is a good variety
of shapes for the valve retaining bracket Ė mine was H-shaped but others are
triangular. Similarly the valve gaskets vary in shape and size.
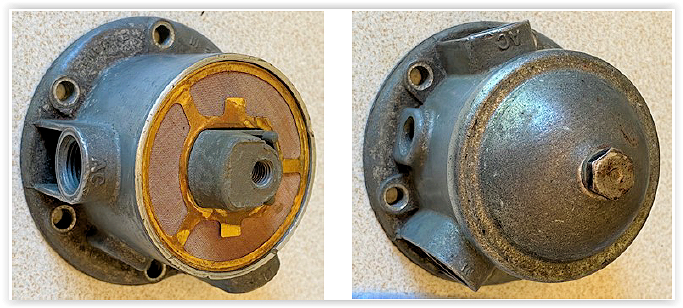
Refitting the gauze and making sure
this
 was
sitting within the body and sub-flush, I fitted the domed cover with a new
washer and fitted the retaining screw with a new fibre washer. It is important
not to tighten the dome retaining screw on the top too much because it is easy
to strip the thread in the casting body. Alternatively, a stud can be fitted in
to the body fully, preventing the thread from stripping and a nut used outside
to retain the domed cover. My pump had the screw, which I carefully tightened
and I retightened it slightly a few days later after it had been run on the
engine.
was
sitting within the body and sub-flush, I fitted the domed cover with a new
washer and fitted the retaining screw with a new fibre washer. It is important
not to tighten the dome retaining screw on the top too much because it is easy
to strip the thread in the casting body. Alternatively, a stud can be fitted in
to the body fully, preventing the thread from stripping and a nut used outside
to retain the domed cover. My pump had the screw, which I carefully tightened
and I retightened it slightly a few days later after it had been run on the
engine.
Fitting the spring and diaphragm is
a bit tricky and probably needs a few attempts and, ideally, about 6 hands!
Aligning the pull-rod end with the slot in the base and noting the position of
the diaphragm to know how far to turn in, carefully slide the pull rod through
the new rubber oil seal and push down on the diaphragm against the spring
pressure and turn it through 90 degrees. Pushing the pump lever away from the
pump body will reduce the spring compression needed. The diaphragm pull-rod will
be retained and locked in. Align the diaphragm holes around the edge
approximately with the screw holes in the body. Fit the two halves of the fuel
pump together and fit the six screws very loosely. Pull the pump lever towards
the body to depress the diaphragm to the most stretched position and then
tighten the 6 screws uniformly tightening in turn screws opposite each other.
Once assembled, moving the pump level should result in a croaking noise.
Fit a new paper gasket to the
crankcase mounting face if needed and slide the pump lever pointing upwards into
the hole on the crankcase ensuring the lever is just inside the crankcase and
outside the camshaft. Once bolted in, turn the starter handle by hand a few
times to ensure the pump lever is in the correct position and the engine doesnít
lock up. Refit the fuel lines and, hopefully, all will work when started.
When I examined the removed
diaphragm of my pump, it appeared intact and the only thing I could find wrong
with the pump was possibly one of the fuel valve fibre washers had moved
slightly sideways and wasnít seating properly and therefore not sealing
correctly. Having fitted the pump, all seems to be working as expected with no
fuel or oil leaks. Although the three pumps I have are all marked as ĎType Uí,
they are each slightly different, so if you are servicing your pump you may need
to research the parts needed. For example, my pump didnít have a drain screw in
the upper fuel chamber to allow debris to be removed, which most seem to have.
Happy motoring. Nick Kidd DA7C
 agm
pull rod moves through, by levering it out carefully from the top with a
screwdriver. I fitted the new rubber fuel pump seal in the base that the
diaphragm pull rod moves through and fitted the metal retaining disc back over
it and using an old screwdriver, re-staked the casting face to retain the disc.
 ing
the fuel valves in the upper body, there is a paper gasket (on my Type U, called
a spectacle gasket), and it is recommended using a thread locking/retaining
compound on the screws for the valve retaining bracket. I used Loctite 222,
which I had available.
 was
sitting within the body and sub-flush, I fitted the domed cover with a new
washer and fitted the retaining screw with a new fibre washer. It is important
not to tighten the dome retaining screw on the top too much because it is easy
to strip the thread in the casting body. Alternatively, a stud can be fitted in
to the body fully, preventing the thread from stripping and a nut used outside
to retain the domed cover. My pump had the screw, which I carefully tightened
and I retightened it slightly a few days later after it had been run on the
engine.
was
sitting within the body and sub-flush, I fitted the domed cover with a new
washer and fitted the retaining screw with a new fibre washer. It is important
not to tighten the dome retaining screw on the top too much because it is easy
to strip the thread in the casting body. Alternatively, a stud can be fitted in
to the body fully, preventing the thread from stripping and a nut used outside
to retain the domed cover. My pump had the screw, which I carefully tightened
and I retightened it slightly a few days later after it had been run on the
engine.