On the button
Rick Fryer (Norfolk A7C) gets to grips with one of the Seven’s idiosyncratic features (with many thanks)
As we all
know, on a Seven, unlike most other cars, low oil pressure at working
temperature is good and high oil pressure is bad -
it is indicative of a blocked oil jet.
To avoid confusing the driver with a fluctuating pressure gauge very near its bottom stop, an oil button that protrudes when pressure is high was fitted on the dashboard. An added advantage was that at night the protrusion (if any) could be felt in the dark. Oil buttons were fitted on Sevens until mid-1930, when they were replaced by a pressure gauge (which had been available as an optional extra for some time).
When I recently fired up my 1929 special’s engine for the first time, I fitted a temporary gauge to check the oil pressure. With 10psi cold, 1-2psi hot and numerous oil leaks there was no doubt the pump was working well, so I removed the gauge and connected the oil button. All the engine oil leaks were rectified, but subsequent engine tests produced a steady dribble of oil down the dashboard and little or no movement of the button. Something was obviously amiss.
I had always thought of the oil button as being some sort of simple spring-loaded plunger, pushed out by oil pressure. Faced with the problem of repairing a leaky one, I soon found out that there was more to them than that.
A quick check in the “Grey Mag” index turned up an article by Ian Moorcraft (1999C) on the button and its repair. Armed with this I set to work.
The first thing is obviously to remove the button from the dashboard. There are two types of fitting. A round bezel, used until September 1928 and an oval bezel, secured to the dashboard with two screws, used from September 1928 to May 1930. Both bezels screw onto the body of the button and are interchangeable.
Disconnect the oil pipe. What you do next depends on the bezel fitted. If you have a round bezel, slacken off the thin nut (11) behind the dashboard using a 28mm spanner, just enough to push the button through the dashboard, grip the bezel and unscrew it. If your oil button has the oval bezel, this nut is surplus to requirements and may not be fitted. It is also possible to remove the button by unscrewing it with the bezel bolted to the dashboard. Use a 23mm spanner on the hexagonal portion of the barrel (10). It may be easier to remove the two fixing screws and unscrew the bezel.
Important: Grip the barrel only by the hexagonal - the slightest dent or deformation of the barrel will prevent the oil button from working.
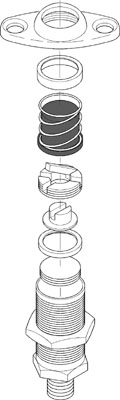
With the oil button out of the car, dismantling can begin. The article in the “Grey Mag” states that the oil inlet is plugged and has three spiral holes to allow pressure to enter the barrel. Neither of the buttons in my possession have this, so to force the Bakelite button (4) out of the barrel I just pushed a suitable-sized drill up the inlet. Once the button is gripped, a pull on it will remove the whole assembly from the barrel. This assembly consists of a brass collar (2), a fine coil spring (3) and the button itself (4), which has a brass washer secured to its underside with a countersunk screw. If your button has the inlet plugged, it is possible to “jar” the button out by holding the barrel in your hand and banging your hand on the edge of the bench.
Once the button is out of the way, look down into the barrel - after cleaning out any gunge - and you will see a brass plug (6), with two slots cut in it at right angles. In one slot is a lever (5), pivoted at one end. The free movement of this lever is critical to the operation of the oil button. It should be possible to flip this lever to the vertical position and allow access to the slots with a wide-bladed screwdriver. If not, make up a suitable slotted blade - do not lever up the lever! In the centre of the plug is a slotted brass pin (7), whose slot should line up with a slot on the plug.
About ten turns should free the plug from the barrel and it should be possible to shake it out. The pin (7) and a countersunk brass washer (8) may fall out with the plug. If not they should be fished out of the gunge in the bottom of the barrel.
Also lurking in the depths will be a washer (9), or the remains thereof. This is a multi-layer assembly, apparently made originally from pig’s intestines! The one in my button was shrivelled and damaged beyond recognition.
Having completed the dismantling, thoroughly clean all the components and inspect them. If the barrel (10) is damaged, it is theoretically possible to restore it by having the internal bore machined. Good luck! If the spring (3) has rusted away, a suitable replacement might be found or a new one wound from piano wire. The lever (5) must pivot freely in the plug (6) and the pin (7) must move freely. If your button has the oil inlet plugged, pay particular attention to cleaning out the three spiral holes.
The first job on reassembly is to make a new washer (9). As noted earlier, this is multi-layer. Having no suitable pig’s intestine to hand, I used a thick polythene bag and, with the countersunk washer (8) as a template, cut out four thicknesses. Apparently this works better than one thick washer.
Using a smear of engine oil to keep everything together, insert the polythene washers (9) in the base of the barrel (10) followed by the brass washer (8), with the countersunk face downwards. Ensure that the brass washer (8) is pushed home and clamps the polythene washers (9) firmly in position - this is where any leaks will develop.
Next assemble the slotted pin (7) in the slotted plug (6), aligning the lever (5) in the slots. This must all move freely when screwed into the barrel and the pin must centre in the countersunk washer (8). Screwing in this assembly is best done with the barrel on its side.
Screw the slotted plug down hard so that the countersunk washer grips the polythene washers and makes an oil-tight seal.
Check that the pin (7) and lever (5) are free to move, then replace the bakelite button (4), spring (3) and collar (2). These just push into the barrel.
Refit the assembly in the car, connect the oil pipe and away you go - no more oily trouser legs!