FAN SPINDLE MODIFICATION
I recently detected some unwanted play in the top (fan) pulley and decided it was probably time to fit new brass bushes. For some time the fan belt had been inclined to sit against the pulley flange causing that edge of the fan belt to fray. I have also noticed that the fan assembly is inclined to deliver spots of grease in all directions when the engine is running. It seemed logical that the worn bushes probably caused misalignment of the pulley which in-turn led to the worn fan-belt but the reason for losing grease was less clear.
A recent article in the ‘Grey mag’ mentioned the use of ‘proper’ ball races in a fan pulley and this aroused my interest. A quick rummage in by box of bearings soon yielded a pair of imperial ball races 1/4” wide, ½” bore and 1.00” outside diameter. I also found a suitable chunk of aluminium and set about designing a new pulley.
Whilst measuring the Austin spindle, I noticed the
drilling (for conveying grease) had been made from the front and left unplugged.
This obviously lets grease reach the back of the fan, which, being only a gentle
push fit on the front boss of the pulley, seemed to be a likely source of the
escaping grease. So, I decided to plug the front of this hole but not so far
back as the radial drilling that feeds the bearings. The spindle is hardened on
its outer surface but soft enough in the centre to carefully enlarge the hole to
say 5/32” Dia and tap 2BA with a relatively low percentage engagement to avoid
breaking the tap. Next, after degreasing everything, a 2BA screw was secured in
position with Loctite and cut-off flush at the front end when cured. Finally,
the cross-drilling for the nut split pin was restored.
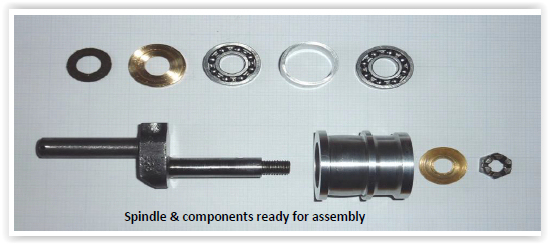
The new pulley design was very straightforward and based
on positioning the two ball-races as far apart as possible. The Austin felt seal
housing was replicated by a light press fit brass bush to hold everything
together. Finally, the bearings are separated by a simple alloy spacer.
The bearings were an easy push fit on the spindle and in the new alloy pulley,
so, a spot of thread-lock was used to secure everything in position, obviously
taking great care to avoid getting any on the bearing tracks.
The replacement felt seals that I have encountered are far too wide at about ½” and
need to be cut-down to a thickness of around 1/4” which means you can keep the
remainder as a spare. Cutting can of course be achieved with the kitchen carving
knife but a more accurate approach, is to hold the felt seal on a 3/8” mandrel
in the lathe and cut it with a Stanley knife blade held in a simple clamp tool
as shown in the following photo.
replacement felt seals that I have encountered are far too wide at about ½” and
need to be cut-down to a thickness of around 1/4” which means you can keep the
remainder as a spare. Cutting can of course be achieved with the kitchen carving
knife but a more accurate approach, is to hold the felt seal on a 3/8” mandrel
in the lathe and cut it with a Stanley knife blade held in a simple clamp tool
as shown in the following photo.
If you run the lathe at top speed and advance the cut very gently, the seal will
only need to be a firm push-fit on the mandrel for it to remain in place whilst
cutting.
Finally, everything was sparingly greased and adjusted to ensure a light compression of the felt seal. The pull of the fan exerts a gentle forward axial load when running, that seems to hold the steel insert against the brass washer at the front sufficiently well to prevent the loss of grease. This spindle has now done well over a thousand miles, spins very freely with no play and seems just fine. The relatively loose belt sits nicely in the centre of the pulleys and the former source of grease spray has been completely cured. Projects like this probably suggest that I have too much time on my hands, nevertheless it was an interesting exercise and quite rewarding.
Spanner Article kindly reproduced from the Herefordshire A7 Club.